Pioneer BDP-140 Owner's Manual - Page 45
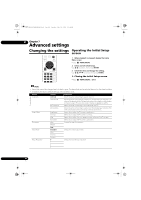
Changing the Country/Area code
 |
View all Pioneer BDP-140 manuals
Add to My Manuals
Save this manual to your list of manuals |
Page 45 highlights
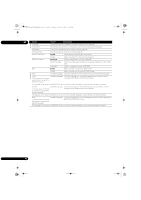
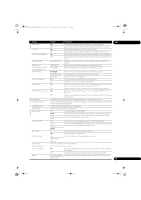
BDP-140_UCXCNSM_IBD_EN.book Page 45 Tuesday, July 19, 2011 10:54 AM Changing to other language at language setting 3 Re-input the password. Use the number buttons (0 to 9) or / to input the 07 number, then press ENTER to set. 1 Select and set Language. Use / to select, then press ENTER. Use / to move the cursor. • To change the password, input the previously 2 Select and set OSD, Audio, Subtitle or Menu Use / to select, then press ENTER. registered password, then input the new password. 3 Select and set the desired language. Use / to select, then press ENTER. Note • We recommend making a note of the password. 4 Change the language. Use / to change, then press ENTER. • The language can also be changed using the number buttons. Use / to move the cursor to Number, use the number buttons (0 to 9) to input the number, then press ENTER. Refer to page 48. • If you have forgotten the password, reset the player to the factory default setting, then register the password again (page 47). Changing the Parental Lock level for viewing DVDs/BD-ROMs Some DVD-Video discs containing scenes of violence, for Note example, have Parental Lock levels (check the indications on the disc's jacket or elsewhere). To restrict viewing • If a language not recorded on the BD/DVD is set, one these discs, set the player's level to the level lower than of the recorded languages is automatically selected the discs. and played. Erasing data that has been added to BDs and application data Use this procedure to erase data that has been added to BDs (data downloaded with the BD-LIVE function and data used with the BONUSVIEW function) and application data. 1 Select and set Security Parental Control Next Screen. Use / to select, then press ENTER. 2 Input the password. Use the number buttons (0 to 9) or / to input the number, then press ENTER to set. Use / to move the cursor. Caution 3 Change the level. Use / to change, then press ENTER to set. • Some time is required to erase the data. • Do not unplug the power cord while data is being erased. • This operation does not work when a disc is loaded. Note • The level can be set to Off or between Level1 and Level8. When set to Off, viewing is not restricted. 1 Select and set BUDA BUDA Setup. Use / to select, then press ENTER. 2 Select and set the erase menu. Use / to select, then press ENTER. Changing the Country/Area code 1 Select and set Security Country Code More. Use / to select, then press ENTER. 3 Select Yes, then press ENTER. Use to select, then press ENTER. Registering or Changing the 2 Input the password. Use the number buttons (0 to 9) to input the number, then press ENTER to set. Use / to move the cursor. password Use this procedure to register or change the code number required for the Parental Lock settings. 3 Change the country/area code. Use / to change, then press ENTER to set. 1 Select and set Security Change Password Next Screen. Use / to select, then press ENTER. 2 Input the password. Use the number buttons (0 to 9) or / to input the number, then press ENTER to set. Use / to move the cursor. 45 En
-
 1
1 -
2
-
3
-
4
-
5
-
6
-
7
-
8
-
9
-
10
-
11
-
12
-
13
-
14
-
15
-
16
-
17
-
18
-
19
-
20
-
21
-
22
-
23
-
24
-
25
-
26
-
27
-
28
-
29
-
30
-
31
-
32
-
33
-
34
-
35
-
36
-
37
-
38
-
39
-
 40
40 -
 41
41 -
 42
42 -
 43
43 -
 44
44 -
 45
45 -
 46
46 -
 47
47 -
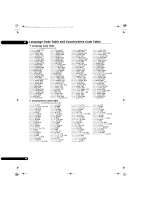 48
48 -
 49
49 -
 50
50 -
51
-
52
-
53
-
54
-
55
-
56
-
57
-
58
-
59
-
60
-
61
-
62
-
63
-
64
-
65
-
66
-
67
-
68
-
69
-
70
-
71
-
72
-
73
-
74
-
75
-
76
-
77
-
78
-
79
-
80
-
81
-
82
-
83
-
84
-
85
-
86
-
87
-
88
-
89
-
90
-
91
-
92
-
93
-
94
-
95
-
96
-
97
-
98
-
99
-
100
-
101
-
102
-
103
-
104
-
105
-
106
-
107
-
108
-
109
-
110
-
111
-
112
-
113
-
114
-
115
-
116
-
117
-
118
-
119
-
120
-
121
-
122
-
123
-
124
-
125
-
126
-
127
-
128
-
129
-
130
-
131
-
132
-
133
-
134
-
135
-
136
-
137
-
138
-
139
-
140
-
141
-
142
-
143
-
144
-
145
-
146
-
147
-
148
-
149
-
150
-
151
-
152
-
153
-
154
-
155
-
156
-
157
-
158
-
159
-
160
-
161
-
162
-
163
-
164
-
165
-
166
-
167
-
168
-
169
-
170
-
171
-
172
-
173
-
174
-
175
-
176
-
177
-
178
-
179
-
180
-
181
-
182
-
183
-
184
-
185
-
186
-
187
-
188
-
189
-
190
-
191
-
192
 |
 |
