Pioneer CDJ 100S Owner's Manual - Page 14
Digital Mode, Troubleshooting - problems
 |
UPC - 012562450261
View all Pioneer CDJ 100S manuals
Add to My Manuals
Save this manual to your list of manuals |
Page 14 highlights
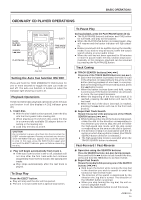
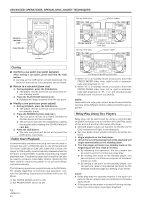
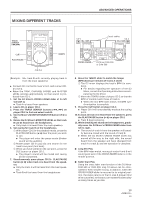
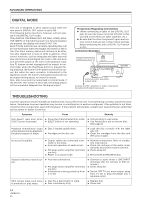
ADVANCED OPERATIONS DIGITAL MODE This unit is designed to allow digital output when the rear panel's DIGITAL OUT switch is set to ON. The following button functions, however, will not operate in the DIGITAL OUT mode: CUE, DIGITAL JOG BREAK (JET, ZIP, WAH, HOLD), MASTER TEMPO. In the event that such non-functioning keys are pressed, the display will show D-OUT ON. Even if these functions are currently operating,they will be non-functional when the Digital Out switch is set to ON. (Cue Point memory alone will continue to be effective after Digital Out is reset to OFF.) In addition, other control functions, such as relay play and fader start will also not function when Digital Out is set to ON, and Auto Cue will enter pause at the start of the playback track. Any FL frames current displayed will be erased. In normal mode, when the Play/Pause button is pressed during playback, the frame's interrupted sound will be output, but when the same operation is attempted in the digital out mode, the frame's interrupted sound will not be output (during pause, no sound is output). Also, after a cue point is memorized in normal mode, if the DIGITAL OUT switch is set to ON, the analog output will be somewhat delayed from the digital output. Precautions Regarding Connections ¶ When connecting a cable to the DIGITAL OUT jack, be sure the power is turned off both to this unit and to the other unit (DAT, amplifier, etc.). ¶ Be sure that the other component's gain and volume control dials are set to their lowest settings before switching this unit's DIGITAL OUT switch to ON. Connection Examples DIGITAL OUT Switch DIGITAL OUT Terminal CDJ-100S Commercially available output cable Connect to DAT, amplifier or other component furnished with digital input jack. TROUBLESHOOTING Incorrect operations can be mistaken as malfunctions. If you believe the unit is not operating correctly, consult the chart below. Sometimes incorrect operation may be due to a malfunction in another component. If the problem is not fixed, check the other components used with the player. If the problem still persists, contact your nearest Pioneer authorized service center or dealer for service. Symptom Cause Remedy Disc doesn't eject even when ÷ Power plug is disconnected from outlet. ÷ Connect plug to wall outlet. EJECT button is pressed. ÷ EJECT button is not operating. ÷ Use Forced eject pin to remove disc. (See page 4) Playback immediately stops ÷ Disc is loaded upside down. when started. During playback, the player pauses or stops. ÷ Smudges on the disc, etc. ÷ Load the disc correctly with the label side UP. ÷ Clean the smudges from the disc and then play it again. No sound is audible. ÷ Output cables are connected incorrectly or are loose. ÷ Incorrect operation of audio mixer. ÷ Pin plugs and/or amplifier terminals are dirty. ÷ Player is in pause mode. ÷ Recheck connections. Refer to installation instructions. ÷ Check the settings of the audio mixer switches and sound volume controls. ÷ Clean away dirt. ÷ Press the PLAY/PAUSE button. Sound is distorted, noise is output. ÷ Incorrect connections. ÷ Pin plugs and/or amplifier terminals are dirty. ÷ Interference is being picked up from a TV set. ÷ Connect to audio mixer's LINE INPUT terminals. (Do not connect to MIC terminals.) ÷ Clean away dirt. ÷ Switch OFF TV set, move player away from TV set or plug the player into a separate outlet. With certain discs, loud noise ÷ Disc has a bad scratch or warp. is produced or play stops. ÷ Disc is extremely dirty. ÷ Replace disc. ÷ Clean disc. 14 En
-
 1
1 -
2
-
3
-
4
-
5
-
6
-
7
-
8
-
 9
9 -
 10
10 -
 11
11 -
 12
12 -
 13
13 -
 14
14 -
 15
15 -
 16
16
 |
 |