Pioneer CDJ 100S Owner's Manual - Page 8
Disc Loading/unloading - case
 |
UPC - 012562450261
View all Pioneer CDJ 100S manuals
Add to My Manuals
Save this manual to your list of manuals |
Page 8 highlights
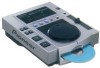
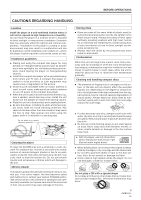
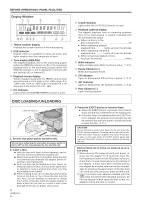
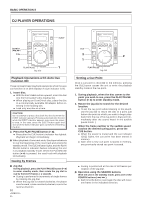
BEFORE OPERATIONS: PANEL FACILITIES Display Window 1 TRACK number display Displays the current number of the track playing. 2 CUE indicator Flashes when it is possible to input cue point, and lights steadily after the completion of input. 3 Time display (REMAIN) The elapsed playback time of the track being played (when the REMAIN indicator is off) or the remaining playback time of the track being played (when the REMAIN indicator is on) is displayed in minutes (M) and seconds (S), or frames (F). 4 Playback tempo display Tempo changes made with the TEMPO control knob are performed in 0.1% steps in the ±10% range. 0 to +10% in the +10% to -16% range is indicated in 0.1% steps and 0.2% steps from 0 to -16%. 5 MT indicator Lights when the MASTER TEMPO function is used. DISC LOADING/UNLOADING Label surface up Insert straight 1. Set the rear-panel power switch to ON. Do not force a disc into the unit when the power switch is set to OFF as this may damage the disc and the unit. 2. Insert a disc. ¶ Hold the disc with label surface upwards, and insert into the front panel disc loading slot . ¶ When playing an 8 cm (3-inch) disc, place the disc in a commercially available CD adapter before inserting in the loading slot. ¶ Only one disc can be loaded at a time. Never attempt to load more than one disc at the same time, or attempt to load a second disc when one disc has already been loaded. ¶ When loading a disc, do not placing any twisting force on the disc, or try to force the disc into the slot. Also, do not attempt to interrupt or defeat the motion of the disc when the player begins to draw a disc into the slot or to eject a disc, since damage to the disc or player could occur. 8 En 6 A.CUE indicator Lights when the AUTO CUE function is used. 7 Playback address display The elapsed playback time or remaining playback time of the track playing is roughly indicated with the full-scaled bar graph. ÷ When no disc is in the disc compartment off ÷ When displaying elapsed playback time lights up from the left side ÷ When displaying remaining playback time turns off from the left side ÷ When remaining playback time is less than 30 seconds blinks 8 WAH indicator Lights or blinks when WAH function is active. ] P. 11 9 Pause indicator (*) Blinks during pause mode. 0 ZIP indicator Lights or blinks when ZIP function is active. ] P. 11 - JET indicator Lights or blinks when JET function is active. ] P. 11 = Play indicator (#) Lights during playback. 3. Press the EJECT button to remove discs. ¶ When the EJECT button is pressed, disc rotation stops and the disc is ejected from the loading slot. ¶ If the disc fails to be ejected when the EJECT button is pressed, the accessory forced eject pin can be inserted into the front-panel's forced eject hole to eject the disc. ] P. 4 CAUTION Do not attempt to press a disc back into the slot when the EJECT indicator appears. Pressing a disc back into the slot while the EJECT indicator appears may cause the player to stop. In this case, press the EJECT button again and wait until the EJECT indicator goes out before reinserting the disc. PRECAUTIONS ON PLAYING CD SINGLES (8 cm/3inch Discs) 1 When playing CD singles (8 cm/3-inch discs), al- ways use the adapter for 8 cm/3-inch discs. Before loading the disc into the CD player, be sure to check that it is secured properly by the catches of the adapter. If discs have been inserted without the adapter by mistake, remove the disc immediately by pressing the eject button. If the disc does not come out with one press, press another time. 2 Use 8 cm/3-inch disc adapters labeled with the ' mark (recommended standard product). Do not use adapters which cause the disc to idle, nor adapters which are bent or curved.
-
 1
1 -
2
-
 3
3 -
 4
4 -
 5
5 -
 6
6 -
 7
7 -
 8
8 -
 9
9 -
 10
10 -
 11
11 -
 12
12 -
 13
13 -
14
-
15
-
16
 |
 |