Pioneer DEH-P77DH Other Manual - Page 8
DFS Alarm Installation - wiring
 |
UPC - 012562500638
View all Pioneer DEH-P77DH manuals
Add to My Manuals
Save this manual to your list of manuals |
Page 8 highlights
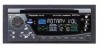
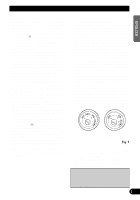
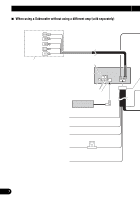
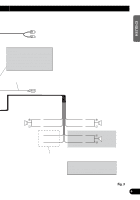
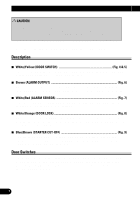
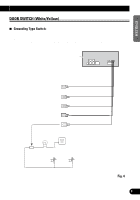
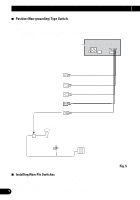
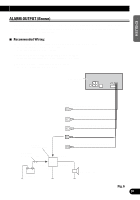
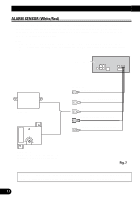
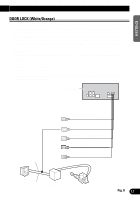
DFS Alarm Installation CAUTION • Because of the complexity of today's technically advanced vehicle wiring systems, we recommend that your DFS Alarm be installed ONLY by a professional Pioneer installer. • Install the unit so that it can be quickly disconnected in case the engine doesn't start even if the unit operates correctly. (Refer to "STARTER CUT-OFF" and "Avoiding Trouble" sections.) Affix the included deterrent stickers to the inside of the front door windows. Description 7 White/Yellow (DOOR SWITCH Fig. 4 & 5) This lead is used to trigger DFS Alarm when any door is opened and may be connected to either positive or negative (+/-) type door pin switches. 7 Brown (ALARM OUTPUT Fig. 6) This lead is a selectable constant or pulsed positive (+) output capable of driving up to 2 relays (500 mA) max. Use this lead to trigger relays for siren, horn honk or flashing lights. 7 White/Red (ALARM SENSOR Fig. 7) This lead is a negative (-) input and is provided for hookup of negative triggering sensors such as shock, or glass sensors (sold separately). 7 White/Orange (DOOR LOCK Fig. 8) This lead is used to disarm DFS Alarm from power door lock systems or alarm systems with remote unlock. This lead may be connected to door lock systems with either positive or negative (+/-) unlock triggers. 7 Blue/Brown (STARTER CUT-OFF Fig. 9) This lead provides a positive (+) constant output when DFS Alarm is triggered and remains constant for 30 minutes or until DFS Alarm is disarmed. This output should be used with an optional relay to disable starter. Door Switches This DFS Alarm's door trigger input is designed to work with either positive or negative door pin switches. After hookup, simply set door system type from DFS Alarm menu. Domelight Delay-DFS Alarm will wait for last door to close and courtesy light to turn off before Exit Delay Timer Starts. 7
-
 1
1 -
2
-
 3
3 -
 4
4 -
 5
5 -
 6
6 -
 7
7 -
 8
8 -
 9
9 -
 10
10 -
 11
11 -
 12
12 -
 13
13 -
14
-
15
-
16
-
17
-
18
-
19
-
20
-
21
-
22
-
23
-
24
-
25
-
26
-
27
-
28
-
29
-
30
-
31
-
32
-
33
-
34
-
35
-
36
-
37
-
38
-
39
-
40
-
41
-
42
-
43
-
44
-
45
-
46
-
47
-
48
 |
 |