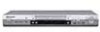
Pioneer DV-578A-S Owner's Manual - Page 14
Connecting up, Connecting to an AV receiver - sacd
 |
View all Pioneer DV-578A-S manuals
Add to My Manuals
Save this manual to your list of manuals |
Page 14 highlights
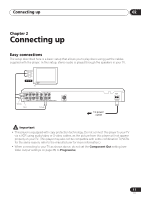
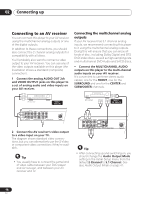
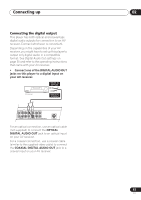
02 Connecting up Connecting to an AV receiver You can connect this player to your AV receiver using the multichannel analog outputs or one of the digital outputs. In addition to these connections, you should also connect the 2 channel analog outputs for compatibility with all discs. You'll probably also want to connect a video output to your AV receiver. You can use any of the video outputs available on this player (the illustration shows a standard (composite) connection). 1 Connect the analog AUDIO OUT 2ch and VIDEO OUTPUT jacks on this player to a set of analog audio and video inputs on your AV receiver. Connecting the multichannel analog outputs If your AV receiver has 5.1 channel analog inputs, we recommend connecting this player to it using the multichannel analog outputs. Doing this will ensure that you can enjoy all kinds of disc, including Dolby Digital and DTS DVD-Video discs, as well as high sampling rate and multichannel DVD-Audio and SACD discs. • Connect the MULTICHANNEL AUDIO outputs on this player to the multi-channel audio inputs on your AV receiver. It's convenient to use three stereo audio cables; one for the FRONT, one for the SURROUND and one for the CENTER and SUBWOOFER channels. AV receiver AUDIO/ VIDEO IN AV receiver MULTICH. INPUTS L AUDIO OUT (5.1 ch ) L CENTER Y PB COAXIAL R R FRONT SURROUND AUDIO OUT ( 2 ch ) SUB WOOFER OPTICAL DIGITAL AUDIO OUT VIDEO OUT PR COMPONENT VIDEO OUT S VIDEO OUT 2 Connect the AV receiver's video output to a video input on your TV. The diagram shows standard video connections, but you can alternatively use the S-Video or component video connections if they're available. Tip • You usually have to connect the same kind of video cable between your DVD player and AV receiver, and between your AV receiver and TV. L AUDIO OUT (5.1 ch ) L CENTER Y PB COAXIAL R FRONT R SURROUND AUDIO OUT ( 2 ch ) SUB WOOFER OPTICAL DIGITAL AUDIO OUT VIDEO OUT PR COMPONENT VIDEO OUT S VIDEO OUT Tip • After connecting up and switching on, you should change the Audio Output Mode setting in the Initial Setup menu from the default 2 Channel to 5.1 Channel. See also Audio Output Mode on page 41. 14 En
-
 1
1 -
2
-
3
-
4
-
5
-
6
-
7
-
8
-
 9
9 -
 10
10 -
 11
11 -
 12
12 -
 13
13 -
 14
14 -
 15
15 -
 16
16 -
 17
17 -
 18
18 -
 19
19 -
20
-
21
-
22
-
23
-
24
-
25
-
26
-
27
-
28
-
29
-
30
-
31
-
32
-
33
-
34
-
35
-
36
-
37
-
38
-
39
-
40
-
41
-
42
-
43
-
44
-
45
-
46
-
47
-
48
-
49
-
50
-
51
-
52
-
53
-
54
-
55
-
56
 |
 |
