Pioneer DV210KV-K Operating Instructions - Page 36
Video Output settings
 |
UPC - 012562900414
View all Pioneer DV210KV-K manuals
Add to My Manuals
Save this manual to your list of manuals |
Page 36 highlights
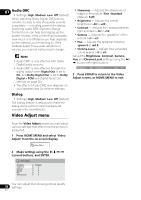
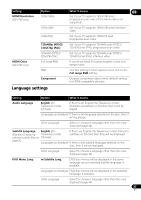
08 Setting Dolby Digital Out Option Dolby Digital Dolby Digital > PCM DTS Out DTS 96kHz PCM Out MPEG Out DTS > PCM (for DV-410V) Off 96kHz > 48kHz 96kHz MPEG MPEG > PCM Video Output settings What it means Dolby Digital encoded digital audio is output when playing a Dolby Digital DVD disc. Dolby Digital audio is converted to PCM audio before being output. DTS encoded digital audio is output when playing a DTS disc. (Noise will be output if your amplifier/ receiver is not compatible with DTS audio.) No digital audio is output when playing a DTS disc.DTS audio is converted to PCM audio before being output. No digital audio is output when playing a DTS disc. 96 kHz digital audio is converted to 48 kHz for digital output. 96 kHz digital audio is output as is at 96 kHz. MPEG encoded digital audio is output as is. MPEG encoded digital audio is converted to PCM audio for digital output. Setting Option TV Screen (This setting effective for analog and HDMI video output. See also Screen sizes and disc formats on page 43.) 4:3 (Letter Box) 4:3 (Pan & Scan) 16:9 (Wide) 16:9 (Compressed) (DV-410V only) Component Out Progressive Interlace What it means Set if you have a conventional 4:3 TV. Widescreen movies are shown with black bars top and bottom. Set if you have a conventional 4:3 TV. Widescreen movies are shown with the sides cropped so that the image fills the screen. Set if you have a widescreen TV. Can be selected when you are connected via HDMI, and have the HDMI Resolution set to 1920x1080p, 1920x1080i or 1280x720p. Video in 4:3 can be properly displayed on a 16:9 high definition television (with black bars shown on either side of the screen). Set if your TV is compatible with progressive scan video (see your TV's instruction manual for details). The PRGSVE indicator lights in the front panel display. See also Switching the video output to interlace using the front panel controls on page 12. Note that progressive scan video is only output from the component video jacks. Set if your TV is not compatible with progressive scan video. 36 En
-
 1
1 -
2
-
3
-
4
-
5
-
6
-
7
-
8
-
9
-
10
-
11
-
12
-
13
-
14
-
15
-
16
-
17
-
18
-
19
-
20
-
21
-
22
-
23
-
24
-
25
-
26
-
27
-
28
-
29
-
30
-
 31
31 -
 32
32 -
 33
33 -
 34
34 -
 35
35 -
 36
36 -
 37
37 -
 38
38 -
 39
39 -
 40
40 -
 41
41 -
42
-
43
-
44
-
45
-
46
-
47
-
48
-
49
-
50
-
51
-
52
 |
 |