Pioneer PDR-W37 Owner's Manual
Pioneer PDR-W37 Manual
 |
View all Pioneer PDR-W37 manuals
Add to My Manuals
Save this manual to your list of manuals |
Pioneer PDR-W37 manual content summary:
- Pioneer PDR-W37 | Owner's Manual - Page 1
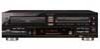
COMPACT DISC RECORDER / MULTI-CD CHANGER PDR-W37 Operating Instructions - Pioneer PDR-W37 | Owner's Manual - Page 2
NOT REMOVE COVER (OR BACK). NO USERSERVICEABLE PARTS INSIDE. REFER SERVICING TO QUALIFIED SERVICE PERSONNEL. The exclamation point within an equilateral triangle to the presence of important operating and maintenance (servicing) instructions in the literature accompanying the appliance. CAUTION: ¶ - Pioneer PDR-W37 | Owner's Manual - Page 3
grounding of the mast and supporting structure, grounding of the lead service. REPLACEMENT PARTS - When replacement parts are required, be sure the service technician has used replacement parts proper ventilation is provided or the manufacturer's instructions have been adhered to. POWER SOURCES - - Pioneer PDR-W37 | Owner's Manual - Page 4
27 Putting the batteries in the remote 5 Manually numbering tracks 27 Hints on installation 5 Starting tracks in time increments 28 Avoiding condensation problems 6 Changing the recording speed 28 Maintaining your CD recorder 6 Setting the recording level 28 Moving the unit - Pioneer PDR-W37 | Owner's Manual - Page 5
• Stereo audio cords (x2) • AC power cord • Two 'AA' size R6P batteries • Remote control unit • Warranty card • These operating instructions Using this manual This manual is for the PDR-W37 Compact Disc Recorder/Multi-CD Changer. It is split into two sections; the first covers setting up, and the - Pioneer PDR-W37 | Owner's Manual - Page 6
rotate at a high speed and may be damaged. CD lens cleaner The compact disc recorder's pickup lens should not become dirty in normal use, but if for some reason it should malfunction due to dirt or dust, consult your nearest Pioneer authorized service center. Although lens cleaners for compact disc - Pioneer PDR-W37 | Owner's Manual - Page 7
disc and where to find it. Once a CD-R is finalized, further recording and other changes become impossible. The CD recorder and other CD players treat a finalized disc as an ordinary playbackonly CD. (See page 31 for more information on finalizing CD-Rs.) CD-rewritable discs can be finalized in the - Pioneer PDR-W37 | Owner's Manual - Page 8
IN OPTICAL 1 2 COAXIAL COAXIAL OPTICAL Connect to the TAPE/MD/ CD-R LINE IN/OUT jacks of your amplifier or receiver. Connect to the CONTROL OUT of a Pioneer amplifer or receiver to be able to use the amp/receiver's remote control with this unit. Connecting optical cords 1 OPTICAL 2 Before - Pioneer PDR-W37 | Owner's Manual - Page 9
many of the playback and recording features of the PDR-W37. This is useful when you want to name your CD-Rs or CD-RWs for future reference. This recording features (such as inputting CD text, DIN connector erasing, repeating tracks, etc.), the instructions are the same as those for the remote - Pioneer PDR-W37 | Owner's Manual - Page 10
that's already 1, 2 or 3 from the changer. (p.14) playing (press again to restart playback). (p.14) 4 CD = CD-R START / REC THIS - Press to start 7 - Press to stop playback. (p.14) recording from disc(s)/tracks in the CD changer. (p.13, 11 PLAY MODE - Set the play mode to play one disc, all - Pioneer PDR-W37 | Owner's Manual - Page 11
ABC 2 JKL 5 TUV 8 >10 4 CURSOR 3 DEF 3 MNO 6 WXYZ 9 NAME ¢ 1 ENTER ¡ REC THIS 7 8 DISC 1 DISC 2 DISC 3 CD-R PROGRAM CHECK CLEAR RANDOM SKIP PLAY SKIP ID REPEAT SET CLEAR COMPACT DISC RECORDER/ Î MULTI-CD CHANGER REMOTE CONTROL UNIT 11 12 13 14 15 11 NAME CLIP - Press to copy the - Pioneer PDR-W37 | Owner's Manual - Page 12
the recorder is paused. 9 CD-R function indicators CD TEXT- Lights if the current CD contains CD text. CD / CD-R / CD-RW - Indicates the type of disc currently loaded in the recorder. FINALIZE - Blinks during auto-finalization recording; lights if a finalized CD-RW disc is loaded. MANUAL - Indicates - Pioneer PDR-W37 | Owner's Manual - Page 13
DISC MULTI CHANGER POWER - OFF _ ON CD=CD-R START REC THIS COMPACT DISC DIGITAL RECORDER OPEN/CLOSE 0 MENU /DELETE ¶ REC VOL PUSH ENTER CD TEXT Hi-bitLegatoLinkConversion Quick CD recording Although the PDR-W37 has many advanced recording features, duplicating a CD is pretty much a one-touch - Pioneer PDR-W37 | Owner's Manual - Page 14
CD-singles. The disc tray has guides for both 12cm and 8cm discs. 3 Press OPEN/CLOSE 10 again to close the disc tray. 4 Press DISC 1 (CD SELECT 1 on the front panel) to start playback. • For CD-R playback, press CD-R on the remote display shows DISC END and the recorder goes into play-pause mode (you - Pioneer PDR-W37 | Owner's Manual - Page 15
into the changer have been read by the unit (wait for the TOC READ message to disappear). Using the menu features Several features of the CD recorder can be accessed by using the MENU/DELETE key. This menu is like a selection of preferences that will stay in memory even if the system - Pioneer PDR-W37 | Owner's Manual - Page 16
Started DISPLAY TIME /CHARA SCROLL 4 ¢ COMPACT DISC RECORDER / MULTI-CD CHANGER ◊ÛB¿ˆ≤≥ 3 - COMPACT DISC MULTI CHANGER 4 1 ¡ ¢ DISPLAY COMPACT DISC DIGITAL RECORDER CD TEXT Hi-bitLegatoLinkConversion Switching the display (CD changer side) The recorder can display various kinds of disc and - Pioneer PDR-W37 | Owner's Manual - Page 17
switch between them: • Number of tracks / total disc time TOTAL CD-R TRK REMAIN MIN SEC O3 39:13 • Disc name (CD-1) DISC CD TEXT NEW MUSIC • Artist name (CD-1) CD TEXT ARTST JAZZ:Pfeuti • Recording time left on CD-R/CD-RW disc CD-R TRK REMAIN MIN SEC AL 35:14 After you have pressed - Pioneer PDR-W37 | Owner's Manual - Page 18
MIN SEC O1:1O • Track number / remaining track recording time • Disc time remaining CD-R TRK REMAIN MIN SEC AL 44:52 • Recording time left on CD-R/CD-RW disc CD-R REMAIN MIN SEC AL 73:19 • Total elapsed recording time During recording, press DISPLAY to switch the display mode. There - Pioneer PDR-W37 | Owner's Manual - Page 19
as it is, the easiest way is to follow the steps in Quick CD recording on page 13. The instructions here give you a little more control over the recording you make. 1 Load the CD you want to copy in to the CD changer. You can use any of the three disc trays in the changer. 2 Load - Pioneer PDR-W37 | Owner's Manual - Page 20
is 2x speed. See Changing the recording speed on page 28 to change it. 4 Press the CD SELECT button for the disc you want to record. On the remote, use the three DISC buttons. 5 Use 41 and ¡ ¢ (CD changer side) to select the track you want to record. On the remote, use the number buttons (or 4 and - Pioneer PDR-W37 | Owner's Manual - Page 21
sure that there is enough space on the disc for what you want to record (see Switching the Display on page 16-18 to check this). 3 Press the CD SELECT button for the disc you want to record. On the remote, use the three DISC buttons. The disc will begin playback from the first - Pioneer PDR-W37 | Owner's Manual - Page 22
enough space on the disc for what you want to record (see Switching the Display on pages 16-18 to check this). 3 Program a playlist of tracks you want to record. For detailed instructions on programming a playlist see Programming a playlist (3-CD changer) on page 35. 5 If you want to automatically - Pioneer PDR-W37 | Owner's Manual - Page 23
RECORDER / MULTI-CD CHANGER ◊ÛB¿ˆ≤≥ 3 - COMPACT DISC MULTI CHANGER 5 Recording Features COMPACT DISC DIGITAL RECORDER NAME ¶ DISPLAY CHARACTER REC VOL 7 PUSH ENTER CD TEXT Hi-bitLegatoLinkConversion Using CD text You can name a CD-R or CD-RW so that when you load the disc into the player - Pioneer PDR-W37 | Owner's Manual - Page 24
a track title, you must assign it to a track number using 4 or ¢, or the corresponding number on the remote control. Pressing NAME twice takes you back to the previous menu (step 2). Editing CD text The CD recorder can store information for up to three discs at one time. When an unfinalized - Pioneer PDR-W37 | Owner's Manual - Page 25
Recording Features COMPACT DISC DIGITAL RECORDER NAME 4 1 ¡ ¢ ¶ REC VOL PUSH ENTER CD TEXT Hi-bitLegatoLinkConversion Copying track names to other tracks If you need to name several tracks with similar names-several parts press the jog dial (ENTER). On the remote, use the 4 and ¢ buttons to - Pioneer PDR-W37 | Owner's Manual - Page 26
the fades on other songs in your mix. Note that you can't record a fade in when in synchro recording mode (although you can record a fade out). Setting the fade length 1 Press MENU/DELETE. 2 Turn the jog dial (4 and ¢ on the remote) until FADER TIME appears in the display, then press to ENTER. 3 Use - Pioneer PDR-W37 | Owner's Manual - Page 27
-54dB. 3 Turn the jog dial (4 and ¢ on 2 Start recording. You can use manual numbering in any record mode, but it is best suited to manual digital-input or analog-input recording (see page 41 for more on these recording modes). 3 Press ¡¢ on the CD-R side(¢ on the remote) at any point you want the - Pioneer PDR-W37 | Owner's Manual - Page 28
(x1) speed is better. This feature is only available when recording from the CD changer. 1 Prepare for recording REC MODE must be pressed before going to step 2. See pages 19-22 for step-by-step recording instructions. 2 Press 41 or ¡¢ (CD-R side) to switch the copying speed. The Hi indicator shows - Pioneer PDR-W37 | Owner's Manual - Page 29
MULTI CHANGER REC MODE COMPACT DISC DIGITAL RECORDER MENU/ DELETE ¶ REC VOL PUSH ENTER CD TEXT Hi-bitLegatoLinkConversion 1 Prepare for recording REC MODE must be pressed before going to step 2. See pages 19-22 for step-by-step recording instructions. Setting the balance You can increase the - Pioneer PDR-W37 | Owner's Manual - Page 30
After finalization is complete: If a CD-R is loaded, the CD-R indicator changes to CD. If a CD-RW is loaded, the finalize indicator lights in the display. • None of the controls on the player or the remote have any effect during finalization. If, however, the recorder hasn't managed to finalize the - Pioneer PDR-W37 | Owner's Manual - Page 31
'erase to' track is always the last track. • Press 7 or ERASE again to cancel erase here. 3 Press 6 (CD-R side). 4 Eject or finalize the disc. You must eject, then re-insert the disc if you want to record any new tracks. See Finalizing a disc on page 30 if you have finished all the - Pioneer PDR-W37 | Owner's Manual - Page 32
date since you can't use a partially erased disc. 3 Eject the disc. You must eject, then re-insert the disc if you want to record any new tracks. 3 Press 6 (CD-R side). The display shows the time remaining to completion. • You can halt this erase process by holding down the 7 button for 10 seconds - Pioneer PDR-W37 | Owner's Manual - Page 33
DISC DIGITAL RECORDER OPEN/CLOSE 0 CD-R CONTROL 4 1 ¡ ¢ ¶ REC VOL 6 7 PUSH ENTER CD TEXT Hi-bitLegatoLinkConversion SKIP ID SET CLEAR Marking recorded tracks to skip Although you can't erase tracks on a CD-R disc, you can set what are called 'skip IDs'. These tell a CD player (though many - Pioneer PDR-W37 | Owner's Manual - Page 34
with skip IDs. Press SKIP PLAY on the remote to turn it off. The SKIP indicator lights CD-R side). Until you eject the disc, the recorder stores the skip ID information in its memory. On pressing 0, the recorder skip IDs on the disc. This means the player won't play those tracks that are marked by - Pioneer PDR-W37 | Owner's Manual - Page 35
COMPACT DISC MULTI CHANGER 6 PLAY MODE 7 7 Playback Functions COMPACT DISC DIGITAL RECORDER 6 7 CD TEXT Hi-bitLegatoLinkConversion Programming a playlist (3-CD changer) Programming a playlist means telling the player precisely which tracks, and in what order, you want played. You can program - Pioneer PDR-W37 | Owner's Manual - Page 36
TUV WXYZ 7 8 9 MARK 10/0 >10 4 ¢ 3 7 CD-R PROGRAM REPEAT COMPACT DISC RECORDER / MULTI-CD CHANGER ◊ÛB¿ˆ≤≥ 3 - COMPACT DISC MULTI CHANGER COMPACT DISC DIGITAL RECORDER ¶ REC VOL 6 PUSH ENTER CD TEXT Hi-bitLegatoLinkConversion Programming a playlist (CD-R) You can program a playlist for - Pioneer PDR-W37 | Owner's Manual - Page 37
Functions TIME TIME FADER 7 CD-R RANDOM Using the random mode To have the recorder play tracks in a different order CD-R on the remote first, then RANDOM. Fading in and fading out CD-R side only Use the fader feature to fade the volume down gradually and pause playback, or to have the player - Pioneer PDR-W37 | Owner's Manual - Page 38
modes: 1-track, all track or all track with finalize. Should your particular recording application need it, there's also a manual recording mode. When recording from external sources, bear in mind the following: • Most CDs, MDs, DCCs and DATs are digital-copy protected, which generally means that - Pioneer PDR-W37 | Owner's Manual - Page 39
/CLOSE 0 SYNCHRO ¶ DISPLAY CHARACTER REC VOL 7 PUSH ENTER CD TEXT Hi-bitLegatoLinkConversion Digital synchro recording If you have a CD, MD, DAT or DCC player connected to either of the digital inputs of this recorder, you can make digital recordings from it very simply using this mode. Note - Pioneer PDR-W37 | Owner's Manual - Page 40
from your turntable, cassette deck, or other analog audio source. Note that double speed recording is not possible in this mode. 1 Make sure that any discs loaded in the CD changer are stopped. 2 Load a CD-R or CD-RW disc. If it's a blank disc, the display shows NEW DISC. If the disc isn't blank - Pioneer PDR-W37 | Owner's Manual - Page 41
COMPACT DISC MULTI CHANGER INPUT 7 COMPACT DISC DIGITAL RECORDER OPEN/CLOSE 0 REC/ REC MUTE ¶ ¶ ¡ ¢ DISPLAY CHARACTER REC VOL 6 7 PUSH ENTER CD TEXT Hi-bitLegatoLinkConversion Manual recording (analog or digital) The main use for manual recording mode is when there are no specific start and - Pioneer PDR-W37 | Owner's Manual - Page 42
. • It is not possible to record a blank section if the disc was stopped (not recording) just before you record-paused. 2 To finish the recording session here, press 7. • To restart recording, press 6. COMPACT DISC DIGITAL RECORDER REC/ REC MUTE ¶ 6 7 CD TEXT Hi-bitLegatoLinkConversion 42 - Pioneer PDR-W37 | Owner's Manual - Page 43
detailed care information see the instructions that come with discs. Digital and analog sources This recorder has both an optical and a coaxial digital input, as well as a pair of analog inputs. Use a digital input when: • recording from a CD/MD/DAT/DCC player or digital satellite with a digital - Pioneer PDR-W37 | Owner's Manual - Page 44
for the CD recorder: • The start of the track may not be recorded. • The track number will be recorded on the disc after the start of the track • The beginning of the next track on the DAT is unintentionally recorded To avoid these problems, we recommend recording start IDs on the DAT manually, if - Pioneer PDR-W37 | Owner's Manual - Page 45
, DAT, DVD, DCC) PMA REC SKIP SET ? SKIP CLR ? ERASE TOC ? ERASE ALL ? INITIALIZE ? The recorder displays the source it is monitoring (CD, MD, DAT DVD, or DCC) during record setup. The recorder is writing TOC data to the disc' s PMA (Program Memory Area). Never turn off the power while this display - Pioneer PDR-W37 | Owner's Manual - Page 46
during playback or recording, with possible Pioneer authorized service center. Open the disc tray and reload the disc. Make sure that it is seated properly in the disc guide. Open the disc tray and make sure that nothing is obstructing it. If the problem persists, contact a Pioneer authorized service - Pioneer PDR-W37 | Owner's Manual - Page 47
once you see the SYNCHRO indicator start to blink. 3 If none of the above solves the problem, use manual digital recording to record. • Digital synchro-recording uses a digital sub-signal contained in the source player's digital output. Some CD/ MD/DAT/DVD players are not compatible with synchro - Pioneer PDR-W37 | Owner's Manual - Page 48
played • The disc loaded contains skip IDs - pages 33-34. A recorded CD-R/CD-RW disc won't play on other CD players • Check that the disc has been finalized - page 30. • Most ordinary CD players will not play CD-RW discs. Can't record • Check that all connections to the amplifier and any other - Pioneer PDR-W37 | Owner's Manual - Page 49
disc audio system Applicable discs CDs, CD-Rs and CD-RWs Power supply AC 120 Frequency deflection: Level 2 (standard mode) *Recording specification values are for the LINE input ( Remote control unit 1 Size AA/R6P dry cell batteries 2 Stereo audio cord 2 AC power cord 1 Operating instructions - Pioneer PDR-W37 | Owner's Manual - Page 50
ELECTR N • STRIES •A ONIC INDU EST 1924 SSOCIATIO We Want You LISTENING For A Lifetime Selecting fine audio equipment such as the unit you've just purchased is only the start of your musical enjoyment. Now it's time to consider how you can maximize the fun and excitement your equipment offers. - Pioneer PDR-W37 | Owner's Manual - Page 51
- Pioneer PDR-W37 | Owner's Manual - Page 52
EUROPE NV Haven 1087, Keetberglaan 1, B-9120 Melsele, Belgium TEL: 03/570.05.11 PIONEER ELECTRONICS AUSTRALIA PTY. LTD. 178-184 Boundary Road, Braeside, Victoria 3195, Australia, TEL: [03] 9586-6300 PIONEER ELECTRONICS DE MEXICO S.A. DE C.V. San Lorenzo 1009 3er Piso Desp. 302 Col. Del Valle
-
 1
1 -
 2
2 -
 3
3 -
 4
4 -
 5
5 -
 6
6 -
 7
7 -
8
-
9
-
10
-
11
-
12
-
13
-
14
-
15
-
16
-
17
-
18
-
19
-
20
-
21
-
22
-
23
-
24
-
25
-
26
-
27
-
28
-
29
-
30
-
31
-
32
-
33
-
34
-
35
-
36
-
37
-
38
-
39
-
40
-
41
-
42
-
43
-
44
-
45
-
46
-
47
-
48
-
49
-
50
-
51
-
52
 |
 |
COMPACT DISC RECORDER / MULTI-CD CHANGER
PDR-W37
Operating Instructions