Pioneer PDR-W839 Owner's Manual - Page 39
Recording Other Sources
 |
View all Pioneer PDR-W839 manuals
Add to My Manuals
Save this manual to your list of manuals |
Page 39 highlights
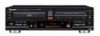
8 Recording Other Sources COMPACT DISC RECORDER / MULTI-CD CHANGER ◊ÛB¿ˆ˘≤/ 3 - COMPACT DISC MULTI CHANGER INPUT COMPACT DISC DIGITAL RECORDER ¶ REC VOL 7 PUSH ENTER CD TEXT LegatoLinkConversion Introduction Use the various recording modes described here when you're recording from a component connected to the recorder either directly via an optical or coaxial digital connection, or via your amplifier to the the analog line in jacks. For most sources, both analog and digital, it's convinient to use one of the synchro recording modes: 1-track, all track or all track with finalize. Should your particular recording application need it, there's also a manual recording mode. When recording from external sources, bear in mind the following: • Most CDs, MDs, DCCs and DATs are digital-copy protected, which generally means that you can make a copy of the original, but not a copy of a copy. • When recording incompatible or copy-proteced digital sources, use the analog inputs. • When recording digitally from DAT, the start ID track markers on the tape may be after the start of the track. Check the tape you're planning to record and manually insert new start IDs before recording. These points are covered in more detail in Additional Information on pages 44-45. Monitoring a source for recording Using the monitor facility you can listen to a source connected to the analog or digital inputs. This is especially useful for cueing up for the next recording and also for checking that tracks are starting in the proper places during automatic track numbering. 1 Stop playback of any discs playing in this unit. 2 Start playing the source. 3 Press INPUT to select the input to be monitored. Pressing INPUT repeatedly switches the active input: ANALOG - OPTICAL - COAXIAL The recorder's display indicates the current input. 4 The display shows monitoring information. If the source is digital, the display indicates the type of source if it recognizes it (CD, MD, DVD, DAT, DCC) and the sampling rate (32kHz, 44kHz, 48kHz). If the digital signal is incompatible or copy-protected, the display shows Can't REC. • When automatic track numbering has been selected, the TRACK indicator will light for 2 seconds at track start points (except digital formats listed above, where track numbers change with those on the source material). See Setting the silence threshold on page 28 if you find the recorder can't recognize the gaps between tracks. The display shows MONITOR. The level meter shows the recording level. Adjust using the REC VOL knob. 5 To stop monitoring, press 7 (CD-R side). 39 En
-
 1
1 -
2
-
3
-
4
-
5
-
6
-
7
-
8
-
9
-
10
-
11
-
12
-
13
-
14
-
15
-
16
-
17
-
18
-
19
-
20
-
21
-
22
-
23
-
24
-
25
-
26
-
27
-
28
-
29
-
30
-
31
-
32
-
33
-
 34
34 -
 35
35 -
 36
36 -
 37
37 -
 38
38 -
 39
39 -
 40
40 -
 41
41 -
 42
42 -
 43
43 -
 44
44 -
45
-
46
-
47
-
48
-
49
-
50
-
51
-
52
 |
 |
