Pioneer VSX-816-K Owner's Manual
Pioneer VSX-816-K Manual
 |
UPC - 012562785851
View all Pioneer VSX-816-K manuals
Add to My Manuals
Save this manual to your list of manuals |
Pioneer VSX-816-K manual content summary:
- Pioneer VSX-816-K | Owner's Manual - Page 1
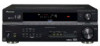
/VIDEO MULTI-CHANNEL RECEIVER VSX-816 Register your product at www.pioneerelectronics.com (US) www.pioneerelectronics.ca (Canada) • Protect your new investment The details of your purchase will be on file for reference in the event of an insurance claim such as loss or theft. • Receive free tips - Pioneer VSX-816-K | Owner's Manual - Page 2
Thank you for buying this Pioneer product. Please read through these operating instructions so you will know how to operate your model properly. After you have finished reading the instructions, put them away in a safe place for future reference. If the AC plug of this unit does not match the AC - Pioneer VSX-816-K | Owner's Manual - Page 3
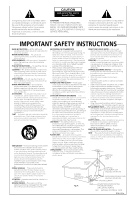
user to the presence of important operating and maintenance (servicing) instructions in the literature accompanying the appliance. D1-4-2-3_En READ INSTRUCTIONS - All the safety and operating instructions mast and supporting structure, grounding be fatal. OVERLOADING - Do not overload wall outlets, - Pioneer VSX-816-K | Owner's Manual - Page 4
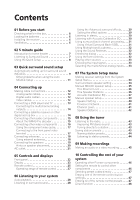
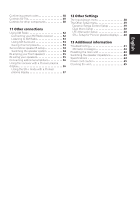
the tone controls 32 Playing other sources 33 Choosing the input signal 33 Selecting the multichannel analog inputs . . . 33 07 The System Setup menu Making receiver settings from the System Setup menu 34 Surround back speaker setting 34 Manual MCACC speaker setup 35 Fine Channel Level 36 - Pioneer VSX-816-K | Owner's Manual - Page 5
59 Dynamic Range Control Setup 59 Dual Mono Setup 60 LFE Attenuator Setup 60 SR+ Setup for Pioneer plasma displays . . . 60 13 Additional information Troubleshooting 61 XM radio messages 63 Resetting the main unit 63 Switching the speaker impedance 63 Specifications 64 Power cord caution - Pioneer VSX-816-K | Owner's Manual - Page 6
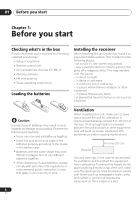
Please check that you've received the following supplied accessories: • Setup microphone • Remote control unit • Dry cell batteries (AA size IEC R6) x2 • AM loop antenna • FM wire antenna • These operating instructions Loading the batteries Installing the receiver When installing this unit, make - Pioneer VSX-816-K | Owner's Manual - Page 7
this receiver. Check the manual that remote to set the receiver to the DVD input.1 There are several other sound options you can select. See Listening to your system on page 28 for more on this.2 Note 1 You may need to set your DVD player to output Dolby Digital, DTS and 88.2/96kHz PCM (2 channel - Pioneer VSX-816-K | Owner's Manual - Page 8
DIMMER ANALOG MIDNIGHT/ ATT LOUDNESS SPEAKERS TUNING / STATION TUNER EDIT TONE QUICK SETUP SETUP MULTI JOG AUDIO/VIDEO MULTI-CHANNEL RECEIVER VSX-816 ENTER MULTI JOG DIGITAL PRECISION PROCESSING AUX SIGNAL SB ch ACOUSTIC SELECT PROCESSING EQ MCACC SETUP MIC MASTER VOLUME DOWN - Pioneer VSX-816-K | Owner's Manual - Page 9
sound (MCACC) The Auto Multi-Channel Acoustic Calibration (MCACC) setup measures the REMOTE CONTROL UNIT DVD CD TV DVR TVCTRL CD-R/TAPE FM XM RADIO AM RECEIVER D.ACCESS +10 CLASS DISC ENTER TOP MENU TUNE DTV MENU ST SETUP ENTER MENU ST T.EDIT RETURN GUIDE CATEGORY TUNE TV CONTROL - Pioneer VSX-816-K | Owner's Manual - Page 10
instructions problem, turn off the power and check the speaker connections. 9 Make sure 'OK' is selected, then press ENTER. A progress report is displayed on-screen while the receiver outputs more test tones to determine the optimum receiver settings for channel these settings manually using the - Pioneer VSX-816-K | Owner's Manual - Page 11
surround sound setup 03 • Channel Level - The overall balance SKIP to go back to the System Setup menu. Other problems when using the Auto MCACC Setup If the room environment is switch them off if necessary. If there are any instructions showing in the front panel display, please follow them. - Pioneer VSX-816-K | Owner's Manual - Page 12
) Left (white) Digital audio cables Commercially available coaxial digital audio cables or optical cables should be used to connect digital components to this receiver.1 Video cables Standard RCA video cables These cables are the most common type of video connection and are used to connect to the - Pioneer VSX-816-K | Owner's Manual - Page 13
IN DVD / LD FRONT PLAY CD-R D V D 5.1CH INPUT IN / TAPE / MD REC L VIDEO OUT CONTROL IN OUT OUT MONITOR OUT DVR / VCR IN TV / SAT IN SUB WOOFER DVD / LD PREOUT IN S-VIDEO This receiver 2 1 COAXIAL DIGITAL OUT R AUDIO L ANALOG OUT VIDEO OUT DVD player Note 1 If your DVD player - Pioneer VSX-816-K | Owner's Manual - Page 14
D 5.1CH INPUT IN / TAPE / MD VIDEO OUT CONTROL IN OUT OUT MONITOR OUT DVR / VCR IN TV / SAT IN SUB WOOFER DVD / LD PREOUT IN S-VIDEO REC L DVD/multi-channel decoder with multi-channel analog output jacks 2 1 DIGITAL OUT Connecting a satellite receiver or other digital set-top box - Pioneer VSX-816-K | Owner's Manual - Page 15
CD-R/TAPE/MD analog output jack using a stereo RCA phono cable. This receiver IN IN OPT 2 (TV/ SAT) IN OPT 1 (CD) OUT ASSIGNABLE LD FRONT PLAY CD-R D V D 5.1CH INPUT IN / TAPE / MD REC L VIDEO OUT CONTROL IN OUT OUT MONITOR OUT DVR / VCR IN TV / SAT IN SUB WOOFER DVD / LD PREOUT - Pioneer VSX-816-K | Owner's Manual - Page 16
LD FRONT PLAY CD-R D V D 5.1CH INPUT IN / TAPE / MD VIDEO OUT CONTROL IN OUT OUT MONITOR OUT DVR / VCR IN TV / SAT IN SUB WOOFER DVD / LD inputs on the recorder to the DVR/VCR AUDIO and VIDEO outputs on this receiver. Use a stereo RCA phono cable for the audio connection and a standard - Pioneer VSX-816-K | Owner's Manual - Page 17
video, which delivers a very stable, flicker-free picture. See the manuals that came with your TV and source component to check whether they are for more on this. 3 Connect the COMPONENT VIDEO MONITOR OUT jacks on this receiver to the component video inputs on your TV or monitor. Use a three-way - Pioneer VSX-816-K | Owner's Manual - Page 18
04 Connecting up Connecting antennas Connect the AM loop antenna and the FM wire antenna as shown below. To improve reception and sound quality, connect external antennas (see Using external antennas below). fig. a fig. b fig. c Using external antennas To improve FM reception Use an F connector - Pioneer VSX-816-K | Owner's Manual - Page 19
CEN- SUB TER WOOFER AUX FM UNBAL 75 Ω CD DVR / VCR AM LOOP ANTENNA MONITOR OUT OUT CONTROL IN OUT R L SURROUND DVD 5.1CH INPUT IN TV / SAT IN DVD / LD FRONT D terminal. Use good quality speaker wire to connect the speakers to the receiver. Note 1 If you're not using a subwoofer, change the - Pioneer VSX-816-K | Owner's Manual - Page 20
speaker terminals also accept single banana plugs. (Refer to speaker manual for details.) Caution • These speaker terminals are hazardous when above or below the TV so that the sound of the center channel is localized at the TV screen. Also, make sure the center receiver to turn off automatically. - Pioneer VSX-816-K | Owner's Manual - Page 21
60 LS SB fig. A RS SBL SBL SBR SBR fig. B 3-D view of 7.1 channel speaker setup Caution • Do not connect a TV set, monitor, heater, or similar appliance order to avoid overheating and fire risk. This can also cause the receiver to malfunction. • Since a subwoofer or power amplifier can exceed the - Pioneer VSX-816-K | Owner's Manual - Page 22
and displays Chapter 5: Controls and displays Front panel ADVANCED ST/DIRECT/ STANDARD SURR AUTO SURR LISTENING MODE STANDBY/ON PHONES 1 2 34 56 AUDIO/VIDEO MULTI-CHANNEL RECEIVER VSX-816 ENTER MULTI JOG DIGITAL PRECISION PROCESSING DVD / LD TV/ SAT DVR/ VCR VIDEO CD CD-R / TAPE - Pioneer VSX-816-K | Owner's Manual - Page 23
Controls and displays 05 English Deutsch Français Italiano Nederlands Español 8 PHONES jack Use to connect headphones (when connected, there is no sound output from the speakers). 9 STANDBY/ON Switches the receiver SBch PROCESSING Selects surround back channel processing or the virtual surround - Pioneer VSX-816-K | Owner's Manual - Page 24
When the (STANDARD) Pro Logic II mode of the receiver is on, 2 PRO LOGIC II lights to indicate Pro the sleep mode is active (see Remote control below). 10 Tuner indicators - Lights when the mono mode channel EQ / Sound Retriever indicators These indicators show the EQ balance for each channel - Pioneer VSX-816-K | Owner's Manual - Page 25
REMOTE CONTROL UNIT 12 DVD TV DVR TVCTRL 2 CD-R/TAPE XM RADIO CD FM AM RECEIVER 13 SLEEP SB ch ANALOG ATT SR+ DIMMER MIDNIGHT/ LOUDNESS 3 D.ACCESS +10 CLASS DISC ENTER TOP MENU 4 TUNE MENU 5 DTV MENU ST ENTER ST T.EDIT SETUP RETURN TUNE GUIDE CATEGORY TV CONTROL - Pioneer VSX-816-K | Owner's Manual - Page 26
Controls and displays MENU - Displays the disc menu of DVDVideo discs. It also displays TV and DTV menus. T.EDIT - Press to memorize and name a station for recall (page 43). SETUP (Press RECEIVER first to access) Use to access the System Setup menu (see page 34). GUIDE - Displays the guides channel - Pioneer VSX-816-K | Owner's Manual - Page 27
volume also restores the sound). 16 EFFECT/CH SEL Press repeatedly to select a channel, then use +/- to adjust the level (see Tip on page 42). Also range of remote control The remote control may not work properly if: • There are obstacles between the remote control and the receiver's remote sensor. - Pioneer VSX-816-K | Owner's Manual - Page 28
the XM Surround feature (page 53). Listening in surround sound Using this receiver, you can listen to any source in surround sound. However, the to anything but Normal (SB)), 2 Pro Logic IIx becomes 2 Pro Logic II (5.1 channel sound). 3 If surround back processing (page 31) is switched to OFF, or - Pioneer VSX-816-K | Owner's Manual - Page 29
setting you want to adjust. Depending on the current status / mode of the receiver, certain options may not appear. Check the table below for notes on this. in your setup. For more on this, refer to Using surround back channel processing on page 31. • When an Advanced Surround listening mode is - Pioneer VSX-816-K | Owner's Manual - Page 30
select between: • ALL CH - No special weighting is given to any one channel. • F. ALIGN - All speakers are heard in accordance with the front speaker , Dialog Enhancement, the Sound Retriever or the tone controls when DIRECT is selected, the receiver automatically switches to STEREO. 2 • You can't - Pioneer VSX-816-K | Owner's Manual - Page 31
Listening to your system 06 English Deutsch Français Italiano Nederlands Español Using surround back channel processing • Default setting: SB ON You can have the receiver automatically use 6.1 decoding for 6.1 encoded sources (for example, Dolby Digital EX or DTS-ES), or you can choose to always - Pioneer VSX-816-K | Owner's Manual - Page 32
dialog • Default setting: OFF The Dialog Enhancement feature localizes dialog in the center channel to make it stand out from other background sounds in a TV or movie want to adjust the bass or treble using the front panel tone control. 1 Press TONE to select the frequency you want to adjust. Press - Pioneer VSX-816-K | Owner's Manual - Page 33
the channel you want to watch, otherwise make sure that the TV's video input is set to this receiver (For example, if you connected this receiver players don't output DTS signals. For more details, refer to the instruction manual supplied with your DVD player. 3 • During playback from the - Pioneer VSX-816-K | Owner's Manual - Page 34
GUIDE CATEGORY TUNE TV CONTROL TV VOL INPUT SELECT TV CH VOL 1 Switch on the receiver and your TV. Use the RECEIVER button to switch on.1 2 Press RECEIVER on the remote control connected (see Manual speaker setup on you can use the surround back speaker channels with this system. In addition to - Pioneer VSX-816-K | Owner's Manual - Page 35
Amp - Select this setting if you're bi-amping Other problems when Manual MCACC' from the System Setup menu. See Making receiver Channel Level below). • Fine SP Distance - Make precise delay settings for your speaker system (see Fine Speaker Distance on page 36). The last five settings are specifically - Pioneer VSX-816-K | Owner's Manual - Page 36
, simply use / to select it. 3 When you're finished, press RETURN. You return to the Manual MCACC setup menu. Fine Speaker Distance • Default setting: 10.0 ft (all channels) For proper sound depth and separation with your system, it is necessary to add a slight bit of delay to some speakers so - Pioneer VSX-816-K | Owner's Manual - Page 37
you can also adjust these settings manually to get a frequency balance that suits the volume is at the middle position. • See Other problems when using the Auto MCACC Setup on page 11 for Analyzing Surround Analyzing Channel Level [ ] Acoustic Cal EQ [ ] :Cancel As the receiver outputs test - Pioneer VSX-816-K | Owner's Manual - Page 38
settings (no equalization is applied to the front left and right channels). You return to the Acoustic Cal EQ setup menu after the point from which to start. 1 Select 'EQ Data Copy' from the Manual MCACC setup menu. 3.Manual MCACC a.Fine Ch Level b.Fine SP Distance c.EQ AUTO Setting d.EQ Data - Pioneer VSX-816-K | Owner's Manual - Page 39
so you can compare the different settings. 3 Select the channels you want, pressing ENTER when you're finished checking each one. 4 When you're finished, press RETURN. You return to the Manual MCACC setup menu. Manual speaker setup This receiver allows you to make detailed settings to optimize the - Pioneer VSX-816-K | Owner's Manual - Page 40
sure that the settings made in Automatically setting up for surround sound (MCACC) on page 9 are correct. 4.Manual SP Setup a.Speaker Setting b.Crossover Network c.Channel Level d.Speaker Distance 4a.Speaker Setting Front SMALL Center [ SMALL ] Surr [ SMALL ] SB [ SMALL x2 ] SUB W. [ YES - Pioneer VSX-816-K | Owner's Manual - Page 41
alternatively and let your ears judge which sounds best. If you're having problems, the easiest option is to route all the bass sounds to the you're finished, press RETURN. You return to the Manual SP Setup menu. Channel Level Using the channel level settings, you can adjust the overall balance of - Pioneer VSX-816-K | Owner's Manual - Page 42
remote control. You can set two channel levels: one for DVD 5.1 CH and one for the listening modes. Speaker Distance For good sound depth and separation from your system, you need to specify the distance of your speakers from the listening position. The receiver return to the Manual SP Setup menu. - Pioneer VSX-816-K | Owner's Manual - Page 43
(search) and manual (step) tuning functions RECEIVER SLEEP SR+ SB ch DIMMER ANALOG ATT MIDNIGHT/ LOUDNESS D.ACCESS +10 CLASS DISC ENTER TOP MENU TUNE DTV MENU ST SETUP ENTER MENU ST T.EDIT RETURN TUNE GUIDE CATEGORY TV CONTROL the number buttons on the remote control. 1 Press FM or AM - Pioneer VSX-816-K | Owner's Manual - Page 44
classes A, B and C. 2 Press ST / to select the station preset you want. • You can also use the number buttons on the remote control to recall the station preset. Note 1 If the receiver is left disconnected from the AC power outlet for over a month, the station memories will be lost and will have to - Pioneer VSX-816-K | Owner's Manual - Page 45
connections). TV VOL INPUT SELECT TV CH VOL RECEIVER INPUT SELECT SOURCE AUDIO/VIDEO PRE-PROGRAMMED REMOTE CONTROL UNIT DTV ON/OFF MPX REC DTV INFO MUTE 's instruction manual if you're unsure. 5 Start recording, then start playback of the source component.1 Note 1 • The receiver's volume - Pioneer VSX-816-K | Owner's Manual - Page 46
work for the model that you are using.2 Note • You can cancel or exit any of the steps by pressing RECEIVER. To go back a step, press RETURN. • After one minute of inactivity, the remote automatically exits the operation. Remote control unit Other Pioneer products with CONTROL terminals Connect to - Pioneer VSX-816-K | Owner's Manual - Page 47
ENTER TOP MENU TUNE DTV MENU ST SETUP ENTER MENU ST T.EDIT RETURN TUNE GUIDE CATEGORY TV CONTROL TV VOL INPUT SELECT TV CH VOL 1 While pressing the RECEIVER button, press and hold the SETUP button. The remote LCD display shows SETUP. 2 Use / to select PRESET then press ENTER. 3 Press the - Pioneer VSX-816-K | Owner's Manual - Page 48
, any component you select (using the MULTI CONTROL buttons) will be selected by both the receiver and the remote control. When you turn direct function off, you can operate the remote control without affecting the receiver.1 1 While pressing the RECEIVER button, press and hold the SETUP button. The - Pioneer VSX-816-K | Owner's Manual - Page 49
Controls for TVs This remote control can control components after entering the proper codes or teaching the receiver the commands (see Operating other Pioneer possible with all models.) TV SELECT TV CH +/- Selects channels. Cable TV DTV menu. DTV GUIDE Use as the GUIDE button for navigating. - Pioneer VSX-816-K | Owner's Manual - Page 50
Controls for other components This remote control can control these components after entering the proper codes or teaching the receiver the commands (see Operating other Pioneer DVD/LD player Go forward channels (channel +). VCR Pause playback Stops playback (on some models, pressing this when the - Pioneer VSX-816-K | Owner's Manual - Page 51
. ENTER DVD/DVR Player GUIDE Press to access the DVD player setup screen. DVD/DVR Player CH +/- Selects channels. VCR/DVD/DVR Player or channel. DVD/DVR Player SUBTITLE Displays/changes the subtitles on multilingual DVDs. DVD/DVR Player HDD (SHIFT Switches to the hard disk controls when - Pioneer VSX-816-K | Owner's Manual - Page 52
WOOFER DVD / LD PREOUT IN S-VIDEO REC L This receiver Using XM Radio XM is the leading provider of satellite radio service in the United States. Through two highpower satellites, Rock and Roll, XM Radio service offers over 150 channels of music, news, talk, sports and children's programming - Pioneer VSX-816-K | Owner's Manual - Page 53
Radio After connecting, you will be able to use this receiver to select channels and navigate categories using the on-screen display.1 The Channel number Artist name Song name Channel name Selecting channels and browsing by genre From the XM Channel Guide, you can browse XM Radio channels - Pioneer VSX-816-K | Owner's Manual - Page 54
number buttons on the remote control to recall the channel preset. Connect & Play™, XM-Ready® and The Ultimate Playlist are trademarks of XM Satellite Radio Inc. ©2005 XM Satellite Radio Inc. All rights reserved. All other trademarks are the property of their respective owners. Second Zone speaker - Pioneer VSX-816-K | Owner's Manual - Page 55
output from speaker system A (up to 5 channels, depending on the source), the two speakers in when you are bi-amping the speakers or you could severely damage the amplifier. See your speaker manual for more information. • receiver. Using a banana plug for the second connection is recommended. 55 En - Pioneer VSX-816-K | Owner's Manual - Page 56
R ANALOG INPUT L R ANALOG INPUT L R ANALOG INPUT Center channel amplifier (mono) Surround back channel amplifier Surround channel amplifier Front channel amplifier Powered subwoofer Using this receiver with a Pioneer plasma display If you have a Pioneer plasma display2, you can use an SR - Pioneer VSX-816-K | Owner's Manual - Page 57
page 60 for detailed instructions. VIDEO INPUT 1 Pioneer plasma display VIDEO INPUT 2 DVD player Satellite receiver, etc DVD AUDIO IN ADVANCED ST/DIRECT/ STANDARD SURR AUTO SURR LISTENING MODE STANDBY/ON PHONES TV/SAT AUDIO IN AUDIO/VIDEO MULTI-CHANNEL RECEIVER VSX-816 ENTER MULTI JOG - Pioneer VSX-816-K | Owner's Manual - Page 58
cables. 1 Press RECEIVER on the remote control, then press the control to navigate through the screens and select menu items. Press RETURN to confirm and exit the current menu. 2 Select 'Input Assign' from the System Setup menu. System Setup 1.Surr Back System 2.Auto MCACC 3.Manual MCACC 4.Manual - Pioneer VSX-816-K | Owner's Manual - Page 59
make customized settings to reflect how you are using the receiver. 1 Press RECEIVER on the remote control, then press the SETUP button. An on-screen display (OSD channel (LFE Attenuator Setup on page 60). • SR+ Setup - Specify how you want to control your Pioneer plasma display (SR+ Setup for Pioneer - Pioneer VSX-816-K | Owner's Manual - Page 60
limiting • LFE OFF - No sound from LFE channel 60 En 3 When you're finished, press RETURN. You return to the Other Setup menu. SR+ Setup for Pioneer plasma displays Make the following settings if you have connected a Pioneer plasma display to this receiver using an SR+ cable. Note that the number - Pioneer VSX-816-K | Owner's Manual - Page 61
receiver back on. If the message persists, call a Pioneer authorized blinks. independent service company. No sound is output when a function is selected. • Make sure the component is connected correctly (refer to Connecting up on page 12). • Press MUTE on the remote control instruction manual - Pioneer VSX-816-K | Owner's Manual - Page 62
Problem page 33). • Refer to the instruction manual supplied with the DVD player. No remote. • This feature only works with Pioneer products. The display is dark or off. • Press DIMMER on the control repeatedly to return to the default. The System Setup screen doesn't appear. • When the receiver - Pioneer VSX-816-K | Owner's Manual - Page 63
, song/program title, or channel category associated with the channel at this time. No action needed. Resetting the main unit Use this procedure to reset all the receiver's settings to the factory default. Use the front panel controls to do this. 1 Switch the receiver into standby. 2 While holding - Pioneer VSX-816-K | Owner's Manual - Page 64
Specifications Amplifier section • Continuous power output (stereo) Front. . 110 W (20 to 20 000 Hz, THD 0.7 %, 8 Ω)1 • Continuous power output (surround) Front. . . . . 110 W per channel (1 kHz, 1.0 %, 8 Ω) Center 110 W (1 kHz, 1.0 %, 8 Ω) Surround 110 W per channel kΩ • Tone control Bass 6 dB ( - Pioneer VSX-816-K | Owner's Manual - Page 65
size IEC R6 2 Remote control 1 AM loop antenna 1 FM wire antenna 1 These operating instructions Cleaning the unit • Use these will corrode the surface. Note • Specifications and the design are subject to possible Pioneer authorized service center or your dealer for a replacement. 65 En - Pioneer VSX-816-K | Owner's Manual - Page 66
your hearing. Guard against this by setting your equipment at a safe level BEFORE your hearing adapts. To establish a safe level: • Start your volume control at a low setting. • Slowly increase the sound until you can hear it comfortably and clearly, and without distortion. Once you have established - Pioneer VSX-816-K | Owner's Manual - Page 67
models , USER ATTACHED YOU SPECIFIC LEGAL service. To receive warranty service y ou need to present your sales receipt or, if rented, your rental contract showing place and date of original owner Service Company, please call or write: CUSTOMER SUPPORT DIVISION PIONEER service representative the problem - Pioneer VSX-816-K | Owner's Manual - Page 68
or if you wish to purchase replacement parts, operating instructions, service manuals, or accessories, please call the number shown below. 8 0 0 - 4 2 1 - 1 4 0 4 Please do not ship your product to Pioneer without first calling the Customer Support Division at the above listed number for assistance
-
 1
1 -
 2
2 -
 3
3 -
 4
4 -
 5
5 -
 6
6 -
 7
7 -
8
-
9
-
10
-
11
-
12
-
13
-
14
-
15
-
16
-
17
-
18
-
19
-
20
-
21
-
22
-
23
-
24
-
25
-
26
-
27
-
28
-
29
-
30
-
31
-
32
-
33
-
34
-
35
-
36
-
37
-
38
-
39
-
40
-
41
-
42
-
43
-
44
-
45
-
46
-
47
-
48
-
49
-
50
-
51
-
52
-
53
-
54
-
55
-
56
-
57
-
58
-
59
-
60
-
61
-
62
-
63
-
64
-
65
-
66
-
67
-
68
 |
 |
AUDIO/VIDEO MULTI-CHANNEL
RECEIVER
VSX-816
• Protect your new investment
The details of your purchase will be on file for reference in the event of an
insurance claim such as loss or theft.
• Improve product development
Your input helps us continue to design products that meet your needs.
• Receive a free Pioneer newsletter
Registered customers can opt in to receive a monthly newsletter.
• Receive free tips, updates and service bulletins on
your new product
Operating Instructions
Register your product at
www.pioneerelectronics.com (US)
www.pioneerelectronics.ca (Canada)