Pioneer VSX-816-K Owner's Manual - Page 45
Making recordings
 |
UPC - 012562785851
View all Pioneer VSX-816-K manuals
Add to My Manuals
Save this manual to your list of manuals |
Page 45 highlights
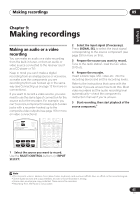
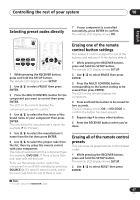
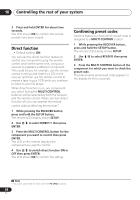
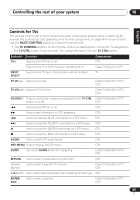
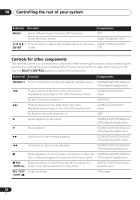
Making recordings 09 English Deutsch Français Italiano Nederlands Español Chapter 9: Making recordings Making an audio or a video recording You can make an audio or a video recording from the built-in tuner, or from an audio or video source connected to the receiver (such as a CD player or TV). Keep in mind you can't make a digital recording from an analog source or vice-versa, so make sure the components you are recording to/from are hooked up in the same way (see Connecting up on page 12 for more on connections). If you want to record a video source, you also need to use the same type of connection for the source as for the recorder. For example, you can't record a component hooked up to S-video jacks with a recorder hooked up to the composite video outputs (see page 16 for more on video connections). TV VOL INPUT SELECT TV CH VOL RECEIVER INPUT SELECT SOURCE AUDIO/VIDEO PRE-PROGRAMMED REMOTE CONTROL UNIT DTV ON/OFF MPX REC DTV INFO MUTE REC STOP JUKEBOX AUDIO SUBTITLE HDD DVD DISP CH CH STANDARD ADV.SURR STEREO AUTO SURR DVD CD TV CD-R/TAPE FM DVR XM RADIO AM TV CTRL RECEIVER DIALOGE S.RETRIEVER ACOUSTIC EQ SIGNAL SEL SHIFT EFFECT/CHSEL SLEEP SB h ANALOG 1 Select the source you want to record. Use the MULTI CONTROL buttons (or INPUT SELECT). 2 Select the input signal (if necessary). Press SIGNAL SEL to select the input signal corresponding to the source component (see page 33 for more on this). 3 Prepare the source you want to record. Tune to the radio station, load the CD, video, DVD etc. 4 Prepare the recorder. Insert a blank tape, MD, video etc. into the recording device and set the recording levels. Refer to the instructions that came with the recorder if you are unsure how to do this. Most video recorders set the audio recording level automatically-check the component's instruction manual if you're unsure. 5 Start recording, then start playback of the source component.1 Note 1 • The receiver's volume, balance, tone (bass, treble, loudness), and surround effects have no effect on the recorded signal. • Some digital sources are copy-protected, and can only be recorded in analog. • Some video sources are copy-protected. These cannot be recorded. • Recording from XM Radio is not possible. 45 En
-
 1
1 -
2
-
3
-
4
-
5
-
6
-
7
-
8
-
9
-
10
-
11
-
12
-
13
-
14
-
15
-
16
-
17
-
18
-
19
-
20
-
21
-
22
-
23
-
24
-
25
-
26
-
27
-
28
-
29
-
30
-
31
-
32
-
33
-
34
-
35
-
36
-
37
-
38
-
39
-
 40
40 -
 41
41 -
 42
42 -
 43
43 -
 44
44 -
 45
45 -
 46
46 -
 47
47 -
 48
48 -
 49
49 -
 50
50 -
51
-
52
-
53
-
54
-
55
-
56
-
57
-
58
-
59
-
60
-
61
-
62
-
63
-
64
-
65
-
66
-
67
-
68
 |
 |