Pioneer VSX-816-K Owner's Manual - Page 17
Connect the COMPONENT VIDEO - rear panel
 |
UPC - 012562785851
View all Pioneer VSX-816-K manuals
Add to My Manuals
Save this manual to your list of manuals |
Page 17 highlights
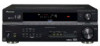
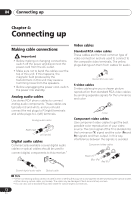
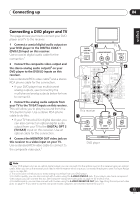
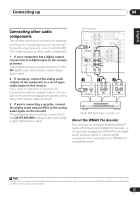
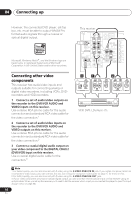
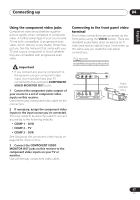
English Deutsch Français Italiano Nederlands Español Connecting up 04 Using the component video jacks Component video should deliver superior picture quality when compared to composite video. A further advantage (if your source and TV are both compatible) is progressive-scan video, which delivers a very stable, flicker-free picture. See the manuals that came with your TV and source component to check whether they are compatible with progressive-scan video. Important • If you connect any source component to the receiver using a component video input, you must also have your TV connected to this receiver's COMPONENT VIDEO MONITOR OUT jacks. 1 Connect the component video outputs of your source to a set of component video inputs on this receiver. Use a three-way component video cable for the connection. 2 If necessary, assign the component video inputs to the input source you've connected. This only needs to be done if you didn't connect according to the following defaults: • COMP 1 - DVD • COMP 2 - TV • COMP 3 - DVR See Assigning the component video inputs on page 58 for more on this. 3 Connect the COMPONENT VIDEO MONITOR OUT jacks on this receiver to the component video inputs on your TV or monitor. Use a three-way component video cable. Connecting to the front panel video terminal Front video connections are accessed via the front panel using the VIDEO button. There are standard audio/video jacks as well as an Svideo jack and an optical input. Hook them up the same way you made the rear panel connections. This receiver DIGITAL PRECISION PROCESSING CD CD-R / TAPE / MD FM AM XM AUX S -VIDEO VIDEO INPUT VIDEO L AUDIO R DIGITAL IN MCACC SETUP MIC V L R VIDEO OUTPUT DIGITAL OUT Video camera (etc.) 17 En
-
 1
1 -
2
-
3
-
4
-
5
-
6
-
7
-
8
-
9
-
10
-
11
-
 12
12 -
 13
13 -
 14
14 -
 15
15 -
 16
16 -
 17
17 -
 18
18 -
 19
19 -
 20
20 -
 21
21 -
 22
22 -
23
-
24
-
25
-
26
-
27
-
28
-
29
-
30
-
31
-
32
-
33
-
34
-
35
-
36
-
37
-
38
-
39
-
40
-
41
-
42
-
43
-
44
-
45
-
46
-
47
-
48
-
49
-
50
-
51
-
52
-
53
-
54
-
55
-
56
-
57
-
58
-
59
-
60
-
61
-
62
-
63
-
64
-
65
-
66
-
67
-
68
 |
 |
