Poulan 1992-06 User Manual - Page 17
Spark, Arrestor
 |
View all Poulan 1992-06 manuals
Add to My Manuals
Save this manual to your list of manuals |
Page 17 highlights
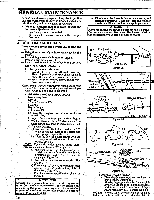
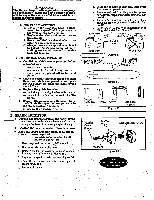
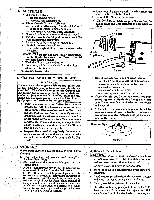
A WARNING The Depth GaugeToolis requiredto insureproper depth gauge. Filing the depth gauge too deep will increase the chance of kickback which can result in serious injury. b. CHAIN REPLACEMENT 1.) Use only the Low-Kickback replacement chain specified for your saw in the "Specifications" section. 2.) Replace the chain when cutters or links break. 3.) See a qualified service dealer to replace or sharpen your chain. 4.) Always have a worn sprocket replaced by a qualified service dealer when installing a new chain to avoid excessive wear to the chain. 2. GUIDE BAR MAINTENANCE • Conditions which can require guide bar maintenance: -- saw cuts to one side. -- saw has to be forced through a cut. inadequate supply of oil to bar and chain. • Check the condition of the guide bar each time the chain is sharpened. A worn guide bar will damage the rhain and make cutting more difficult. • Replace the guide bar when: the inside groove of guide bar rails is worn. - the guide bar is bent or cracked. See Figure 35 . • Use onlythe replacement Reduced-Kickback Guide Bar specified for your saw in the "Specification" section. a. Remove the guide bar to service. B. SPARK ARRESTOR • Carbon deposits build up on the spark arrestoras thesawis used and must be removed toavoid creating a fire hazard or causing engine damage. • Replace the spark arrestor if breaks occur. • Keep the spark arrestor clean at all times. Clean: --as required. --at least once for each 25-30 hours of operation. Items required: wire brush, 3/8" wrench 1. Disconnect the spark plug wire. 2. Remove the muffler cover screws and washers. Remove the muffler coven Figure 36 . 3 Remove the spark arrestor screen. Figure 36 . 4. Clean the screen with a wire brush or replace if breaks are found. 5. Reassemble parts. b. Clean the oil holes at least once after every five hours of operation. c. Remove sawdust from the guide bar groove periodically with a putty knife or awire. Figure 34 . d. Remove burrs by filing the side edges of the guide bar grooves square with a flat file. Figure 35 . e. Restore square edges to an uneven rail top be filing with a flat file. Figure 35 . Hook Angle :AD Too Much Squared Hook Angle y Off Corner Rounded Corner Right Way Figure 33 Remove Sawdust From Guide Bar Groove Wrong Way Figure 34 1 vir Correct Guide Rar Groove Worn Grooves Figure 35 I File Edges Square Muffler Cover Screws Muffler Cover Spark Arrestor Screen Washers Figure 36 HEAD SPECIAL SAFETY SECTION I'M:QUENTIN - 17 -
-
 1
1 -
2
-
3
-
4
-
5
-
6
-
7
-
8
-
9
-
10
-
11
-
 12
12 -
 13
13 -
 14
14 -
 15
15 -
 16
16 -
 17
17 -
 18
18 -
 19
19 -
 20
20 -
 21
21 -
 22
22 -
23
-
24
 |
 |