Poulan 1992-06 User Manual - Page 18
Starter
 |
View all Poulan 1992-06 manuals
Add to My Manuals
Save this manual to your list of manuals |
Page 18 highlights
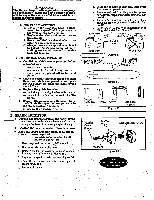
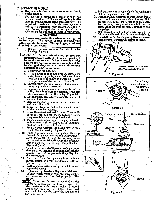
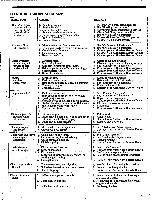
C. STARTER ROPE le Replace a broken starter or a rope that is badly frayed. NOTE: A recoil spring lies beneath the pulley and is under tension. If the recoil spring is disturbed, considerable time and effort will be required to reinstall. For this reason you may want to let a qualified service dealer handle this repair. Ifyou try to repair the starter ropeand the recoil spring pops out, take the unit to your dealer. A WARNING Always wear eye protection when servicing the starter rope. The recoil spring beneath the pulleyis undertension. If the springpopsout,serious injury can result. 1. Remove the four screws on the side of the fan housing. Figure 37 . CAUTION: Do not mix chrome-colored fan housing screws with the black-colored cylindershroud screws. Other than color,these screws are similar in appearance; but if interchanged, they can strip out and/or cause permanent engine damage. 2. Remove the fan housing. 3. If the starter rope is not broken, release the springtension by pullingabout10 inches of rope from theinpulley as shown in Figure 38 . Catch the rope one of the notches. Figure 38 . 4. Carefully turn the pulley counterclockwise until the spring tension is released. 5. Remove the pulley screw in the center of the pulley. Be sure to note the position of the cam when removing it from the pulley. Figure 39 . 6. Lift the pulley carefully while gently twisting it counterclockwise. 7. Remove the rope retainer screwand remove the old rope. Figure 39 . 8. Move away from the fuel tank and melt the end of the rope to be installed. 9. Allow the melted end to drip once. Then, while the rope is still hot, pull the melted end through a rag to obtain a smooth, pointed end. 10. Insert one end of the rope through the handle and secure with a knot. Leave a3/-16"pigtail behind the knot. Figure 40 (inset). 11. Feed the rope through the round starter rope hole in the fan housing. Figure 39 12. Guide the rope inside the pulley, then up through the pulley hole (on the pulley ratchet side). Figure 39 . It might be necessary to insert a small screwdriver through the underside hole to push the rope through the pulley hole. Figure 39 (inset). 13. Tie a knot in the end of the rope leaving no more than 3/8 to 1/4 inch tail and pull the knot snugly into the corner of the groove m the pulley. Pull the rope tightly. 14. Tuck the tail on the rope knot into the inner curved section to avoid interference with the flywheel. 15. Set the pulleyinto the housing;push it down and engage the spring. 16. Replaceand tighten the pulleyscrew. Makesure the starter dog, retainer, cam, and wave washer are positioned and installed properly. Figure 39 . NOTE; Make sure the cam is installed on the starter dog in the direction shown in Figure 39 , Also, make sure the wave washer is seated around the top outer edge of the retainer and not caught between the top of the retainer and the pulley screw. - 18 - 17. Pull out 10 inches of rope. Catch the rope in the slot in the pulley. Figure 40 . 18. Turn the pulley clockwise to wind up the spring until it will turn no more without forcing. Hold the pulley by hand. Do not let go of the pulley. Let the pulley slowly unwind one full turn and release the rope from the slot. Continue to hold the pulley. 19. Hold the pulley and pull the starter rope to the full extent of length. Let the rope rewind slowly. 20. Reinstall the fan housing using the chrome-colored screws. Tighten the screws securely. that Notch Remove Chrome Colored Screws (See Caution under Step 1) Figure 37 Turn Pulley Counterclockwise To Release Tension 4. Figure 38 Phillips Screwdriver Pulley Screw Wave Washer Cam Starter Dog -0-- Retainer tti Starter dl fill Rope Hole Figure 39 3/16" • Figure 40 Notch
-
 1
1 -
2
-
3
-
4
-
5
-
6
-
7
-
8
-
9
-
10
-
11
-
12
-
 13
13 -
 14
14 -
 15
15 -
 16
16 -
 17
17 -
 18
18 -
 19
19 -
 20
20 -
 21
21 -
 22
22 -
 23
23 -
24
 |
 |