ProForm 100 Zlx Bike Uk Manual - Page 9
Attach the Water Bottle Holder 49 to
 |
View all ProForm 100 Zlx Bike manuals
Add to My Manuals
Save this manual to your list of manuals |
Page 9 highlights
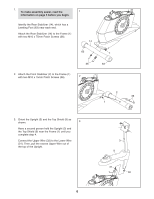
8. Attach the Water Bottle Holder (49) to the Upright (3) with two M4 x 22mm Screws (54). 8 49 3 54 9. Identify the Right Handlebar (48), which is marked with an "R" sticker, and orient it as 9 shown. Make sure that the hexagonal holes are in the indicated location. While a second person holds the Right Handlebar (48) near the Upright (3), tie the indicated wire tie to the Right Pulse Wire (64). Then, pull the other end of the wire tie upward out of the top of the Upright. Tip: Avoid pinching the wire. Slide the Right Handlebar (48) onto the Upright (3). Attach the Right Handlebar (48) with two M8 x 38mm Button Bolts (53) and two M8 Locknuts (37). Make sure that the Locknuts are in the hexagonal holes. Attach the Left Handlebar (47) in the same way. 47 66 3 Avoid pinching the wire Wire Tie 53 64 48 37 Hexagonal Holes 9
-
 1
1 -
2
-
3
-
 4
4 -
 5
5 -
 6
6 -
 7
7 -
 8
8 -
 9
9 -
 10
10 -
 11
11 -
 12
12 -
 13
13 -
 14
14 -
15
-
16
-
17
-
18
-
19
-
20
-
21
-
22
-
23
-
24
 |
 |
