ProForm Sr30 English Manual - Page 7
the Pedals. For best performance, the Pedals must - exercise cycle
 |
View all ProForm Sr30 manuals
Add to My Manuals
Save this manual to your list of manuals |
Page 7 highlights
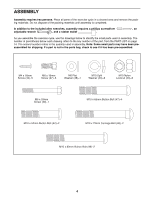
9. While another person holds the Upright (11) in the position shown, connect the console wire to the Reed Switch Wire (46). Next, connect the console cable to the Lower Cable (32) in the following way: • Refer to inset drawing A. Pull up on the metal bracket on the Lower Cable (32), and insert the tip of the console cable (CC) into the wire clip inside of the metal bracket. • Refer to inset drawing B. Firmly pull the console cable (CC) and slide it into the metal bracket on the Lower Cable (32) as shown. • Refer to inset drawing C. Using pliers, squeeze the prongs on the upper end of the metal bracket together. Insert the excess wire and cable down into the Frame (1). Slide the Upright (11) onto the Frame. Make sure that the wires and cables are not pinched. Attach the Upright to the Frame with two M10 x 66mm Button Bolts (47), two M10 Split Washers (43), and two M10 Nylon Locknuts (44). 10. Identify the Left Pedal (20), which is marked with an "L." Using an adjustable wrench, firmly tighten the Left Pedal counterclockwise into the left arm of the Crank (14). Tighten the Right Pedal (not shown) clockwise into the right arm of the Crank. Important: Tighten both Pedals as firmly as possible. After using the exercise cycle for one week, retighten the Pedals. For best performance, the Pedals must be kept tightened. Adjust the left Pedal Strap (21) to the desired position, and press the end of the Pedal Strap onto the tab on the side of the Left Pedal (20). Adjust the other Pedal Strap (not shown) in the same way. 9 47 43 Console Wire 46 11 44 Console Cable 32 1 A Metal Bracket CC 32 10 B CC 32 C Metal Bracket 21 14 20 11. Make sure that all parts of the exercise cycle are properly tightened. Note: Some hardware may be left over after assembly is completed. To protect the floor or carpet from damage, place a mat under the exercise cycle. 7
-
 1
1 -
 2
2 -
 3
3 -
 4
4 -
 5
5 -
 6
6 -
 7
7 -
 8
8 -
 9
9 -
 10
10 -
 11
11 -
 12
12 -
13
-
14
-
15
-
16
 |
 |
