Pyle PFSH2 PFSH2 Manual 1 - Page 6
TUef} - handheld digital
 |
View all Pyle PFSH2 manuals
Add to My Manuals
Save this manual to your list of manuals |
Page 6 highlights
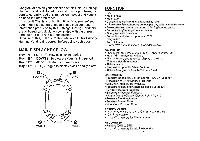
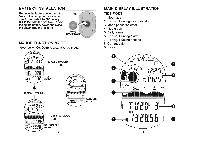
SELECT SETTING MODE Press and hold the button D (SET) for approximate 3 seconds until the CLK start to flicKer on the display. CLOCK SETTING is shown . After using the A (UP) I B (DOWN) button to switch to different SETTING mode. Press and hOlCllM o button (SET) for appcoximale 3 seconds Pr... S button (DOWN) Press B button (DOWN) \: '-~ ~J .. • \J:::IjyJ.. \. L :~~I Press A press : ;,-l.J.J.J ' 1 CLOCK t I ••lbog mod. button (UP) CITY button (UP) ..tbng mode Pres. S button (DOWN) ALARM .ettltlQ mo
-
 1
1 -
 2
2 -
 3
3 -
 4
4 -
 5
5 -
 6
6 -
 7
7 -
 8
8 -
 9
9 -
 10
10 -
 11
11 -
 12
12 -
13
-
14
-
15
-
16
 |
 |

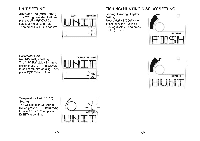
SELECT SETTING MODE
Press and hold the button D (SET) for approximate 3
seconds u
nt
il the CLK start to flicKer on the display.
CLOCK SETTING is shown. After using the A (UP)
I
B (DOWN) button to switch to different SETTING mode.
Pr
ess
and
hOlCllM
o
button (SET) for
appcox
imale
3
seco
n
ds
Pr
...
S
button
(DOWN)
Press
B
button
(DOWN)
\:
'
-~
~
J
..
•
\J
:::Ijy
J
..
\.
L
:
~
~
I
Press
A
pre
ss :
;,-l
.J.J.J
'
1
CLOCK
button (UP)
CITY
button
(U
P)
ALARM
••
lbog
mod.
..
t
bng
mode
.ettltlQ
mo<!e
t
I
Pres. S button (DOWN)
j
I
Press A burton (UP)
(Figure 2)
-9-
CLOCK SETTING
Be
su
re to correctly configure the current time and date
and your local data before using the functions
of
th
is
Fi
sh
ing Handheld.
To
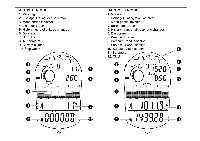
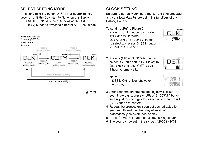
set time (Ref to Figure 2)
1. Press D (SET) button to indicate
12Hr and 24Hr format.
Use A (UP) or B (DOWN) button
to select and press D (SET) button
to confirm the setting.
2. Press A (UP) or B (DOWN) button to
select DST on or off. If DST is set to
ON, clock and local GMT
is
add
1 hour
au
tomatically.
Note:
If DST
is
ON,
[d]
icon shows on
the display.
\:
[I
:.:...
iJ
!
~
Dn
\
d
TUef}
3/
I1eB.56
3. After confinnation, the second digits will flicKer.
To
set minute digits, press A (UP) or B (DOWN) button
and
ad
just minute digits to desire value then press D
(SET) button to confinn.
4. Repeat the process
un
t
il
you get desired value for
year, month and day then day
of
week will
automatically cal
cu
late and display.
5. Press C (MODE) button to exit the setti
ng
screen.
6. The year can be set in the range of 2000 to 2039.
-10-