RCA RIR205 User Manual - Page 31
Web-based utility of Wi-Fi Enabler, Enter, admin, LAN Settings
 |
UPC - 044476052859
View all RCA RIR205 manuals
Add to My Manuals
Save this manual to your list of manuals |
Page 31 highlights
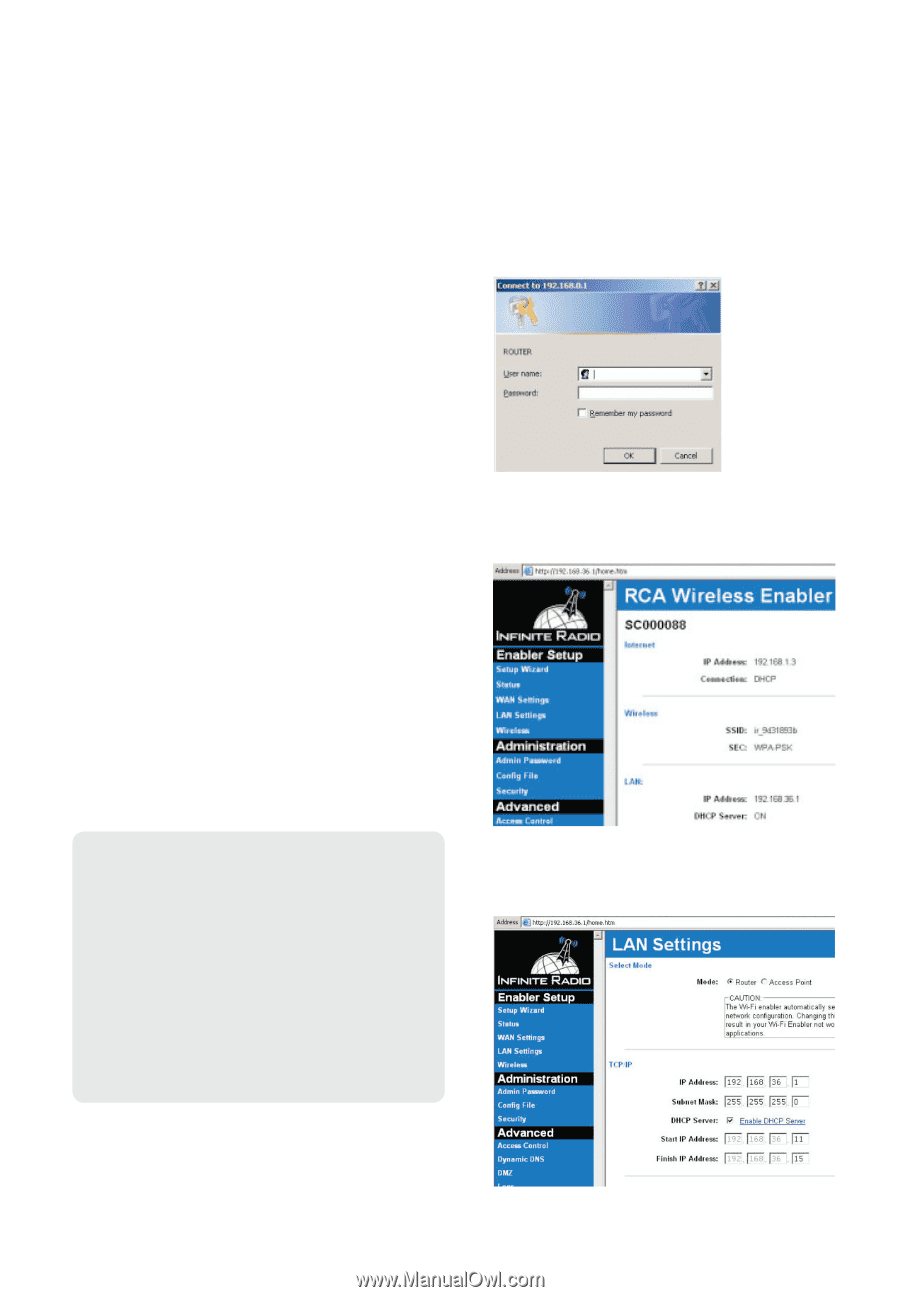
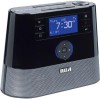
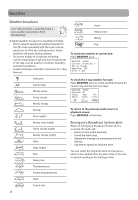
More information Web-based utility of Wi-Fi Enabler • This section is provided for advanced users that would like to verify their Enabler's configurations via the Enabler's web-based utility. • The utility can be accessed via your web browser through the use of a computer connected to LAN port of the Wi-Fi Enabler. Refer to page 9, step 4 for more information. • Major pages in the utility and the page's key functions will be described below. For a basic network setup, most users will not have to use the following screens but this utility may be useful, for troubleshooting. press Enter. The address depends on whether the Enabler is configured as a Router or as an Access Point (AP) on your system. 5. When the below screen appears, enter admin for the User Name and leave the Password field blank, and then click OK. To access the web-based utility of the Wi-Fi Enabler: 1. Connect the supplied Ethernet cable from the Wi-Fi Enabler LAN port to your computer's Ethernet port. Refer to page 9, step 4 for more informaiton. 2. For PC users running Windows XP, click on Start, Run, and type cmd in the open dialog box and press Enter. • For Mac users running OSx click on the terminal window. 6. The web-based utility's home page will be displayed. You can check the SSID and Security Type here. 3. For PC users, at the dos prompt, type ipconfig / all. This will show you the IP address for your Default gateway (Wi-Fi Enabler). • For Mac users, in the terminal window, type ipconfig getpacket en0. • A sample of the configuration is shown below: Ethernet adapter Local Area Connection: Connection-specific DNS Suffix . : Description Broadcom NetXtreme 57xx Gigabit Controller #2 Physical Address 00-12-3F-14-C2-0D Dhcp Enabled Yes Autoconfiguration Enabled . . . . : Yes IP Address 192.168.36.11 Subnet Mask 255.255.255.0 Default Gateway 192.168.36.1 DHCP Server 192.168.36.1 DNS Servers 192.168.36.1 Lease Obtained Monday, May 12, 2008 7:05:37 PM Lease Expires Thursday, May 15, 2008 7:05:37 PM C:\Documents and Settings\Administrator> 7. Click LAN Settings from the left menu to view more configurations (such as IP address, Subnet Mask, etc.). 4. Launch your Web browser and enter the Router's Default Gateway address, (in the above example: 192.168.36.1 or 192.168.0.1) in the Address field that was found above and then 31
-
 1
1 -
2
-
3
-
4
-
5
-
6
-
7
-
8
-
9
-
10
-
11
-
12
-
13
-
14
-
15
-
16
-
17
-
18
-
19
-
20
-
21
-
22
-
23
-
24
-
25
-
 26
26 -
 27
27 -
 28
28 -
 29
29 -
 30
30 -
 31
31 -
 32
32 -
 33
33 -
 34
34 -
 35
35 -
 36
36
 |
 |