RCA RTS202 RTS202 Product Manual - Page 4
Connections and Setup - specifications
 |
UPC - 062118400011
View all RCA RTS202 manuals
Add to My Manuals
Save this manual to your list of manuals |
Page 4 highlights
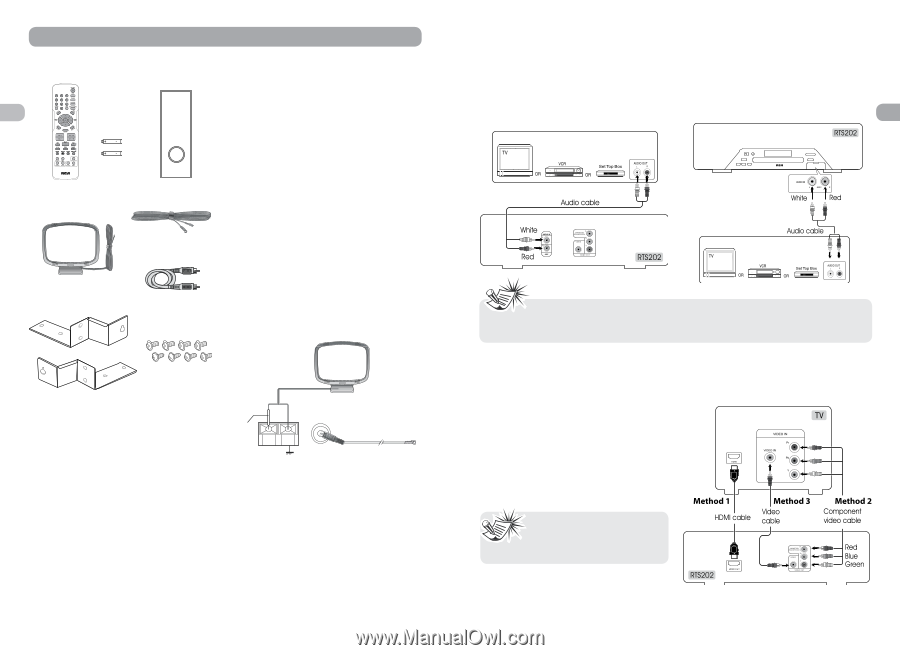
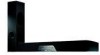
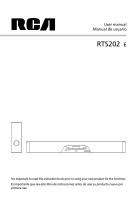
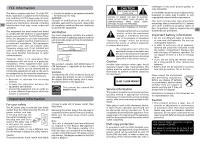
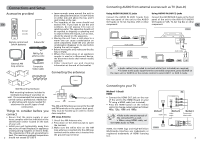
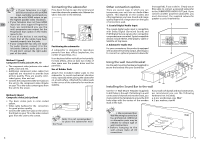
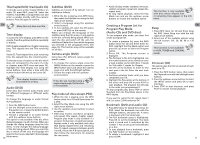
Connections and Setup Accessories provided EN Remote control and 2xAAA batteries Subwoofer External AM loop antenna FM Pig-Tail antenna wire Composite Video Cable • Leave enough space around the unit to allow adequate ventilation: 10 cm/4 inches on either side and above the top, and 5 cm/2 inches at the rear. • The humidity of the room should not exceed 75%. If you have to use the unit outdoors, do not expose it to rain or splashing water. The apparatus should not be exposed to dripping or splashing and no objects filled with liquids, such as vases, should be placed on the apparatus. • Moving the unit from a cold place to a warm one can cause condensation on some components inside the unit. Let the condensation disappear on its own before turning the unit on again. • Before moving the unit, make sure the disc tray is empty. • Where the mains plug or an appliance coupler is used as a disconnect device, the disconnect device shall remain readily operable. • Other important use and cleaning information at the end of the booklet. Connecting the antennas Antenna Wall Mounting Hardware Wall-mounting hardware included to facilitate mounting of sound bar on wall. It's recommended that mounting be carried out by a professional. Additional or alternative parts may be needed for attachment to specific types of wall construction. Things to consider before you connect • Ensure that the mains supply in your house complies with that indicated on the identification sticker located on the back of your unit. • Install your unit horizontally, away from any source of heat (fireplace) or appliances creating strong magnetic or electric fields. The components of this unit are sensitive to heat. The maximum ambient temperature 2 should not exceed 35°C/95°F. White AM LOOP GND FM ANTENNA The AM and FM antennas connect to the AM and FM terminals on the system's back panel. They must be hooked up in order to receive clear reception. AM Loop Antenna 1. Uncoil the AM Antenna wire. 2. Press down on the Antennas tab to open the terminal. 3. Make sure the white wire on the AM loop antenna is inserted into the AM loop terminal and the other wire is inserted into the ground loop terminal. Connecting AUDIO from external sources such as TV (Aux-In) Using AUDIO IN (AUX 1) jacks Connect the AUDIO IN (AUX 1) jacks from the rear panel of the unit to the AUDIO OUT jacks on TV, Set Top Box, VCR or other component. Using AUDIO IN (AUX 2) jacks Connect the AUX IN (AUX 2) jacks on the front panel of the unit to the AUX OUT (AUDIO OUT) jacks on VCR, TV, Set Top Box or other component. EN • Audio cables (color-coded in red and white) (not included) are required. • To listen to the audio input from the connected component, press SOURCE on the main unit or AUX1/2 on the remote control to select AUX 1 or AUX 2 mode. Connecting to your TV Method 1 (best) HDMI • Connect the HDMI OUT jack on the rear of the unit to the HDMI IN jack on your TV using a HDMI cable (not included). • Press the HDMI button on the remote control to change output signals as follows: 480p, 720p, 1080i and 1080p. • Refer to the owner's manual of the connected TV as well. • When using HDMI cable, set the HDMI Audio to PCM. HDMI, the HDMI logo and High-Definition Multimedia Interface are trademarks or registered trademarks of HDMI licensing LLC. 3
-
 1
1 -
 2
2 -
 3
3 -
 4
4 -
 5
5 -
 6
6 -
 7
7 -
 8
8 -
 9
9 -
 10
10 -
11
-
12
-
13
-
14
-
15
-
16
-
17
-
18
-
19
-
20
-
21
-
22
-
23
-
24
-
25
 |
 |