Ricoh Aficio SP C231SF User Guide - Page 365
Basic Operation for Sending, Scanned Files, Scanner, Address book, B&W Start, Color Start, Color
 |
View all Ricoh Aficio SP C231SF manuals
Add to My Manuals
Save this manual to your list of manuals |
Page 365 highlights
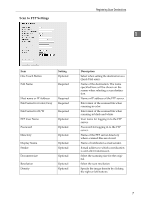
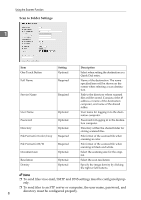
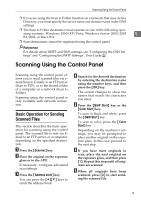
Scanning Using the Control Panel ❒ If you are using the Scan to Folder function on a network that uses Active Directory, you must specify the server name and domain name in the DNS settings. ❒ The Scan to Folder destination must operate on one of the following oper- ating systems: Windows 2000/XP/Vista, Windows Server 2003/2003 1 R2/2008, or Mac OS X. ❒ Scan destinations cannot be registered using the control panel. Reference For details about SMTP and DNS settings, see "Configuring the DNS Settings" and "Configuring the SMTP Settings", User Guide . Scanning Using the Control Panel Scanning using the control panel allows you to send scanned files via email (Scan to E-mail), to an FTP server (Scan to FTP), or to the shared folder of a computer on a network (Scan to Folder). Scanning using the control panel is only available with network connection. Basic Operation for Sending Scanned Files This section describes the basic operation for scanning using the control panel. The scanned file is sent via Email, to an FTP server, or a computer, depending on the specified destination. A Press the {Scanner} key. B Place the original on the exposure glass or in the ADF. If necessary, configure advanced scan settings. C Press the {Address book} key. You can press the {U}{T} keys to scroll the address book. D Search for the desired destination by entering the destination name using the number keys, and then press the {OK} key. The screen changes to show the names that match the characters you enter. E Press the {B&W Start} key or the {Color Start} key. To scan in black and white, press the {B&W Start} key. To scan in color, press the {Color Start} key. Depending on the machine's settings, you may be prompted to place another original on the exposure glass. In this case, proceed to the next step. F If you have more originals to scan, place the next original on the exposure glass, and then press {1}. Repeat this step until all originals are scanned. G When all originals have been scanned, press {2} to start sending the scanned file. 9
-
 1
1 -
2
-
3
-
4
-
5
-
6
-
7
-
8
-
9
-
10
-
11
-
12
-
13
-
14
-
15
-
16
-
17
-
18
-
19
-
20
-
21
-
22
-
23
-
24
-
25
-
26
-
27
-
28
-
29
-
30
-
31
-
32
-
33
-
34
-
35
-
36
-
37
-
38
-
39
-
40
-
41
-
42
-
43
-
44
-
45
-
46
-
47
-
48
-
49
-
50
-
51
-
52
-
53
-
54
-
55
-
56
-
57
-
58
-
59
-
60
-
61
-
62
-
63
-
64
-
65
-
66
-
67
-
68
-
69
-
70
-
71
-
72
-
73
-
74
-
75
-
76
-
77
-
78
-
79
-
80
-
81
-
82
-
83
-
84
-
85
-
86
-
87
-
88
-
89
-
90
-
91
-
92
-
93
-
94
-
95
-
96
-
97
-
98
-
99
-
100
-
101
-
102
-
103
-
104
-
105
-
106
-
107
-
108
-
109
-
110
-
111
-
112
-
113
-
114
-
115
-
116
-
117
-
118
-
119
-
120
-
121
-
122
-
123
-
124
-
125
-
126
-
127
-
128
-
129
-
130
-
131
-
132
-
133
-
134
-
135
-
136
-
137
-
138
-
139
-
140
-
141
-
142
-
143
-
144
-
145
-
146
-
147
-
148
-
149
-
150
-
151
-
152
-
153
-
154
-
155
-
156
-
157
-
158
-
159
-
160
-
161
-
162
-
163
-
164
-
165
-
166
-
167
-
168
-
169
-
170
-
171
-
172
-
173
-
174
-
175
-
176
-
177
-
178
-
179
-
180
-
181
-
182
-
183
-
184
-
185
-
186
-
187
-
188
-
189
-
190
-
191
-
192
-
193
-
194
-
195
-
196
-
197
-
198
-
199
-
200
-
201
-
202
-
203
-
204
-
205
-
206
-
207
-
208
-
209
-
210
-
211
-
212
-
213
-
214
-
215
-
216
-
217
-
218
-
219
-
220
-
221
-
222
-
223
-
224
-
225
-
226
-
227
-
228
-
229
-
230
-
231
-
232
-
233
-
234
-
235
-
236
-
237
-
238
-
239
-
240
-
241
-
242
-
243
-
244
-
245
-
246
-
247
-
248
-
249
-
250
-
251
-
252
-
253
-
254
-
255
-
256
-
257
-
258
-
259
-
260
-
261
-
262
-
263
-
264
-
265
-
266
-
267
-
268
-
269
-
270
-
271
-
272
-
273
-
274
-
275
-
276
-
277
-
278
-
279
-
280
-
281
-
282
-
283
-
284
-
285
-
286
-
287
-
288
-
289
-
290
-
291
-
292
-
293
-
294
-
295
-
296
-
297
-
298
-
299
-
300
-
301
-
302
-
303
-
304
-
305
-
306
-
307
-
308
-
309
-
310
-
311
-
312
-
313
-
314
-
315
-
316
-
317
-
318
-
319
-
320
-
321
-
322
-
323
-
324
-
325
-
326
-
327
-
328
-
329
-
330
-
331
-
332
-
333
-
334
-
335
-
336
-
337
-
338
-
339
-
340
-
341
-
342
-
343
-
344
-
345
-
346
-
347
-
348
-
349
-
350
-
351
-
352
-
353
-
354
-
355
-
356
-
357
-
358
-
359
-
 360
360 -
 361
361 -
 362
362 -
 363
363 -
 364
364 -
 365
365 -
 366
366 -
 367
367 -
 368
368 -
 369
369 -
 370
370 -
371
-
372
-
373
-
374
-
375
-
376
-
377
-
378
-
379
-
380
-
381
-
382
-
383
-
384
-
385
-
386
-
387
-
388
-
389
-
390
-
391
-
392
-
393
-
394
-
395
-
396
-
397
-
398
-
399
-
400
-
401
-
402
-
403
-
404
-
405
-
406
-
407
-
408
-
409
-
410
-
411
-
412
-
413
-
414
-
415
-
416
 |
 |