Ricoh MP C5503 Manuals - Page 3
Simple Screen, Communicating indicator, Fax Received
 |
View all Ricoh MP C5503 manuals
Add to My Manuals
Save this manual to your list of manuals |
Page 3 highlights
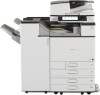
1111[Simple Screen] key Press to switch to the simple screen. See "Switching Screen Patterns", Getting Started . 1111[ # ] key (Enter key) Press to confirm values entered or items specified. 1111[Start] key Press to start copying, printing, scanning, or sending. 1111[Sample Copy] key Press to make a single set of copies or prints to check print quality before making multiple sets. See "Sample Copy", Copy/ Document Server . 1111[Stop] key Press to stop a job in progress, such as copying, scanning, faxing, or printing. 1111[Clear] key Press to delete a number entered. 1111Number keys Use to enter the numbers for copies, fax numbers and data for the selected function. 1111[Check Status] key Press to check the machine's system status, operational status of each function, and current jobs. You can also display the job history and the machine's maintenance information. 1111Data In indicator (facsimile and printer mode) Flashes when the machine is receiving print jobs or LAN-Fax documents from a computer. See Fax and Print . 2222Communicating indicator, Fax Received indicator, Confidential File indicator ••Communicating indicator Lights continuously during data transmission and reception. ••Fax Received indicator Lights continuously while data other than personal box or Memory Lock file is being received and stored in the fax memory. See "Substitute Reception", Fax . ••Confidential File indicator Lights continuously while personal box data is being received. Blinks while Memory Lock file is being received. See "Personal Boxes" and "Printing a File Received with Memory Lock", Fax . 2222Media access lamp Lights up when a removable memory device is inserted in the media slot. 2222Media slots Use to insert an SD card or a USB flash memory device. Simple Screen When you press the {Simple Screen} key, the screen changes to the simplified display. Letters and keys are displayed at a larger size, making operations easier. Certain keys do not appear on the simplified display.
-
 1
1 -
 2
2 -
 3
3 -
 4
4 -
 5
5 -
 6
6 -
 7
7 -
 8
8 -
 9
9 -
10
-
11
-
12
-
13
-
14
-
15
-
16
-
17
-
18
-
19
-
20
-
21
-
22
-
23
-
24
-
25
-
26
-
27
-
28
-
29
-
30
-
31
-
32
-
33
-
34
-
35
-
36
-
37
-
38
-
39
-
40
-
41
-
42
-
43
-
44
-
45
-
46
-
47
-
48
-
49
-
50
-
51
-
52
-
53
-
54
-
55
-
56
-
57
-
58
-
59
-
60
-
61
-
62
-
63
-
64
-
65
-
66
-
67
-
68
-
69
-
70
-
71
-
72
-
73
-
74
-
75
-
76
-
77
-
78
-
79
-
80
-
81
-
82
-
83
-
84
-
85
-
86
-
87
-
88
-
89
-
90
-
91
-
92
-
93
-
94
-
95
-
96
-
97
-
98
-
99
-
100
-
101
-
102
-
103
-
104
-
105
-
106
-
107
-
108
-
109
-
110
-
111
-
112
-
113
-
114
-
115
-
116
-
117
-
118
-
119
-
120
-
121
-
122
-
123
-
124
-
125
-
126
-
127
-
128
-
129
-
130
-
131
-
132
-
133
-
134
-
135
-
136
-
137
-
138
-
139
-
140
-
141
-
142
-
143
-
144
-
145
-
146
-
147
-
148
-
149
-
150
-
151
-
152
-
153
-
154
-
155
-
156
-
157
-
158
-
159
-
160
-
161
-
162
-
163
-
164
-
165
-
166
-
167
-
168
-
169
-
170
-
171
-
172
-
173
-
174
-
175
-
176
-
177
-
178
-
179
-
180
-
181
-
182
-
183
-
184
-
185
-
186
-
187
-
188
-
189
-
190
-
191
-
192
-
193
-
194
-
195
-
196
-
197
-
198
-
199
-
200
-
201
-
202
-
203
-
204
-
205
-
206
-
207
-
208
-
209
-
210
-
211
-
212
-
213
-
214
-
215
-
216
-
217
-
218
-
219
-
220
-
221
-
222
-
223
-
224
-
225
-
226
-
227
-
228
-
229
-
230
-
231
-
232
-
233
-
234
-
235
-
236
-
237
-
238
-
239
-
240
 |
 |
