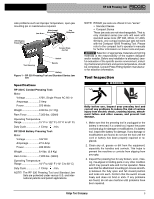
Ridgid RP 330-C Owners Manual - Page 10
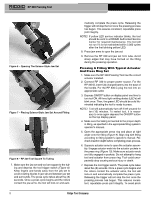
Pressing A Fitting With Typical Actuator, And Press Ring Set
 |
View all Ridgid RP 330-C manuals
Add to My Manuals
Save this manual to your list of manuals |
Page 10 highlights
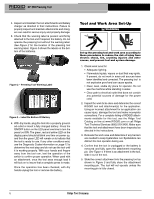
RP 330 Pressing Tool Figure 6 - Opening The Scissor-Style Jaw Set Figure 7 - Placing Scissor-Style Jaw Set Around Fitting Figure 8 - RP 330 Tool Square To Tubing 7. Make sure the jaw set and tool are square to the tub- ing and depress the tool trigger switch (Figure 8). Keep fingers and hands away from the jaw set to avoid crushing injuries in jaw set and between jaw set and surrounds. The press cycle takes about five (5) seconds. Once a press cycle begins and the rollers contact the jaw arms, the tool will lock-on and auto- matically complete the press cycle. Releasing the trigger will not stop the tool once the pressing process has begun. This assures consistent, repeatable press joint integrity. NOTE! If yellow LED service indicator blinks, the tool should be sent to a RIDGID Authorized Service Center for required maintenance. The tool will not run if it is not maintained within 2,000 cycles after the first blinking yellow LED. 8. Press jaw arms to open the jaw set. 9. Remove the RP 330 and jaw set from tube. Avoid sharp edges that may have formed on the fitting during the pressing operation. Pressing A Fitting With Typical Actuator And Press Ring Set 1. Make sure the RP 330 Pressing Tool has the correct actuator installed. 2. Connect RP 330 to proper power source. For the RP 330-B, insert fully charged battery into the base of the handle. For the RP 330-C plug the tool into an appropriate outlet. 3. Depress ON/OFF button on display panel one time to turn tool ON. All three light emitting diodes (LED's) will blink once. Then, the green LED should be solid illuminated indicating the tool is ready to press. NOTE! Tool will automatically turn off if left unused for ten (10) minutes. To restart tool, it is necessary to once again depress the ON/OFF button on the top display panel. 4. Make sure the tubing is inserted to the proper depth in fitting, as specified in the appropriate fitting system's operator's manual. 5. Open the appropriate press ring and place at right angle onto the fitting (Figure 9). Align ring with fitting according to fitting system's operator's manual. Recheck insertion depth before completing press process. 6. Squeeze actuator arms to open the actuator assembly. Engage actuator ends into the actuator pockets in the press ring (Figure 10). Make sure actuator ends are fully engaged in pockets. Do not attempt to hang tool and actuator from press ring. Tool could unexpectedly drop causing serious injury or death. 7. Depress the tool trigger switch. The press cycle takes about five (5) seconds. Once a press cycle begins and the rollers contact the actuator arms, the tool will lock-on and automatically complete the press cycle. Releasing the trigger will not stop the tool once the pressing process has begun. This assures consistent, repeatable press joint integrity. To avoid pinch 8 Ridge Tool Company
-
 1
1 -
2
-
3
-
4
-
 5
5 -
 6
6 -
 7
7 -
 8
8 -
 9
9 -
 10
10 -
 11
11 -
 12
12 -
 13
13 -
 14
14 -
 15
15 -
16
-
17
-
18
-
19
-
20
-
21
-
22
-
23
-
24
-
25
-
26
-
27
-
28
-
29
-
30
-
31
-
32
-
33
-
34
-
35
-
36
-
37
-
38
-
39
-
40
-
41
-
42
-
43
 |
 |
