Ridgid RP 330-C Owners Manual - Page 9
Operating Instructions - press tool battery
 |
View all Ridgid RP 330-C manuals
Add to My Manuals
Save this manual to your list of manuals |
Page 9 highlights
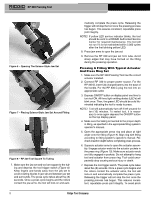
RP 330 Pressing Tool Figure 4 - Fully Open Attachment Mounting Pin Figure 5 - Slide Attachment Into Tool 6. If using a battery tool, with dry hands insert the battery into the tool. If using a corded tool, run the cord along the previously identified clear path, and with dry hands plug the pressing tool in. Keep all connections dry and off the ground. If the power cord is not long enough, use an extension cord that: • Is in good condition • Is appropriately rated for the use (example - rated for outdoor use) • Has sufficient wire size (16 AWG for 50' or less, 14 AWG for 50' to 100'). Undersized wires can overheat, melting the insulation or causing fire or other damage. Operating Instructions WARNING Always wear eye protection to protect your eyes against dirt and other foreign objects. Keep your fingers and hands away from the tool attachment during the press cycle. Your fingers or hands can be crushed fractured or amputated in the attachment or tool or between the attachment, work piece and other objects. Follow operating instructions to reduce the risk of injury from crushing and other causes and to prevent tool damage. NOTICE These instructions are generalized practices for several types of press tool attachments. Always follow the specific instructions for the pressing tool attachment being used and the fitting manufacturers specific installation instructions. Failure to follow the specific attachment and fitting installation instructions may result in improper press connections that can lead to extensive property damage. Preparing the Connection 1. Make sure that the work area is free of bystanders and other distractions and that the tool and work area has been properly set up. 2. Prepare the connection according to the fitting manufacturers instructions. Pressing A Fitting With Typical Scissor Jaw Set 1. Make sure the RP 330 Pressing Tool has the correct jaw set installed. 2. Connect RP 330 to proper power source. For the RP 330-B, insert fully charged battery into the base of the handle. For the RP 330-C plug the tool into an appropriate outlet. 3. Depress ON/OFF button on display panel one time to turn tool ON. All three light emitting diodes (LED's) will blink once. Then, the green LED should be solidly illuminated indicating the tool is ready to press. NOTE! Tool will automatically turn off if left unused for ten (10) minutes. To restart tool, it is necessary to once again depress the ON/OFF button on the top display panel. 4. Squeeze jaw arms to open the jaw set (Figure 6). 5. Place open jaws around the fitting (Figure 7). Make sure the contour of the jaw set is properly aligned with the contour of the fitting as specified in Fitting Systems operator's manual. Do not attempt to hang the jaw set and tool from fitting. Tool could unexpectedly drop and cause serious injury or death. 6. Make sure the tubing is inserted to the proper depth in fitting, as specified in the appropriate fitting system's operator's manual. Ridge Tool Company 7
-
 1
1 -
2
-
3
-
 4
4 -
 5
5 -
 6
6 -
 7
7 -
 8
8 -
 9
9 -
 10
10 -
 11
11 -
 12
12 -
 13
13 -
 14
14 -
15
-
16
-
17
-
18
-
19
-
20
-
21
-
22
-
23
-
24
-
25
-
26
-
27
-
28
-
29
-
30
-
31
-
32
-
33
-
34
-
35
-
36
-
37
-
38
-
39
-
40
-
41
-
42
-
43
 |
 |
