Ridgid RP 330-C Owners Manual - Page 8
Tool and Work Area Set-Up - press tools
 |
View all Ridgid RP 330-C manuals
Add to My Manuals
Save this manual to your list of manuals |
Page 8 highlights
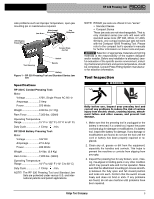
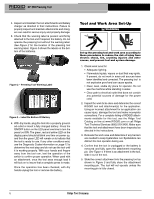
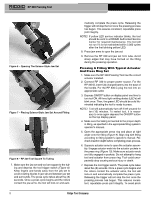
RP 330 Pressing Tool 4. Inspect and maintain the tool attachments and battery charger as directed in their instructions. Failure to properly inspect and maintain attachments and chargers can result in serious injury and property damage. 5. Check that the warning label is present and firmly attached to the tool and if required, the battery. Do not operate the pressing tool without the warning label. See Figure 2 for the location of the pressing tool warning label. Figure 3 shows the labels on the bottom of the batteries. Figure 2 - Pressing Tool Warning Label Figure 3 - Label On Bottom Of Battery 6. With dry hands, plug the tool into a properly grounded outlet or insert a fully charged battery. Press the ON/OFF button on the LED panel one time to turn the press tool ON. The green, red and yellow LED on the display panel should all blink one time on power up, and then the green LED will remain on to indicate that the tool is ready for use. If any other conditions exist, use the Diagnostic Codes information on page 12 to determine the next step and do not use the tool until it is working properly. With your hands and fingers away from the tool ram, test the operation of the switch to confirm proper operation. When used with an attachment, once the tool sees enough load it will lock on to insure that a complete press is made. Once the operation has been checked, with dry hands unplug the tool or remove the battery. Tool and Work Area Set-Up WARNING Set up the pressing tool and work area according to these procedures to reduce the risk of injury from electric shock, fire, crushing injuries and other causes, and prevent tool and system damage. 1. Check work area for: • Adequate lighting. • Flammable liquids, vapors or dust that may ignite. If present, do not work in area until sources have been identified and corrected. The pressing tool is not explosion proof and can cause sparks. • Clear, level, stable dry place for operator. Do not use the machine while standing in water. • Clear path to electrical outlet that does not contain any potential sources of damage for the power cord. 2. Inspect the work to be done and determine the correct RIDGID tool and attachment(s) for the application. Using an incorrect attachment for an application can cause injury, damage the tool and make incomplete connections. For a complete listing of RIDGID attachments available for this tool, see the Ridge Tool Catalog on line at www.RIDGID.com or call Ridge Tool Technical Services (800) 519-3456. Make sure that the tool and attachment have been inspected as directed in the instructions. 3. Evaluate the work area and determine if any barriers are needed to keep bystanders out. Bystanders can distract the tool operator during use. 4. Confirm that the tool is unplugged or the battery is removed and fully open the attachment mounting pin. See Figure 4. If there is an attachment in the tool, slide it out of the tool. 5. Slide the correct attachment into the pressing tool as shown in Figure 5 and fully close the attachment mounting pin. The tool will not operate unless the mounting pin is fully closed. 6 Ridge Tool Company
-
 1
1 -
2
-
 3
3 -
 4
4 -
 5
5 -
 6
6 -
 7
7 -
 8
8 -
 9
9 -
 10
10 -
 11
11 -
 12
12 -
 13
13 -
14
-
15
-
16
-
17
-
18
-
19
-
20
-
21
-
22
-
23
-
24
-
25
-
26
-
27
-
28
-
29
-
30
-
31
-
32
-
33
-
34
-
35
-
36
-
37
-
38
-
39
-
40
-
41
-
42
-
43
 |
 |
