Roku N1100 Getting Started Guide - Page 7
What To - player
 |
UPC - 829610847023
View all Roku N1100 manuals
Add to My Manuals
Save this manual to your list of manuals |
Page 7 highlights
What To Do step 1 Ready for the step-by-step? We've only got four... CONNECT YOUR PLAYER Connect your Roku player to your TV in one of two ways: HIGH DEFINITION: If you have an HDTV and want the best picture quality, use an HDMI cable (not included) to make the connection depicted in the diagram below: • Connect one end to the HDMI port on the back of your Roku player. • Connect the other end to an open HDMI port on your TV. Did you know? Because HDMI outputs digital video and audio, you don't need a separate audio cable. HDMI also supports 5.1 surround sound (where available). GOT A RECEIVER? You can also use HDMI to route video and audio directly through your receiver if it supports HDMI video pass-through.
-
 1
1 -
 2
2 -
 3
3 -
 4
4 -
 5
5 -
 6
6 -
 7
7 -
 8
8 -
 9
9 -
 10
10 -
 11
11 -
 12
12 -
13
-
14
-
15
-
16
-
17
-
18
-
19
-
20
-
21
-
22
-
23
-
24
-
25
-
26
-
27
-
28
-
29
-
30
-
31
-
32
-
33
-
34
-
35
-
36
-
37
-
38
 |
 |

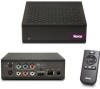
WHAT TO DO
STEP 1
Ready for the step-by-step? We’ve only got four…
CONNECT YOUR PLAYER
Connect your Roku player to your TV in one of two ways:
HIGH DEFINITION:
If you have an HDTV and want the best picture quality, use an
HDMI cable (not included) to make the connection depicted in the diagram below:
DID YOU KNOW?
Because HDMI outputs digital video and audio, you don’t
need a separate audio cable. HDMI also supports 5.1 surround sound (where
available).
GOT A RECEIVER?
You can also use HDMI to route video and
audio directly through your receiver if it supports HDMI video pass-through.
•
Connect one end to the HDMI port on the back of your Roku player.
•
Connect the other end to an open HDMI port on your TV.