Roku N1100 Getting Started Guide - Page 9
Step 2 - won t turn on
 |
UPC - 829610847023
View all Roku N1100 manuals
Add to My Manuals
Save this manual to your list of manuals |
Page 9 highlights
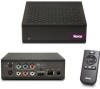
What To Do Step 2 POWER UP KEY COMPONENTS In this step, we'll make sure all systems are GO! First, power your Roku remote by inserting the included batteries: • Turn the remote control over and locate the rectangular battery door on the rear of the unit. • Press the latch at the top of the battery door down while simultaneously removing the battery door. • Insert the batteries into their slots, making sure to match the positive (+) and negative (-) signs. • Place the battery door back over the compartment and press it gently down until the latch snaps securely into place.
-
 1
1 -
2
-
3
-
 4
4 -
 5
5 -
 6
6 -
 7
7 -
 8
8 -
 9
9 -
 10
10 -
 11
11 -
 12
12 -
 13
13 -
 14
14 -
15
-
16
-
17
-
18
-
19
-
20
-
21
-
22
-
23
-
24
-
25
-
26
-
27
-
28
-
29
-
30
-
31
-
32
-
33
-
34
-
35
-
36
-
37
-
38
 |
 |

WHAT TO DO
STEP 2
POWER UP KEY COMPONENTS
In this step, we’ll make sure all systems are GO!
First, power your Roku remote by inserting the included batteries:
•
Turn the remote control over and locate the rectangular battery door on the
rear of the unit.
•
Press the latch at the top of the battery door down while simultaneously
removing the battery door.
•
Insert the batteries into their slots, making sure to match the positive (+) and
negative (-) signs.
•
Place the battery door back over the compartment and press it gently down
until the latch snaps securely into place.