Ryobi A18MS01G Operation Manual - Page 10
Maintenance
 |
View all Ryobi A18MS01G manuals
Add to My Manuals
Save this manual to your list of manuals |
Page 10 highlights
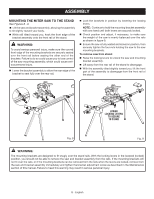
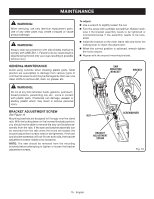
MAINTENANCE WARNING: When servicing, use only identical replacement parts. Use of any other parts may create a hazard or cause product damage. WARNING: Always wear eye protection with side shields marked to comply with ANSI Z87.1. Failure to do so could result in objects being thrown into your eyes resulting in possible serious injury. To adjust: n Use a wrench to slightly loosen the nut. n Turn the screw with a phillips screwdriver. Rotate clockwise if the bracket assembly needs to be tightened or counterclockwise if the assembly needs to be loosened. n Install the bracket on the miter stand rails and lower the locking lever to check the adjustment. n When the correct position is achieved, wrench tighten the nut to secure. n Repeat with the second mounting bracket. GENERAL MAINTENANCE Avoid using solvents when cleaning plastic parts. Most plastics are susceptible to damage from various types of commercial solvents and may be damaged by their use. Use clean cloths to remove dirt, dust, oil, grease, etc. SAW MOUNTING BRACKET WRENCH WARNING: Do not at any time let brake fluids, gasoline, petroleumbased products, penetrating oils, etc., come in contact with plastic parts. Chemicals can damage, weaken or destroy plastic which may result in serious personal injury. BRACKET ADJUSTMENT SCREW See Figure 12. Mounting brackets are designed to fit snugly over the stand rails. With the locking levers in the lowered (locked) position, you should not be able to remove the saw and bracket assembly from the rails. If the saw and bracket assembly can be removed from the rails when the levers are locked, the bracket adjustment screws need to be tightened. If the saw and bracket assembly will not fit over both rails, the bracket adjustment screws needs to be loosened. NOTE: The saw should be removed from the mounting brackets before attempting to tighten or loosen the bracket adjustment screws. NUT BRACKET ADJUSTMENT SCREW SCREWDRIVER Fig. 12 10 - English
-
 1
1 -
2
-
3
-
4
-
 5
5 -
 6
6 -
 7
7 -
 8
8 -
 9
9 -
 10
10 -
 11
11 -
 12
12 -
 13
13 -
 14
14 -
 15
15 -
16
-
17
-
18
-
19
-
20
-
21
-
22
-
23
-
24
-
25
-
26
-
27
-
28
-
29
-
30
-
31
-
32
 |
 |
