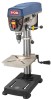
Ryobi DP102L English Manual - Page 13
Assembly - accessories
 |
View all Ryobi DP102L manuals
Add to My Manuals
Save this manual to your list of manuals |
Page 13 highlights
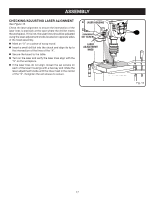
ASSEMBLY UNPACKING This product requires assembly. Carefully remove the tool and any accessories from the box. Place it on a level work surface. Note: This tool is heavy. To avoid back injury, lift with your legs, not your back, and get help when needed. Inspect the tool carefully to make sure no breakage or damage occurred during shipping. Do not discard the packing material until you have carefully inspected the tool, identified all loose parts, and satisfactorily operated the tool. If any parts are damaged or missing, please call 1-800-525-2579 for assistance. WARNING: If any parts are damaged or missing do not operate this tool until the missing parts are replaced. Failure to heed this warning could result in possible serious personal injury. attaching column assembly to base See Figure 5. Place the base on a flat surface. Align screw holes in the column assembly with screw holes in the base. Place a hex bolt in each hole and tighten using an adjust- able wrench. column assembly hex bolt WARNING: Do not attempt to modify this tool or create accessories not recommended for use with this tool. Any such alteration or modification is misuse and could result in a hazardous condition leading to possible serious personal injury. WARNING: Do not connect to power supply until assembly is complete. Failure to comply could result in accidental starting and possible serious personal injury. base Fig. 5 13
-
 1
1 -
2
-
3
-
4
-
5
-
6
-
7
-
 8
8 -
 9
9 -
 10
10 -
 11
11 -
 12
12 -
 13
13 -
 14
14 -
 15
15 -
 16
16 -
 17
17 -
 18
18 -
19
-
20
-
21
-
22
-
23
-
24
-
25
-
26
 |
 |
