Ryobi DP102L English Manual - Page 20
Drilling, Drilling Tips - vise
 |
View all Ryobi DP102L manuals
Add to My Manuals
Save this manual to your list of manuals |
Page 20 highlights
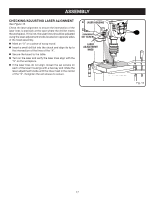
Operation drilling See Figure 20. Using a clamping device, secure the workpiece to the worktable. To protect the top surface of the workpiece, use a piece of scrap wood between the vise and the workpiece. Select the proper drill bit based on the hole size desired. For large holes, drill a pilot hole first, using a smaller diameter bit. Select and set the recommended spindle speed. Refer to Changing Speeds in the Adjustments section of this manual. Set table assembly to desired height. Refer to Adjusting Table Height in the Adjustments section of this manual. If desired, set feed shaft at desired spindle depth. Refer to Adjusting Depth Gauge in the Adjustments section of this manual. Make sure the work table is free of all loose objects and the bit is not in contact with the workpiece. Plug electrical cord into power supply and turn switch ON. Make sure spindle rotates freely. Slowly lower drill bit into workpiece. Do not force the bit; let the drill press do the work. Once the hole is completed, allow the spindle to return to its normal position. This will automatically raise the chuck and bit. DRILLING TIPS If a large hole is needed, it's a good idea to drill a smaller pilot hole before drilling the final one. Your hole will be more accurately positioned, rounder, and the bits will last longer. If the hole is deeper than it is wide, back off occasionally to clear the chips. When drilling metal, lubricate the bit with oil to improve drilling action and increase bit life. As you increase the drill size, you may need to reduce the spindle speed. If drilling a through hole, make sure that the bit will not drill into the table after moving through the workpiece. clamp Fig. 20 20
-
 1
1 -
2
-
3
-
4
-
5
-
6
-
7
-
8
-
9
-
10
-
11
-
12
-
13
-
14
-
 15
15 -
 16
16 -
 17
17 -
 18
18 -
 19
19 -
 20
20 -
 21
21 -
 22
22 -
 23
23 -
 24
24 -
 25
25 -
26
 |
 |
