Ryobi P4002 Operation Manual
Ryobi P4002 Manual
 |
View all Ryobi P4002 manuals
Add to My Manuals
Save this manual to your list of manuals |
Ryobi P4002 manual content summary:
- Ryobi P4002 | Operation Manual - Page 1
Tip, External Power Supply and Operator's Manual TABLE OF CONTENTS General Power Tool Safety Warnings 2-3 Drain Auger Safety Warnings 4 Electrical 5 Symbols 6-7 Features 8 Assembly 8 Operation 8-12 Maintenance 12 Illustrations 13-14 Parts Ordering and Service - Ryobi P4002 | Operation Manual - Page 2
instructions. Failure to follow the warnings and instructions may result in electric shock, fire, and/or serious injury. Save all warnings and instructions or a key left attached to a rotating part of the power tool may result in personal support. Stable footing on a solid surface enables better - Ryobi P4002 | Operation Manual - Page 3
temperature range specified in the instructions. Charging improperly or at temperatures outside the specified range may damage the battery and increase the risk of fire. SERVICE Have your power tool serviced by a qualified repair person using only identical replacement parts. This will ensure that - Ryobi P4002 | Operation Manual - Page 4
the the drain auger within four inches of the drain or inlet being cleared. Operating the tool at greater distances can result in the cable twisting or risk of serious personal injury. Save these instructions. Refer to them frequently and use them to instruct others who may use this tool. If you - Ryobi P4002 | Operation Manual - Page 5
circuit(s) or outlet(s) to be used for the auger. Outlets are available having built-in GFCI protection extension cords before each use. If damaged replace immediately. Never use a product with a product to the outlet. The "drip loop" is that part of the cord below the level of the outlet, or - Ryobi P4002 | Operation Manual - Page 6
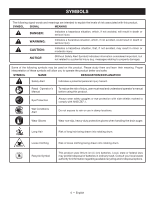
hazard. Read Operator's Manual To reduce the risk of injury, user must read and understand operator's manual before using this product . Wear Gloves Wear non-slip, heavy-duty protective gloves when handling the drain auger. Long Hair Risk of long hair being drawn into rotating drum. Loose - Ryobi P4002 | Operation Manual - Page 7
SYMBOLS Some of the following symbols may be used on this product. Please study them and learn their meaning. Proper interpretation of these symbols will allow you to operate the product better and safer. SYMBOL NAME DESIGNATION/EXPLANATION V Volts Voltage A Amperes Current Hz Hertz - Ryobi P4002 | Operation Manual - Page 8
in place and that battery pack is secured in the product before beginning operation. Depress the latches to remove the battery pack. For complete charging instructions, see the operator's manuals for your battery pack and charger. 8 - English - Ryobi P4002 | Operation Manual - Page 9
trigger and allow the cable to come to a complete stop. FEED DIRECTION SELECTOR COLLAR See Figures 5 and 6, page 14. The drain auger has three operating modes: power cord, and when manually advancing or retracting the cable. Failure to follow these instructions could result in serious personal injury. - Ryobi P4002 | Operation Manual - Page 10
on Cable N Pushed In Do Not Use ADVANCING/RETRACTING THE CABLE See Figures 4 - 6, page 14. To manually advance and retract the cable: instructions can result in damage to the tool. REMOVING/INSTALLING AUGER TIPS See Figure 7, page 14. Your drain auger is shipped with a standard bulb tip. This tip - Ryobi P4002 | Operation Manual - Page 11
cover to gain access to the drain pipe. Install the appropriate auger tip. Connect the product to an AC or DC power supply. Hold the drain auger within four inches of the drain or overflow and manually feed the cable into the drain pipe. NOTE: Advance the cable slowly at first. Advancing it - Ryobi P4002 | Operation Manual - Page 12
AUGER TIP After extended use, the auger tip may wear and need replacing. Refer to Removing/Installing Auger Tips earlier in this manual. REPLACING THE DRUM See Figures 11 - 12, page 14. If the cable becomes damaged or broken, replace the drum before attempting to operate the drain auger. To replace - Ryobi P4002 | Operation Manual - Page 13
NOTES - Ryobi P4002 | Operation Manual - Page 14
incendie et (ou) des blessures graves. Conserver les avertissements et les instructions à des fins de référence ultérieure. Le terme « outil motoris d'aération. Ne pas utiliser l'outil sur une échelle ou un support instable. Une bonne tenue et un bon équilibre permettent de mieux contrôler l'outil - Ryobi P4002 | Operation Manual - Page 15
à 130 °C (265 °F) représente un risque d'explosion. Suivre toutes les instructions afférentes à la recharge et ne pas recharger le bloc-piles ou l'outil hors des tempé és. Seuls le fabricant et les fournisseurs de service autorisés doivent effectuer la réparation ou l'entretien des blocspiles. 3 - - Ryobi P4002 | Operation Manual - Page 16
moins 10 minutes, puis contacter immédiatement un médecin. Le respect de cette règle réduira les risques de blessures graves. Conserver ces instructions. Les consulter fréquemment et les utiliser pour instruire les autres utilisateurs éventuels. Si cet outil est prêté, il doit être accompagné de - Ryobi P4002 | Operation Manual - Page 17
l'outil. Lors de l'utilisation d'un outil électrique à grande distance d'une prise secteur, veiller à utiliser un cordon prolongateur d'une capacité suffisante pour supporter l'appel de courant de l'outil. Un cordon de capacité insuffisante causerait une baisse de la tension de ligne, entraînant une - Ryobi P4002 | Operation Manual - Page 18
SYMBOLES Les termes de mise en garde suivants et leur signification ont pour but d'expliquer le degré de risques associé à l'utilisation de ce produit. SYMBOLE SIGNAL SIGNIFICATION DANGER : Indique une situation dangereuse qui, si elle n'est pas évitée, aura pour conséquences des blessures - Ryobi P4002 | Operation Manual - Page 19
SYMBOLES Certains des symboles ci-dessous peuvent être utilisés sur produit. Veiller à les étudier et à apprendre leur signification. Une interprétation correcte de ces symboles permettra d'utiliser produit plus efficacement et de réduire les risques. SYMBOLE NOM DÉSIGNATION / EXPLICATION V - Ryobi P4002 | Operation Manual - Page 20
applications ci-dessous : Déblocage des éviers et baignoires AVIS : Ce produit a été conçu pour être alimenté par un blocpiles de 18 V One+™ de RYOBI™ (mode CC) ou une source d'alimentation électrique (mode CA). L'une des sources d'alimentation peut être utilisée soit par un bloc-piles approuvé ou - Ryobi P4002 | Operation Manual - Page 21
, lorsqu'on branche ou qu'on débranche le cordon d'alimentation, et lorsqu'on sort ou rétracte le câble manuellement. Ne pas respecter ces instructions de sécurité peut entraîner des blessures graves. GÂCHETTE À VARIATION DE VITESSE Voir la figure 4, page 14. La gâchette avec variation de vitesse - Ryobi P4002 | Operation Manual - Page 22
ou arrière pendant de longues périodes de temps. Ne pas respecter ces instructions risque d'endommager l'outil. RETRAIT ET INSTALLATION DES BOUTS DE FURET Voir la utilisés pour dégager diverses obstructions. Consulter le Guide de sélection de bout de furet pour savoir quel embout choisir. 10 - Fran - Ryobi P4002 | Operation Manual - Page 23
. Retirer le bout de furet en le glissant de l'encoche en T dans le collier. GUIDE DE SÉLECTION DE BOUT DE FURET Embout tulipe Aide à déloger les obstructions et les résidus; utiliser pour un nettoyage général des drains de jusqu'à 50,80 mm de large. Embout pour la graisse Aide à pénétrer les - Ryobi P4002 | Operation Manual - Page 24
UTILISATION Pour vidanger tambour : Enlever le bloc-piles ou débrancher l'outil de sa source d'alimentation. Tenir et incliner l'outil et soulever la languette de vidange située à l'arrière de l'outil. Vidanger tous les liquides à l'intérieur du tambour dans un tuyau ou un contenant approuvé - Ryobi P4002 | Operation Manual - Page 25
NOTES - Ryobi P4002 | Operation Manual - Page 26
ADVERTENCIAS DE SEGURIDAD PARA HERRAMIENTAS ELÉCTRICAS ADVERTENCIA Lea todas las advertencias de seguridad y todas las instrucciones. No seguir las advertencias e instrucciones podría resultar en electrocución, incendio y/o lesiones graves. Guarde todas las advertencias e instrucciones para - Ryobi P4002 | Operation Manual - Page 27
ADVERTENCIAS DE SEGURIDAD PARA HERRAMIENTAS ELÉCTRICAS Una acción descuidada puede causar lesiones graves en una fracción de segundo. No vista ropas holgadas ni joyas. Recójase el cabello si está largo. Las ropas holgadas y las joyas, así como el cabello largo, pueden resultar atraídas hacia el - Ryobi P4002 | Operation Manual - Page 28
sustancias entren en contacto con la piel y los ojos. Cuando extraiga el cable de un drenaje, retírelo lentamente para evitar "salpicaduras". Use agua caliente y jabón para lavarse las manos y otras partes del cuerpo que puedan haber sido expuestas a sustancias potencialmente peligrosas. Ubique - Ryobi P4002 | Operation Manual - Page 29
de que el enchufe del producto o el tomacorriente se mojen, el operador debe disponer un "lazo de goteo" en el cable que conecta el producto con el tomacorriente. El "lazo de goteo" es la parte del cable que está por debajo del nivel del tomacorriente, o del conector en el caso de usar un - Ryobi P4002 | Operation Manual - Page 30
ÓN/EXPLICACIÓN Alerta de seguridad Indica un peligro posible de lesiones personales. Lea el manual del operador Para reducir el riesgo de lesiones, el usuario debe leer y comprender el manual del operador antes de usar este producto. Protección ocular Siempre póngase protección ocular - Ryobi P4002 | Operation Manual - Page 31
SÍMBOLOS Es posible que se empleen en este producto algunos de los siguientes símbolos. Le suplicamos estudiarlos y aprender su significado. Una correcta interpretación de estos símbolos le permitirá utilizar mejor y de manera más segura el producto. SÍMBOLO NOMBRE DENOMINACIÓN/EXPLICACIÓN V - Ryobi P4002 | Operation Manual - Page 32
ías de la herramienta cuando esté ensamblando partes, realizando ajustes, limpiando o cuando ésta no para ser alimentado con un paquete de baterías RYOBI™ One+™ 18 V (modo CC) o mediante aprobado o un cable de alimentación dentro del producto, como se describe en este manual. INSTALACIÓN/DESMONTAR - Ryobi P4002 | Operation Manual - Page 33
é asegurado antes de comenzar con el funcionamiento. Para extraer el cable de alimentación, desenchufe el cable de la fuente de alimentación. Presione el botón de liberación en la parte superior del extremo hembra del cable y extráigalo de la herramienta. SELECTOR DE SENTIDO DE ROTACIÓN (MARCHA - Ryobi P4002 | Operation Manual - Page 34
en sentido N antihorario) Tirado hacia N fuera Tirar del cable físicamente N Empujado hacia dentro No utilizar CÓMO INTRODUCIR/RETRAER EL CABLE Vea las figuras 4 - 6, página 14. Para introducir y retraer el cable de manera manual, siga estos pasos: Asegure el gatillo del interruptor - Ryobi P4002 | Operation Manual - Page 35
Retire el paquete de baterías o desconecte la herramienta del suministro de alimentación. Sostenga el cable y tire el collar hacia atrás. Extraiga la punta de la barrena deslizándola hacia fuera de y levante la pestaña del drenaje ubicada en la parte trasera de la herramienta. 11 - Español - Ryobi P4002 | Operation Manual - Page 36
puntas de barrena anteriormente en este manual. CÓMO REEMPLAZAR EL TAMBOR Vea las figuras 11 y 12, página 14. Si el cable se daña o se rompe, en el husillo. Coloque el cable del nuevo tambor atravesando el collar selector de sentido de alimentación y la parte delantera de la herramienta. - Ryobi P4002 | Operation Manual - Page 37
NOTAS - Ryobi P4002 | Operation Manual - Page 38
de sélection du sens d'alimentation, collar selector de dirección de alimentación) C - Cable (câble, cable) D - Auger tip (bout du furet, punta de la barrena) E - Drum (tambour, tambor) Fig. 2 C B A F - Drain tab (languette de vidange, pestaña de drenaje) G - Rear handle with overmold (poign - Ryobi P4002 | Operation Manual - Page 39
B A A - Switch trigger (gâchette de commutateur, gatillo del interruptor) Fig. 5 A - Cable (câble, cable) B - T-Slot (encoche en T, ranura en T) C - Auger tip (bout du furet, punta de la barrena) Fig. 8 A A - Drain tab (languette de vidange, pestaña de drenaje) Fig. 11 A C D E B A A - Feed - Ryobi P4002 | Operation Manual - Page 40
OPERATOR'S MANUAL/18 VOLT HYBRID DRAIN AUGER MANUEL D'UTILISATION/DÉGORGEOIR POUR TUYAUTERIE HYBRIDE DE DE 18 V MANUAL DEL OPERADOR/BARRENA DE DRENAJE DE HÍBRIDA DE 18 V P4002 To request service, purchase replacement parts, locate an Authorized Service Center or obtain Customer or Technical Support:
-
 1
1 -
 2
2 -
 3
3 -
 4
4 -
 5
5 -
 6
6 -
 7
7 -
8
-
9
-
10
-
11
-
12
-
13
-
14
-
15
-
16
-
17
-
18
-
19
-
20
-
21
-
22
-
23
-
24
-
25
-
26
-
27
-
28
-
29
-
30
-
31
-
32
-
33
-
34
-
35
-
36
-
37
-
38
-
39
-
40
 |
 |
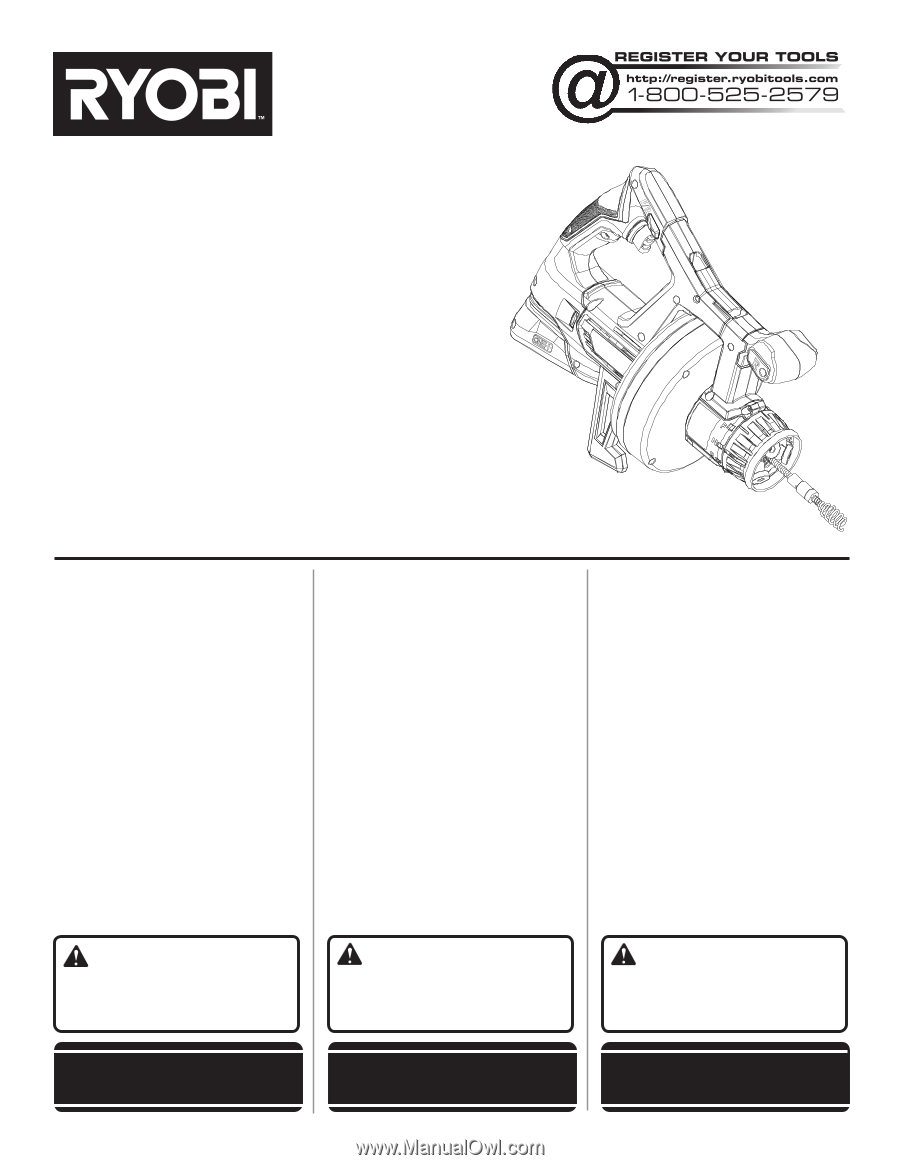
OPERATOR’S MANUAL
MANUEL D’UTILISATION
MANUAL DEL OPERADOR
18 VOLT HYBRID DRAIN AUGER
DÉGORGEOIR POUR TUYAUTERIE
HYBRIDE DE 18 V
BARRENA DE DRENAJE DE HÍBRIDA
DE 18 V
P4002
WARNING:
To reduce the
risk of injury, the user must read and
understand the operator’s manual
before using this product.
SAVE THIS MANUAL FOR
FUTURE REFERENCE
ADVERTENCIA:
Para reducir
el riesgo de lesiones, el usuario debe leer
y comprender el manual del operador
antes de usar este producto.
AVERTISSEMENT :
Pour
réduire les risques de blessures,
l’utilisateur doit lire et veiller à bien
comprendre le manuel d’utilisation avant
d’employer ce produit.
GUARDE ESTE MANUAL
PARA FUTURAS CONSULTAS
CONSERVER CE MANUEL
POUR FUTURE RÉFÉRENCE
INCLUDES:
Hybrid Drain Auger, Auger
Tip, External Power Supply and Operator’s
Manual
TABLE OF CONTENTS
****************
General Power Tool
Safety Warnings
..............................
2-3
Drain Auger Safety Warnings
.............
4
Electrical
.............................................
5
Symbols
...........................................
6-7
Features
..............................................
8
Assembly
............................................
8
Operation
.......................................
8-12
Maintenance
.....................................
12
Illustrations
..................................
13-14
Parts Ordering
and Service
.........................
Back page
INCLUT :
Dégorgeoir pour tuyauterie
hybride, bout du furet, alimentation
électrique externe et manuel d’utilisation
TABLE DES MATIÈRES
****************
Avertissements de sécurité générales
relatives aux outils électriques
........
2-3
Avertissements de sécurité
relatifs dégorgeoir pour tuyauterie
.....
4
Caractéristiques électriques
...............
5
Symboles
.........................................
6-7
Caractéristiques
.................................
8
Assemblage
........................................
8
Utilisation
......................................
8-12
Entretien
...........................................
12
Illustrations
..................................
13-14
Commande de pièces
et dépannage
...................
Page arrière
INCLUYE:
Barrena de drenaje híbrida,
punta de la barrena, fuente de alimentación
exterior y manual del operador
ÍNDICE DE CONTENIDO
****************
Advertencias de seguridad
para herramientas eléctrica
...........
2-3
Advertencias de seguridad
de barrena de drenaje
.......................
4
Aspectos eléctricos
...........................
5
Símbolos
........................................
6-7
Características
...................................
8
Armado
..............................................
8
Funcionamiento
...........................
8-12
Mantenimiento
.................................
12
Illustraciones
..............................
13-14
Pedidos de piezas
y servicio
.......................
Pág. posterior