Ryobi RTS11 Operation Manual - Page 15
Assembling The Stand, Mounting The Table Saw To The Leg, Stand, Warning
 |
View all Ryobi RTS11 manuals
Add to My Manuals
Save this manual to your list of manuals |
Page 15 highlights
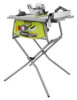
ASSEMBLY ASSEMBLING THE STAND See Figures 6 - 8. NOTE: Do not use this leg stand with other equipment or for other purposes. Lay outside support bracket, on a flat surface. Place inside support bracket on top of outside support bracket with the top rails facing each other. Insert stand legs into the support brackets. Angled ends of stand legs should face away from each other so they resemble a "V". Place hinge R between leg assembly on right side. Repeat with hinge F on left side. Carefully align holes in legs and hinge. Install hardware through holes.Tighten hardware securely. INSIDE SUPPORT BRACKET STAND LEG MOUNTING THE TABLE SAW TO THE LEG STAND See Figure 9. WARNING: Do not lift the saw without help. The saw weighs approximately 55 lbs. Hold it close to your body. Keep your knees bent and lift with your legs, not your back. Ignoring these precautions can result in back injury. Place the stand on level ground and open to its fully extended position. Position the table saw onto the stand so that the holes in the saw's frame are aligned with the holes in the stand's brackets. NOTE: Make sure the table saw's frame is flush against the stand and that all the stand legs are touching the ground. Install leg stand bolts through the holes in the brackets and frame. Secure with wing nuts and tighten securely. Be sure the table saw is on level ground and the stand is sturdy before use. STAND HEX BOLT NUT OUTSIDE SUPPORT BRACKET HOLES INSIDE SUPPORT BRACKET STAND HINGE (F) Fig. 6 INSIDE LEG ASSEMBLY OUTSIDE LEG ASSEMBLY Fig. 8 OUTSIDE SUPPORT BRACKET STAND HINGE (R) Fig. 7 15 - English WING NUT LEG STAND BOLTS Fig. 9
-
 1
1 -
2
-
3
-
4
-
5
-
6
-
7
-
8
-
9
-
 10
10 -
 11
11 -
 12
12 -
 13
13 -
 14
14 -
 15
15 -
 16
16 -
 17
17 -
 18
18 -
 19
19 -
 20
20 -
21
-
22
-
23
-
24
-
25
-
26
-
27
-
28
-
29
-
30
-
31
-
32
-
33
-
34
-
35
-
36
-
37
-
38
-
39
-
40
-
41
-
42
-
43
-
44
-
45
-
46
-
47
-
48
-
49
-
50
-
51
-
52
-
53
-
54
-
55
-
56
-
57
-
58
-
59
-
60
-
61
-
62
-
63
-
64
-
65
-
66
-
67
-
68
-
69
-
70
-
71
-
72
-
73
-
74
-
75
-
76
-
77
-
78
-
79
-
80
-
81
-
82
-
83
-
84
-
85
-
86
-
87
-
88
-
89
-
90
-
91
-
92
-
93
-
94
-
95
-
96
-
97
-
98
-
99
-
100
-
101
-
102
-
103
-
104
-
105
-
106
-
107
-
108
-
109
-
110
-
111
-
112
-
113
-
114
-
115
-
116
-
117
-
118
-
119
-
120
-
121
-
122
-
123
-
124
-
125
-
126
-
127
-
128
 |
 |
