Ryobi TS1345L User Manual - Page 16
Table Extensions
 |
View all Ryobi TS1345L manuals
Add to My Manuals
Save this manual to your list of manuals |
Page 16 highlights
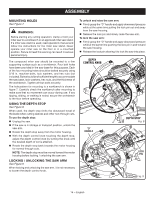
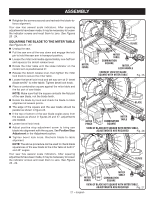
ASSEMBLY TABLE EXTENSIONS See Figures 12 - 14. Table extensions have been provided for both the left and the right side of the saw. To install table extensions: Remove the screw from the end of the table extension. Insert the ends of extension into the holes in the sides of the base. Replace screw and tighten to secure the extension in place. Repeat for other extension. TABLE EXTENSION TABLE EXTENSION BASE SAW VIEWED FROM BOTTOM Fig. 13 BASE Fig. 12 BASE TABLE EXTENSION SCREW Fig. 14 16 − English
-
 1
1 -
2
-
3
-
4
-
5
-
6
-
7
-
8
-
9
-
10
-
 11
11 -
 12
12 -
 13
13 -
 14
14 -
 15
15 -
 16
16 -
 17
17 -
 18
18 -
 19
19 -
 20
20 -
 21
21 -
22
-
23
-
24
-
25
-
26
-
27
-
28
-
29
-
30
-
31
-
32
-
33
-
34
-
35
-
36
-
37
-
38
-
39
-
40
-
41
-
42
-
43
-
44
-
45
-
46
-
47
-
48
-
49
-
50
-
51
-
52
-
53
-
54
-
55
-
56
-
57
-
58
-
59
-
60
-
61
-
62
-
63
-
64
-
65
-
66
-
67
-
68
-
69
-
70
-
71
-
72
-
73
-
74
-
75
-
76
-
77
-
78
-
79
-
80
-
81
-
82
-
83
-
84
-
85
-
86
-
87
-
88
-
89
-
90
-
91
-
92
-
93
-
94
-
95
-
96
-
97
-
98
-
99
-
100
-
101
-
102
-
103
-
104
-
105
-
106
-
107
-
108
 |
 |

16 − English
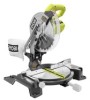
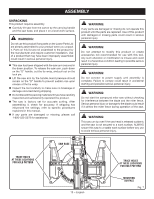
ASSEMBLY
TABLE EXTENSIONS
See Figures 12 - 14.
Table extensions have been provided for both the left and
the right side of the saw.
To install table extensions:
Remove the screw from the end of the table extension.
Insert the ends of extension into the holes in the sides of
the base.
Replace screw and tighten to secure the extension in
place.
Repeat for other extension.
Fig. 13
Fig. 12
Fig. 14
SAW VIEWED FROM BOTTOM
TABLE
EXTENSION
BASE
BASE
TABLE
EXTENSION
TABLE
EXTENSION
SCREW
BASE