Ryobi TSS120L User Manual - Page 20
Operation - model
 |
View all Ryobi TSS120L manuals
Add to My Manuals
Save this manual to your list of manuals |
Page 20 highlights
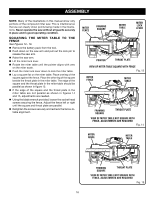
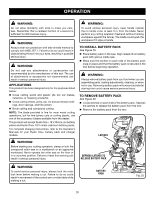
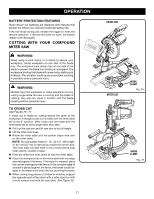
OPERATION WARNING: Do not allow familiarity with tools to make you careless. Remember that a careless fraction of a second is sufficient to inflict serious injury. WARNING: Always wear eye protection with side shields marked to comply with ANSI Z87.1. Failure to do so could result in objects being thrown into your eyes, resulting in possible serious injury. WARNING: Do not use any attachments or accessories not recommended by the manufacturer of this tool. The use of attachments or accessories not recommended can result in serious personal injury. APPLICATIONS This product has been designed only for the purposes listed below: Cross cutting wood and plastic (do not cut metals, ceramics, or masonry products) Cross cutting miters, joints, etc. for picture frames mold- ings, door casings, and fine joinery Bevel cutting and compound cutting Note: The blade provided is fine for most wood cutting operations, but for fine joinery cuts or cutting plastic, use one of the accessory blades available from the dealer. This product will accept Ryobi One+ 18 V lithium-ion battery packs and Ryobi One+ 18 V nickel-cadmium battery packs. For complete charging instructions, refer to the Operator's Manuals for your Ryobi One+ battery pack and charger models. WARNING: To avoid serious personal injury, keep hands outside the no hands zone, at least 3 in. from the blade. Never perform any cutting operation freehand (without holding workpiece against the fence). The blade could grab the workpiece if it slips or twists. TO INSTALL BATTERY PACK See Figure 25. Place battery pack in the saw. Align raised rib on battery pack with groove inside saw. Make sure the latches on each side of the battery pack snap in place and that the battery pack is secured in the tool before beginning operation. WARNING: Always remove battery pack from your tool when you are assembling parts, making adjustments, cleaning, or when not in use. Removing battery pack will prevent accidental starting that could cause serious personal injury. TO REMOVE BATTERY PACK See Figure 25. Locate latches on each side of the battery pack. Depress the latches to release the battery pack from the tool. Remove the battery pack from the tool. LATCHES WARNING: Before starting any cutting operation, clamp or bolt the compound miter saw to a workbench or an approved workstand. Never operate the miter saw on the floor or in a crouched position. Failure to heed this warning can result in serious personal injury. DEPRESS LATCHES TO RELEASE BATTERY PACK WARNING: To avoid serious personal injury, always lock the miter lock lever before making a cut. Failure to do so could result in movement of the control arm or miter table while making a cut. BATTERY PACK Fig. 25 20
-
 1
1 -
2
-
3
-
4
-
5
-
6
-
7
-
8
-
9
-
10
-
11
-
12
-
13
-
14
-
 15
15 -
 16
16 -
 17
17 -
 18
18 -
 19
19 -
 20
20 -
 21
21 -
 22
22 -
 23
23 -
 24
24 -
 25
25 -
26
-
27
-
28
-
29
-
30
-
31
-
32
 |
 |