Ryobi TSS120L User Manual - Page 27
Cutting Warped Material, Warning
 |
View all Ryobi TSS120L manuals
Add to My Manuals
Save this manual to your list of manuals |
Page 27 highlights
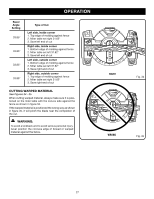
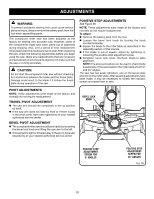
OPERATION Bevel Angle Setting 33.85° 33.85° 33.85° 33.85° Type of Cut Left side, inside corner 1. Top edge of molding against fence 2. Miter table set right 31.62° 3. Save left end of cut Right side, inside corner 1. Bottom edge of molding against fence 2. Miter table set left 31.62° 3. Save left end of cut Left side, outside corner 1. Bottom edge of molding against fence 2. Miter table set left 31.62° 3. Save right end of cut Right side, outside corner 1. Top edge of molding against fence 2. Miter table set right 31.62° 3. Save right end of cut cutting warped material See Figures 34 - 35. When cutting warped material, always make sure it is positioned on the miter table with the convex side against the fence as shown in figure 34. If the warped material is positioned the wrong way as shown in figure 35, it will pinch the blade near the completion of the cut. WARNING: To avoid a kickback and to avoid serious personal injury, never position the concave edge of bowed or warped material against the fence. 45 31.6 30 22.5 22.5 30 31.6 15 0 15 Right 45 31.6 30 22.5 22.5 30 31.6 15 0 15 WRONG 45 45 Fig. 34 Fig. 35 27
-
 1
1 -
2
-
3
-
4
-
5
-
6
-
7
-
8
-
9
-
10
-
11
-
12
-
13
-
14
-
15
-
16
-
17
-
18
-
19
-
20
-
21
-
 22
22 -
 23
23 -
 24
24 -
 25
25 -
 26
26 -
 27
27 -
 28
28 -
 29
29 -
 30
30 -
 31
31 -
 32
32
 |
 |
