Ryobi WS750L Operation Manual - Page 12
Operation, Assembly
 |
View all Ryobi WS750L manuals
Add to My Manuals
Save this manual to your list of manuals |
Page 12 highlights
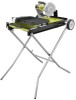
ASSEMBLY Installing TILE CUTTING WHEEL See Figures 16 - 17, page 23. WARNING: A 7 in. tile cutting wheel is the maximum wheel capacity of the saw. Never use a wheel that is too thick to allow wheel washer to engage with the flats on the spindle. Larger wheels will come in contact with the wheel guard, while thicker wheels will prevent the wheel bolt from securing the wheel on the spindle. Either of these situations could result in a serious accident and can cause serious personal injury. Unplug the saw. Loosen the wheel guard lock. Open the wheel guard to expose the arbor nut. Fit the wheel wrench on the arbor nut then the hex key in the spindle. Holding the hex key in place to prevent the wheel from moving, turn the arbor nut counterclockwise. Remove the hex key, wheel wrench, arbor nut and outer washer. Do not remove the inner washer. Wipe a drop of oil onto inner washer where it contacts the wheel. WARNING: If inner washer has been removed, replace it before placing wheel on spindle. Failure to do so could cause an accident since the wheel will not tighten properly. Never use wheels that have openings, grooves, or teeth on this tool. Place the cutting wheel onto the spindle. Replace outer cutting wheel washer. The double "D" flats on the cutting wheel washers align with the flats on the spindle. Using hex key and wheel wrench, tighten arbor nut securely. Retighten the wheel guard lock securely. Installing the rip guide See Figure 18, page 23. Place the rip guide in the unlocked position (lever up). Fit the rip guide onto the permanent fence on the Easy Glide Table™. Lock the rip guide in place by pushing the lever down. connecting the drainage hose See Figure 19, page 23. Always place the drainage hose into a small barrel or bucket so debris can drain from water tray. Unscrew the cap from the drainage output. Attach a drainage hose to the drainage output and place other end of the hose into a bucket or barrel. Do not overflow the bucket or spill water on the ground near the machine. Discard waste water in accordance with local regula- tions. OPERATION WARNING: Do not allow familiarity with tools to make you careless. Remember that a careless fraction of a second is sufficient to inflict serious injury. WARNING: Always wear safety goggles or safety glasses with side shields when operating power tools. Failure to do so could result in objects being thrown into your eyes resulting in possible serious injury. WARNING: Do not use any attachments or accessories not recommended by the manufacturer of this tool. The use of attachments or accessories not recommended can result in serious personal injury. APPLICATIONS You may use this tool for the purposes listed below: Straight line cutting operations such as cross cutting, mitering, ripping, and beveling NOTE: This saw is designed to cut man-made tile, pavers, natural stone products, and stone tile products only. 12 - English
-
 1
1 -
2
-
3
-
4
-
5
-
6
-
 7
7 -
 8
8 -
 9
9 -
 10
10 -
 11
11 -
 12
12 -
 13
13 -
 14
14 -
 15
15 -
 16
16 -
 17
17 -
18
-
19
-
20
-
21
-
22
-
23
-
24
-
25
-
26
-
27
-
28
-
29
-
30
-
31
-
32
-
33
-
34
-
35
-
36
-
37
-
38
-
39
-
40
-
41
-
42
-
43
-
44
-
45
-
46
-
47
-
48
-
49
-
50
-
51
-
52
-
53
-
54
-
55
-
56
-
57
-
58
-
59
-
60
 |
 |
