Samsung 320TSN User Manual - Page 54
General Control Panel Menu, In TouchScreen List of the Touchscreen Control Panel - 3 dual touch screens
 |
UPC - 729507807959
View all Samsung 320TSN manuals
Add to My Manuals
Save this manual to your list of manuals |
Page 54 highlights
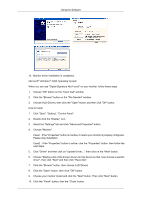
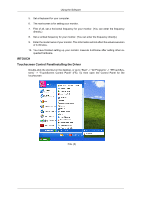
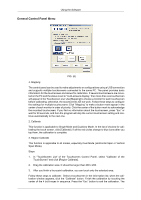
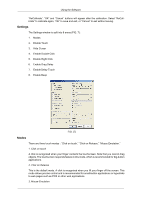
Using the Software General Control Panel Menu FIG. (6) 1. Mapping The control panel can be used to make adjustments or configurations using a USB connection and supports multiple touchscreens connected to the same PC. The panel provides basic information for the touchscreen and allows for calibration. If several touchscreens are mounted on the PC and the status is set to "multi-screens display," then more than one touchscreen will appear in the Touchscreen List. Use [Mapping] to choose a monitor for each touchscreen before calibrating; otherwise, the touchscreens will not work. Follow these steps to configure the settings for multiple touchscreens: Click "Mapping" to make a button-mark appear in the center of each monitor in order of priority. Click the center of the button-mark to acknowledge the mounted touchscreen; If you find no information about the touchscreen, press "Esc" or wait for 30 seconds, and then the program will skip the current touchscreen setting and continue automatically to the next one. 2. Calibrate This function is applicable to Single Mode and Dualview Mode. In the list of choices for calibrating the touch screen, click [Calibrate]. If all the red circles change to blue icons after you tap them, the calibration is complete. 3. Region Calibrate This function is applicable to all modes, especially Dual Mode (Horizontal Span or Vertical Span Mode). Steps 1. In "TouchScreen List" of the Touchscreen Control Panel, select "Calibrate of the TouchScreen" and click [Region Calibrate]. 2. Drag the calibration area. It should be larger than 200 x 200. 3. After you finish a four-point calibration, you can touch only the selected area. Follow these steps to calibrate : Select a touchscreen in the information list; when the calibration window appears, click the "Calibrate" button. Finish the calibration by touching the center of the 4 bull's-eyes in sequence. Press the "Esc" button to exit the calibration. The
-
 1
1 -
2
-
3
-
4
-
5
-
6
-
7
-
8
-
9
-
10
-
11
-
12
-
13
-
14
-
15
-
16
-
17
-
18
-
19
-
20
-
21
-
22
-
23
-
24
-
25
-
26
-
27
-
28
-
29
-
30
-
31
-
32
-
33
-
34
-
35
-
36
-
37
-
38
-
39
-
40
-
41
-
42
-
43
-
44
-
45
-
46
-
47
-
48
-
 49
49 -
 50
50 -
 51
51 -
 52
52 -
 53
53 -
 54
54 -
 55
55 -
 56
56 -
 57
57 -
 58
58 -
 59
59 -
60
-
61
-
62
-
63
-
64
-
65
-
66
-
67
-
68
-
69
-
70
-
71
-
72
-
73
-
74
-
75
-
76
-
77
-
78
-
79
-
80
-
81
-
82
-
83
-
84
-
85
-
86
-
87
-
88
-
89
-
90
-
91
-
92
-
93
-
94
-
95
-
96
-
97
-
98
-
99
-
100
-
101
-
102
-
103
-
104
-
105
-
106
-
107
-
108
-
109
-
110
-
111
-
112
-
113
-
114
-
115
-
116
-
117
-
118
-
119
-
120
-
121
-
122
-
123
-
124
-
125
-
126
-
127
-
128
-
129
-
130
-
131
-
132
-
133
-
134
-
135
-
136
-
137
-
138
-
139
-
140
-
141
-
142
-
143
-
144
-
145
-
146
-
147
-
148
-
149
-
150
-
151
-
152
-
153
-
154
-
155
-
156
-
157
-
158
-
159
-
160
-
161
-
162
-
163
-
164
-
165
-
166
-
167
-
168
-
169
-
170
-
171
 |
 |
