Samsung A402 User Manual - Page 65
PictBridge: Printing
 |
UPC - 492430003414
View all Samsung A402 manuals
Add to My Manuals
Save this manual to your list of manuals |
Page 65 highlights
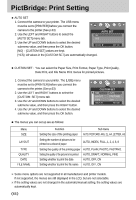
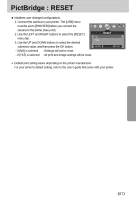
PictBridge: Printing ■ Printing Pictures 1. Connect the camera to your printer. The USB menu must be set to [PRINTER] before you connect the ◀ ▶ camera to the printer.(See p.63) 2. Use the LEFT and RIGHT buttons to select the [PRINT] menu tab. PRINT STANDARD INDEX 3. Use the UP and DOWN buttons to select the desired submenu value, and then press the OK button. MOVE: ▲ ▼ SET:OK [STANDARD] : Print the pictures stored in the memory card in set numbers. One picture is printed on one piece of paper. [INDEX] : Print multiple images on one sheet of paper. 4. The screen shown on the right will appear and the picture will be printed. If no picture is selected, the [NO IMAGE!] message will be displayed. Press the shutter button while printing to cancel the printing and the [IMAGES] menu is displayed. NOW PRINTING ※ Number of pictures in a index print varies depends on the printer used. 001/001 EXIT:SH ■ DPOF PRINT : This allows you to directly print the files with DPOF information. 1. Connect the camera to your printer. The [USB] menu must be set to [PRINTER] before you connect the camera to the printer.(See p.63) 2. Use the LEFT and RIGHT buttons to select the [DPOF PRINT] menu tab. 3. Use the UP and DOWN buttons to select the desired submenu value, and then press the OK button. [NO] : Cancel the printing [YES]: Directly print the file with the DPOF information ◀ ▶ DPOF PRINT NO YES MOVE: ▲ ▼ SET:OK ※ Depending on the manufacturer and printer model, some menus may not be available. With a printer without supporting the DPOF, the menu is still displayed but not available. 《65》
-
 1
1 -
2
-
3
-
4
-
5
-
6
-
7
-
8
-
9
-
10
-
11
-
12
-
13
-
14
-
15
-
16
-
17
-
18
-
19
-
20
-
21
-
22
-
23
-
24
-
25
-
26
-
27
-
28
-
29
-
30
-
31
-
32
-
33
-
34
-
35
-
36
-
37
-
38
-
39
-
40
-
41
-
42
-
43
-
44
-
45
-
46
-
47
-
48
-
49
-
50
-
51
-
52
-
53
-
54
-
55
-
56
-
57
-
58
-
59
-
 60
60 -
 61
61 -
 62
62 -
 63
63 -
 64
64 -
 65
65 -
 66
66 -
 67
67 -
 68
68 -
 69
69 -
 70
70 -
71
-
72
-
73
-
74
-
75
-
76
-
77
-
78
-
79
-
80
-
81
-
82
-
83
-
84
-
85
-
86
-
87
-
88
-
89
-
90
-
91
-
92
-
93
-
94
-
95
-
96
-
97
-
98
-
99
-
100
-
101
-
102
-
103
-
104
-
105
-
106
-
107
-
108
 |
 |
