Samsung CLX 3160FN User Manual (ENGLISH) - Page 31
Changing the size of the paper in the tray 1 - manuale
 |
UPC - 635753712490
View all Samsung CLX 3160FN manuals
Add to My Manuals
Save this manual to your list of manuals |
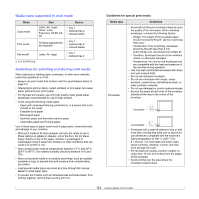
Page 31 highlights
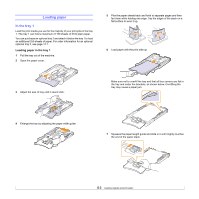
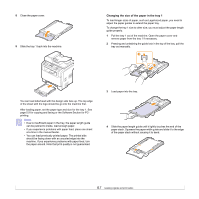
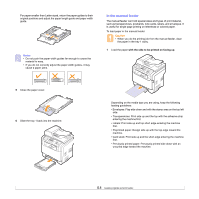
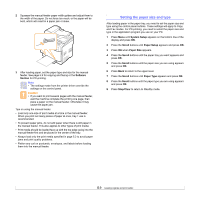
8 Close the paper cover. 9 Slide the tray 1 back into the machine. Changing the size of the paper in the tray 1 To load longer sizes of paper, such as Legal-sized paper, you need to adjust the paper guides to extend the paper tray. To change the tray 1 size to other size, you must adjust the paper length guide properly. 1 Pull the tray 1 out of the machine. Open the paper cover and remove paper from the tray 1 if necessary. 2 Pressing and unlatching the guide lock in the top of the tray, pull the tray out manually. You can load letterhead with the design side face up. The top edge of the sheet with the logo should be go into the machine first. After loading paper, set the paper type and size for the tray 1. See page 5.9 for copying and faxing or the Software Section for PCprinting. Notes • Due to insufficient paper in the tray, the paper length guide can be pushed to inside, load enough paper. • If you experience problems with paper feed, place one sheet at a time in the manual feeder. • You can load previously printed paper. The printed side should be facing down with an uncurled edge into the machine. If you experience problems with paper feed, turn the paper around. Note that print quality is not guaranteed. 3 Load paper into the tray. 4 Slide the paper length guide until it lightly touches the end of the paper stack. Squeeze the paper width guide and slide it to the edge of the paper stack without causing it to bend. 5.7
-
 1
1 -
2
-
3
-
4
-
5
-
6
-
7
-
8
-
9
-
10
-
11
-
12
-
13
-
14
-
15
-
16
-
17
-
18
-
19
-
20
-
21
-
22
-
23
-
24
-
25
-
 26
26 -
 27
27 -
 28
28 -
 29
29 -
 30
30 -
 31
31 -
 32
32 -
 33
33 -
 34
34 -
 35
35 -
 36
36 -
37
-
38
-
39
-
40
-
41
-
42
-
43
-
44
-
45
-
46
-
47
-
48
-
49
-
50
-
51
-
52
-
53
-
54
-
55
-
56
-
57
-
58
-
59
-
60
-
61
-
62
-
63
-
64
-
65
-
66
-
67
-
68
-
69
-
70
-
71
-
72
-
73
-
74
-
75
-
76
-
77
-
78
-
79
-
80
-
81
-
82
-
83
-
84
-
85
-
86
-
87
-
88
-
89
-
90
-
91
-
92
-
93
-
94
-
95
-
96
-
97
-
98
-
99
-
100
-
101
-
102
-
103
-
104
-
105
-
106
-
107
-
108
-
109
-
110
-
111
-
112
-
113
-
114
-
115
-
116
-
117
-
118
-
119
-
120
-
121
-
122
-
123
-
124
-
125
-
126
-
127
-
128
-
129
-
130
-
131
-
132
-
133
-
134
-
135
-
136
-
137
-
138
-
139
 |
 |