Samsung DVD 1080P9 User Manual (ENGLISH) - Page 10
Rear Panel, Audio Out Jacks, Digital Audio Jacks, Component Video Out Jacks
 |
UPC - 036725608085
View all Samsung DVD 1080P9 manuals
Add to My Manuals
Save this manual to your list of manuals |
Page 10 highlights
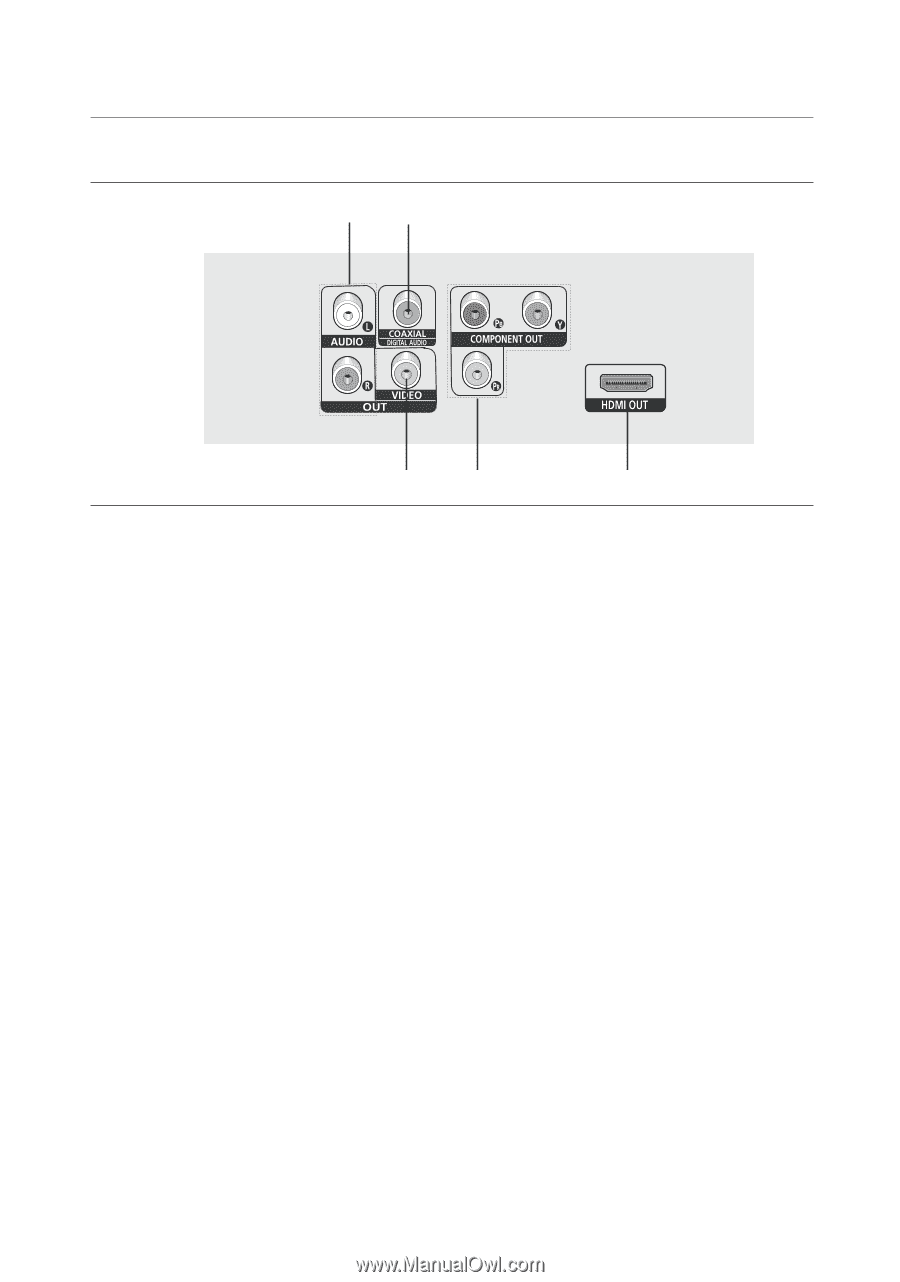
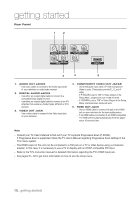
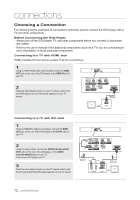
getting started Rear Panel 1 2 3 4 5 1. AUDIO OUT JACKS - Use audio cables to connect to the Audio input jacks of your television or audio/video receiver 2. DIGITAL AUDIO JACKS - Use either an coaxial digital cable to connect to a compatible Dolby Digital receiver. - Use either an coaxial digital cable to connect to an A/V Amplifier that contains a Dolby Digital, MPEG2 or DTS decoder. 3. VIDEO OUT JACK - Use a video cable to connect to the Video input jack on your television. 4. COMPONENT VIDEO OUT JACKS - Use these jacks if you have a TV with Component Video in jacks. These jacks provide PR, PB and Y video. - If P-SCAN is set to "ON" in Video Output of the Setup Menu, progressive scan mode will work. - If I-SCAN is set to "ON" in Video Output of the Setup Menu, interlaced scan mode will work. 5. HDMI OUT JACK - Use an HDMI cable to connect this jack to the HDMI jack on your television for the best quality picture. - If an HDMI cable is connected to an HDMI-compatible TV, HDMI will be output automatically from the player about 10 seconds later. Note - Consult your TV User's Manual to find out if your TV supports Progressive Scan (P-SCAN). If Progressive Scan is supported, follow the TV User's Manual regarding Progressive Scan settings in the TV's menu system. - The HDMI output of this unit can be connected to a DVI jack on a TV or other device using a conversion adapter. In this case, it is necessary to use a TV or display with an HDCP-compatible DVI input. - Refer to the TV's instruction manual for detailed information regarding the TV's HDMI input jack. - See pages 51~ 52 to get more information on how to use the setup menu. 10_ getting started
-
 1
1 -
2
-
3
-
4
-
 5
5 -
 6
6 -
 7
7 -
 8
8 -
 9
9 -
 10
10 -
 11
11 -
 12
12 -
 13
13 -
 14
14 -
 15
15 -
16
-
17
-
18
-
19
-
20
-
21
-
22
-
23
-
24
-
25
-
26
-
27
-
28
-
29
-
30
-
31
-
32
-
33
-
34
-
35
-
36
-
37
-
38
-
39
-
40
-
41
-
42
-
43
-
44
-
45
-
46
-
47
-
48
-
49
-
50
-
51
-
52
-
53
-
54
-
55
-
56
-
57
-
58
-
59
-
60
-
61
-
62
-
63
-
64
-
65
-
66
-
67
-
68
 |
 |