Samsung DVD R155 Quick Guide (easy Manual) (ver.1.0) (English) - Page 28
Quick Recording Setting, Anynet+(HDMI-CEC), Setup, ENTER, System, Quick Recording, Anynet - instructions
 |
UPC - 036725607811
View all Samsung DVD R155 manuals
Add to My Manuals
Save this manual to your list of manuals |
Page 28 highlights
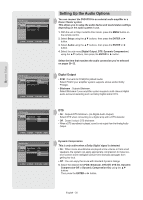
System Setup DVD-Recorder DVD-RW(VR) Title List CM Skip Time : 15 Sec Playlist Disc Manager Timer Rec. Setup EP Mode Time : 6 Hours Chapter Creator : Off Quick Recording : Off Anynet+(HDMI-CEC) : On System MOVE ENTER RETURN EXIT ▌Quick Recording Setting It takes about 10 seconds for a disc to load (initialize) every time you turn on the unit. To bypass this initialization process, you can set the Quick Recording feature to On. This enables you to record immediately without having to wait for the disc to load. 1. With a disc inserted and the unit in Stop mode, press the MENU button on the remote control. 2. Select Setup using the ▲▼ buttons, then press the ENTER or ► button. You can't use the Setup functions while playing a disc. 3. Select System using the ▲▼ buttons, then press the ENTER or ► button. System menu will be displayed. 4. Select Quick Recording using the ▲▼ buttons, then press the ENTER or ► button. Quick Recording menu will be displayed. 5. Select On using the ▲▼ buttons, then press the ENTER or ► button. ■ The Quick Recording is set to Off as default. DVD-Recorder No Disc Timer Rec. CM Skip Time : 15 Sec Setup EP Mode Time Chapter Creator : 6 Hours : Off Quick Recording : Off Anynet+(HDMI-CEC) Ofnf On System MOVE ENTER RETURN EXIT DVDR View TV DVDR Menu DVDR Operation Receiver : Off Setup Move Enter Exit TV Menu ▌Anynet+(HDMI-CEC) Anynet+ is a function that can be used to operate the recorder using a Samsung TV remote control, by connecting the DVD Recorder to a SAMSUNG TV using an HDMI Cable. (see page 15) (This is only available with SAMSUNG TVs that support Anynet+.) 1. With the unit in Stop mode/No Disc mode, press the MENU button on the remote control. 2. Select Setup using the ▲▼ buttons, then press the ENTER or ► button. 3. Select System using the ▲▼ buttons, then press the ENTER or ► button. The system menu will be displayed. 4. Select Anynet+(HDMI-CEC) using the ▲▼ buttons, then press the ENTER or ► button. Anynet+(HDMI-CEC) items will be displayed. 5. Select On using the ▲▼ buttons, then press the ENTER or ► button. Using Anynet+(HDMI-CEC) 1. Connect the recorder to a Samsung TV with an HDMI cable. (See page 15) 2. Set the Anynet+(HDMI-CEC) to "On" on your DVD Recorder. (see above) 3. Set the Anynet+ function on your TV. (See the TV instruction manual for more information.) • You can operate the DVD Recorder by using the TV remote control. (Available TV buttons : , , , , and buttons, ~ button) • When you press the Anynet+ button on the TV's remote control, the OSD to the left will appear. - DVDR Operation : Same as ANYKEY button ( ) on the DVD Recorder remote control. - DVDR Menu : Same as MENU button ( ) on the DVD Recorder remote control. English - 28
-
 1
1 -
2
-
3
-
4
-
5
-
6
-
7
-
8
-
9
-
10
-
11
-
12
-
13
-
14
-
15
-
16
-
17
-
18
-
19
-
20
-
21
-
22
-
 23
23 -
 24
24 -
 25
25 -
 26
26 -
 27
27 -
 28
28 -
 29
29 -
 30
30 -
 31
31 -
 32
32 -
 33
33 -
34
-
35
-
36
-
37
-
38
-
39
-
40
-
41
-
42
-
43
-
44
-
45
-
46
-
47
-
48
-
49
-
50
-
51
-
52
-
53
-
54
-
55
-
56
-
57
-
58
-
59
-
60
-
61
-
62
-
63
-
64
-
65
-
66
-
67
-
68
-
69
-
70
-
71
-
72
-
73
-
74
-
75
 |
 |
