Samsung DVD-R157 Quick Guide (easy Manual) (ver.1.0) (English) - Page 13
Description, Front Panel, Front Panel Display
 |
View all Samsung DVD-R157 manuals
Add to My Manuals
Save this manual to your list of manuals |
Page 13 highlights
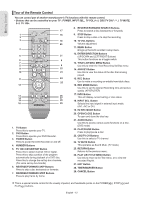
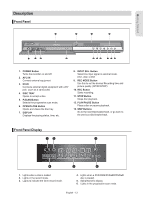
Getting Started Description ▌Front Panel 10 11 12 10 1. POWER Button Turns the recorder on and off. 2. AV 2 IN Connect external equipment. 3. DV-IN Connects external digital equipment with a DV jack. (such as a camcorder) 4. DISC TRAY Opens to accept a disc. 5. P.SCAN Button Selects the progressive scan mode. 6. OPEN/CLOSE Button Opens and closes the disc tray. 7. DISPLAY Displays the playing status, time, etc. 8. INPUT SEL. Button Select line input signal in external mode. (AV1, AV2, or DV) 9. REC MODE Button Use this to set the desired Recording time and picture quality. (XP/SP/LP/EP) 10. REC Button Starts recording. 11. STOP Button Stops disc playback. 12. PLAY/PAUSE Button Plays a disc or pauses playback. 13. SKIP Buttons Go to the next title/chapter/track, or go back to the previous title/chapter/track. ▌Front Panel Display 1. Lights when a disc is loaded. 2. Lights in the record mode. 3. Lights to indicate the timer record mode. 4. Lights when a DVD-RAM/DVD±RW/DVD±R disc is loaded. 5. Alpha/Numeric display. 6. Lights in the progressive scan mode. English - 13
-
 1
1 -
2
-
3
-
4
-
5
-
6
-
7
-
 8
8 -
 9
9 -
 10
10 -
 11
11 -
 12
12 -
 13
13 -
 14
14 -
 15
15 -
 16
16 -
 17
17 -
 18
18 -
19
-
20
-
21
-
22
-
23
-
24
-
25
-
26
-
27
-
28
-
29
-
30
-
31
-
32
-
33
-
34
-
35
-
36
-
37
-
38
-
39
-
40
-
41
-
42
-
43
-
44
-
45
-
46
-
47
-
48
-
49
-
50
-
51
-
52
-
53
-
54
-
55
-
56
-
57
-
58
-
59
-
60
-
61
-
62
-
63
-
64
-
65
-
66
-
67
-
68
-
69
-
70
-
71
-
72
-
73
-
74
-
75
-
76
-
77
-
78
-
79
-
80
-
81
-
82
-
83
 |
 |
