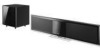
Samsung HT BD8200 User Manual (ENGLISH) - Page 21
INSTALLING THE WALL MOUNT, Connecting - home theater system
 |
UPC - 036725616981
View all Samsung HT BD8200 manuals
Add to My Manuals
Save this manual to your list of manuals |
Page 21 highlights
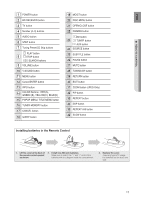
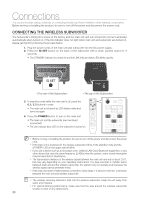
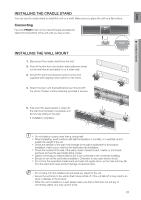
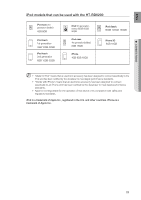
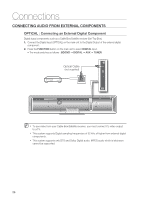
ENG ● CONNECTIONS INSTALLING THE CRADLE STAND You can use the cradle stand to install this unit on a shelf. Make sure you place the unit on a flat surface. Connecting Face the FRONT mark on the stand forward and slide the stand into the bottom of the unit until you hear a click. INSTALLING THE WALL MOUNT 1. Disconnect the cradle stand from the unit. 2. Peel off the film from the double-sided adhesive sheet for the wall mount and attach it on a clean wall. 3. Secure the wall mount bracket using 6 screws (not supplied) while aligning holes marked on the sheet. 4. Attach the back unit bracket(bracket set mount) with the Home Theater unit by fastening provided 4 screws. 5. Fully insert the back bracket's clasp into the wall mount bracket's receptacle and fix it by fully sliding to the right. • Installation completed. Do not install on a place other than a vertical wall. When installating, avoid locations with high temperature or humidity, or a wall that cannot sustain the weight of the set. Check the strength of the wall. If the strength of the wall is insufficient for the product installation, make sure to reinforce the wall before the installation. Check the material of the wall. If the wall is made of plaster board, marble, or iron board, purchase and use the appropriate fixing screws. Cables connecting to external devices are to be connected to the unit before installing. Be sure to turn off the unit before installation. Otherwise, it may cause electric shock. Do not turn the assembled cradle stand and main unit upside down, as the main unit may fall from the stand and cause product damage or personal injury. M ▪ Do not hang onto the installed unit and avoid any impact to the unit. ▪ Secure the unit firmly to the wall so that it does not fall off. If the unit falls off, it may result in an injury or damage to the product. ▪ When the unit is installed on a wall, please make sure that a child does not pull any of connecting cables, as it may cause it to fall. 21
-
 1
1 -
2
-
3
-
4
-
5
-
6
-
7
-
8
-
9
-
10
-
11
-
12
-
13
-
14
-
15
-
 16
16 -
 17
17 -
 18
18 -
 19
19 -
 20
20 -
 21
21 -
 22
22 -
 23
23 -
 24
24 -
 25
25 -
 26
26 -
27
-
28
-
29
-
30
-
31
-
32
-
33
-
34
-
35
-
36
-
37
-
38
-
39
-
40
-
41
-
42
-
43
-
44
-
45
-
46
-
47
-
48
-
49
-
50
-
51
-
52
-
53
-
54
-
55
-
56
-
57
-
58
-
59
-
60
-
61
-
62
-
63
-
64
-
65
-
66
-
67
-
68
-
69
-
70
-
71
-
72
-
73
-
74
-
75
-
76
-
77
-
78
-
79
-
80
-
81
-
82
-
83
-
84
-
85
-
86
-
87
-
88
-
89
-
90
-
91
-
92
-
93
-
94
-
95
-
96
 |
 |
