Samsung HT-C5500 User Manual (user Manual) (ver.1.0) (English) - Page 27
Before Starting (Initial Setting
 |
UPC - 036725617148
View all Samsung HT-C5500 manuals
Add to My Manuals
Save this manual to your list of manuals |
Page 27 highlights
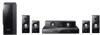
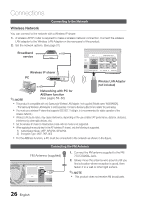
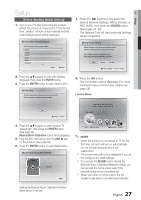
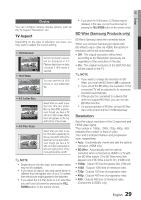
03 Setup Setup Before Starting (Initial Setting) 1. Turn on your TV after connecting the product. (When the product is connected to TV for the first time, product will turn on automatically and the Initial Settings screen will be displayed.) Initial Settings I On-Screen Language Select a language for the on-screen displays. English Français Deutsch Español Italiano Nederlands > Move s Select 7. Press the ◄► buttons to the select the desired Network Settings: Wired, Wireless or PBC (WPS), then press the ENTER button. (See pages 37~40) The Network Test will start and Initial Settings will be completed. Initial Settings I Network Network Setting is needed to use various Internet services. Choose the primary method for connecting to network. Wired : Set the network by using Ethernet cable. Please make sure that Ethernet cable is connected. Wired Wireless PBC (WPS) a Previous d Skip < Move " Select 2. Press the ▲▼ buttons to select the desired language, then press the ENTER button. 3. Press the ENTER button to select Start button. Initial Setting TV Aspect, Musical Room Calibration and Network will be set. Each setting may be changed later under "Settings" Start a Previous " Select 8. Press the OK button. The home menu will be displayed. (For more information about home menu, please see page 28) • Home Menu Please activate Interninteertne@t raTdioV serviYcoueTube to enjoy a variety of Internet Services. 4. Press the ▲▼ buttons to select desired TV Aspect ratio, then press the ENTER button. (See page 29) Musical Room Calibration screen will be displayed. 5. Plug the ASC microphone into the ASC IN jack on the product. (See page 33) 6. Press the ENTER button to select Start button. Initial Setting I Musical Room Calibration Preparing... d Skip No Disc a Change Device d View Devices " Enter ✎ NOTE When the product is connected to TV for the first time, product will turn on automatically. Do not confuse because this is not malfunction. The home menu will not be displayed if you do not configure the initial settings. If you press the BLUE(D) button during the Musical Room Calibration/Network setup, you can access the home menu even if the network setup is not completed yet. When you return to home menu, the full screen mode will be cancelled automatically. Setting the Musical Room Calibration function takes about 3 minutes. 27 English
-
 1
1 -
2
-
3
-
4
-
5
-
6
-
7
-
8
-
9
-
10
-
11
-
12
-
13
-
14
-
15
-
16
-
17
-
18
-
19
-
20
-
21
-
 22
22 -
 23
23 -
 24
24 -
 25
25 -
 26
26 -
 27
27 -
 28
28 -
 29
29 -
 30
30 -
 31
31 -
 32
32 -
33
-
34
-
35
-
36
-
37
-
38
-
39
-
40
-
41
-
42
-
43
-
44
-
45
-
46
-
47
-
48
-
49
-
50
-
51
-
52
-
53
-
54
-
55
-
56
-
57
-
58
-
59
-
60
-
61
-
62
-
63
-
64
-
65
-
66
-
67
-
68
 |
 |
