Samsung LA32B450 User Manual - Page 26
Installing the Stand, Disconnecting the Stand, Installing the Wall Mount Kit, English - ²´ - lcd
 |
UPC - 638940512439
View all Samsung LA32B450 manuals
Add to My Manuals
Save this manual to your list of manuals |
Page 26 highlights
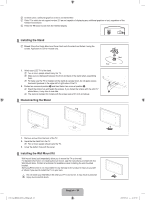
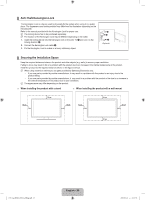
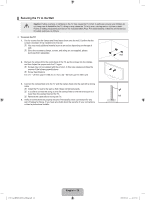
N In these cases, additional graphics or text is not transmitted. N Older TV's which do not support version 2.5 are not capable of displaying any additional graphics or text, regardless of the Teletext transmission. O Press the TV button to exit from the Teletext display. ¦ Installing the Stand N Preset: Place the Guide Stand and Cover Neck onto the stand and fasten it using the screws. Applicable to 32inch models only. Back Front 1. Attach your LCD TV to the stand. N Two or more people should carry the TV. N Make sure to distinguish between the front and back of the stand when assembling them. N To make sure the TV is installed on the stand at a proper level, do not apply excess downward pressure to the upper left of right sides of the TV. 2. Fasten two screws at position 1 and then fasten two screw at position 2. N Stand the product up and fasten the screws. If you fasten the screws with the LCD TV placed down, it may lean to one side. N The stand is installed for models with the screen size of 37 inch and above. ¦ Disconnecting the Stand 1. Remove screws from the back of the TV. 2. Separate the stand from the TV. N Two or more people should carry the TV. 3. Cover the bottom hole with the cover. ¦ Installing the Wall Mount Kit Wall mount items (sold separately) allow you to mount the TV on the wall. For detailed information on installing the wall mount, see the instructions provided with the Wall Mount items. Contact a technician for assistance when installing the wall mounted bracket. Samsung Electronics is not responsible for any damage to the product or injury to yourself or others if you elect to install the TV on your own. Do not install your Wall Mount Kit while your TV is turned on. It may result in personal injury due to electric shock. [450_Aus]BN68-02041A-03Eng.indb 24 English - 24 2009-09-16 �� 11:07:50
-
 1
1 -
2
-
3
-
4
-
5
-
6
-
7
-
8
-
9
-
10
-
11
-
12
-
13
-
14
-
15
-
16
-
17
-
18
-
19
-
20
-
 21
21 -
 22
22 -
 23
23 -
 24
24 -
 25
25 -
 26
26 -
 27
27 -
 28
28 -
 29
29 -
 30
30 -
 31
31 -
32
-
33
 |
 |
