Samsung LN-S2338W Quick Guide (easy Manual) (ver.1.0) (English) - Page 17
Resetting the Picture Settings to the Factory Defaults, Changing the Picture Size, Setting
 |
View all Samsung LN-S2338W manuals
Add to My Manuals
Save this manual to your list of manuals |
Page 17 highlights
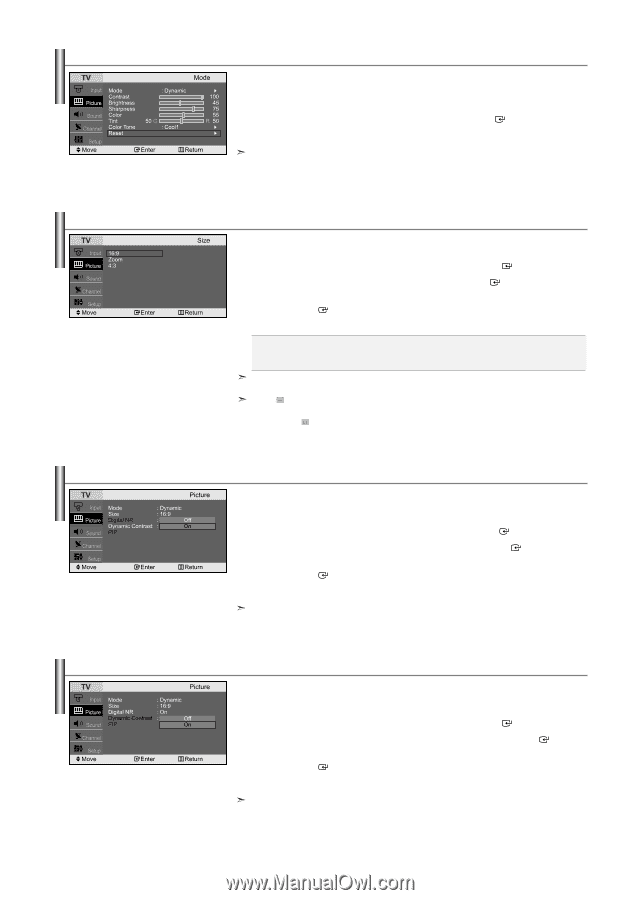
Resetting the Picture Settings to the Factory Defaults You can return to the factory defaults picture settings. 1. To select the desired picture effect, follow the "Using Automatic Picture Settings " instructions number 1 to 4 on page 14. 2. Press the or button to select "Reset", then press the ENTER button. 3. Press the EXIT button to exit. The "Reset" will be set for each picture mode. Changing the Picture Size You can select the picture size which best corresponds to your viewing requirements. 1. Press the MENU button to display the menu. Press the or button to select "Picture", then press the ENTER button. 2. Press the or button to select "Size", then press the ENTER button. 3. Select the required option by pressing the or button. Press the ENTER button. 4. Press the EXIT button to exit. • 16:9: Adjusts the picture size to 16:9 appropriate for DVDs or wide broadcasting. • Zoom: Magnifies the 16:9 wide picture (in the vertical direction) to fit the screen size. • 4:3: This is the default setting for a video movie or normal broadcasting. In PC, Component and DVI Mode, only "16:9" and "4:3" mode can be adjusted. (The "Zoom" mode is not supported.) Select by pressing the or buttons. Use the or button to move the picture up and down. After selecting , use the or button to magnify or reduce the picture size in the vertical direction. Setting the Digital Noise Reduction (Digital NR) If the broadcast signal received by your TV is weak, you can activate the Digital Noise Reduction feature to help reduce any static and ghosting that may appear on the screen. 1. Press the MENU button to display the menu. Press the or button to select "Picture", then press the ENTER button. 2. Press the or button to select "Digital NR", then press the ENTER button. 3. Press the or button to select "On" or "Off". Press the ENTER button. 4. Press the EXIT button to exit. This function don't work in PC mode. Dynamic Contrast Dynamic Contrast is to automatically detect distribution of inputted visual signal and adjust to create optimum contrast. 1. Press the MENU button to display the menu. Press the or button to select "Picture", then press the ENTER button. 2. Press the or button to select "Dynamic Contrast", then press the ENTER button. 3. Press the or button to select "On" or "Off". Press the ENTER button. 4. Press the EXIT button to exit. This function don't work in PC mode. English-15
-
 1
1 -
2
-
3
-
4
-
5
-
6
-
7
-
8
-
9
-
10
-
11
-
 12
12 -
 13
13 -
 14
14 -
 15
15 -
 16
16 -
 17
17 -
 18
18 -
 19
19 -
 20
20 -
 21
21 -
 22
22 -
23
-
24
-
25
-
26
-
27
-
28
-
29
-
30
-
31
-
32
-
33
-
34
-
35
-
36
-
37
-
38
-
39
-
40
-
41
-
42
-
43
-
44
-
45
-
46
-
47
-
48
-
49
-
50
-
51
-
52
-
53
-
54
-
55
-
56
-
57
-
58
-
59
-
60
-
61
-
62
-
63
-
64
-
65
-
66
-
67
-
68
-
69
-
70
-
71
-
72
-
73
-
74
-
75
-
76
-
77
 |
 |