Samsung LN-T3753H Quick Guide (easy Manual) (ver.1.0) (English) - Page 44
Labeling Channels, LNA (Low Noise Amplifier)
 |
View all Samsung LN-T3753H manuals
Add to My Manuals
Save this manual to your list of manuals |
Page 44 highlights
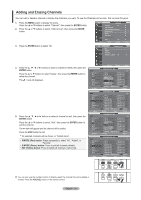
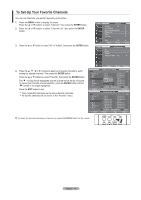
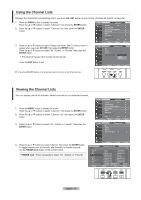
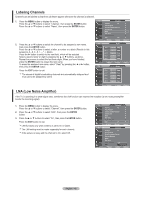
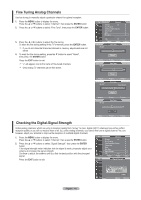
Labeling Channels Channels can be labeled so that their call letters appear whenever the channel is selected. 1. Press the MENU button to display the menu. TV Press the ▲ or ▼ buttons to select "Channel", then press the ENTER button. Press the ▲ or ▼ buttons to select "Name", then press the ENTER button. 2. Press the ▲ or ▼ buttons to select the channel to be assigned a new name, TV then press the ENTER button. Press the ▲ or ▼ buttons to select a letter, a number or a blank (Results in this sequence: A...Z, 0...9 blank). Press the ► button to switch to the next field, which will be selected. Select a second letter or digit by pressing the ▲ or ▼ buttons, as above. Repeat the process to select the last three digits. When you have finished, press the ENTER button to assign the new name. To erase the assigned new name, select "Clear" by pressing the ◄ or ► button, then press the ENTER button. TV Press the EXIT button to exit. The names of digital broadcasting channels are automatically assigned and thus cannot be assigned by users. Channel Antenna : Air Auto Program Clear Scrambled Channel Channel List Name Fine Tune Signal Strength LNA : On Move Enter Name Air 2 Air 3 Air 4 Air 5 Air 6 Clear Clear Clear Clear Clear Move ▲ Air 2 A ▼ Air 3 Air 4 Air 5 Air 6 Enter Name Clear Clear Clear Clear Clear Move Adjust Return Return Return LNA (Low Noise Amplifier) If the TV is operating in a weak-signal area, sometimes the LNA function can improve the reception (a low-noise preamplifier boosts the incoming signal). 1. Press the MENU button to display the menu. Press the ▲ or ▼ buttons to select "Channel", then press the ENTER button. 2. Press the ▲ or ▼ buttons to select "LNA", then press the ENTER button. 3. Press the▲ or ▼ buttons to select "On", then press the ENTER button. Press the EXIT button to exit. LNA functions only when antenna is set to Air or Cable. The LNA setting must be made separately for each channel. If the picture is noisy with the LNA set to On, select Off. TV Channel Antenna : Air ► Auto Program ► Clear Scrambled Channel ► Channel List ► Name ► Fine Tune ► Signal Strength ► LNA : On ► Move Enter Return TV Channel Antenna : Air Auto Program Clear Scrambled Channel Channel Manager Name Fine Tune Signal Strength Off LNA On Move Enter Return English - 42
-
 1
1 -
2
-
3
-
4
-
5
-
6
-
7
-
8
-
9
-
10
-
11
-
12
-
13
-
14
-
15
-
16
-
17
-
18
-
19
-
20
-
21
-
22
-
23
-
24
-
25
-
26
-
27
-
28
-
29
-
30
-
31
-
32
-
33
-
34
-
35
-
36
-
37
-
38
-
 39
39 -
 40
40 -
 41
41 -
 42
42 -
 43
43 -
 44
44 -
 45
45 -
 46
46 -
 47
47 -
 48
48 -
 49
49 -
50
-
51
-
52
-
53
-
54
-
55
-
56
-
57
-
58
-
59
-
60
-
61
-
62
-
63
-
64
-
65
-
66
-
67
-
68
-
69
-
70
-
71
-
72
-
73
-
74
-
75
-
76
-
77
-
78
-
79
-
80
-
81
-
82
-
83
-
84
-
85
-
86
-
87
-
88
-
89
-
90
-
91
-
92
-
93
-
94
-
95
-
96
-
97
-
98
-
99
-
100
-
101
-
102
-
103
-
104
-
105
-
106
-
107
-
108
-
109
-
110
-
111
-
112
-
113
-
114
-
115
-
116
-
117
-
118
-
119
-
120
-
121
-
122
-
123
-
124
-
125
-
126
-
127
-
128
-
129
-
130
-
131
-
132
-
133
-
134
-
135
-
136
-
137
-
138
-
139
 |
 |
