Samsung LS24E65UDWG/ZA User Manual - Page 63
Image Size
 |
View all Samsung LS24E65UDWG/ZA manuals
Add to My Manuals
Save this manual to your list of manuals |
Page 63 highlights
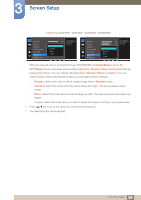
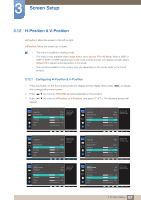
3 Screen Setup 3.9 Image Size Change the picture size. The functions available on the monitor may vary depending on the model. Refer to the actual product. 3.9.1 Changing the Image Size 1 Press any button on the front of the product to display the Key Guide. Next, press [MENU] to display the corresponding menu screen. 2 Press [ ] to move to PICTURE and press [ ] on the product. 3 Press [ ] to move to Image Size and press [ ] on the product. The following screen will appear. In PC mode PICTURE Image Size Response Time H-Position V-Position Coarse Fine Auto Wide Choose the size and aspect ratio of the picture displayed on screen. 50 2200 0 AUTO PICTURE Image Size HDMI Black Level Response Time H-Position V-Position Coarse Fine Auto Wide Choose the size and aspect ratio of the picture displayed on screen. 50 50 2200 0 AUTO PICTURE SMAAMSGUINCG Upscale Image Size HDMI Black Level H-Position V-Position Coarse Fine Auto Wide Choose the size and aspect ratio of the picture displayed on screen. 50 2200 0 AUTO z Auto: Display the picture according to the aspect ratio of the input source. z Wide: Display the picture in full screen regardless of the aspect ratio of the input source. 63 3 Screen Setup
-
 1
1 -
2
-
3
-
4
-
5
-
6
-
7
-
8
-
9
-
10
-
11
-
12
-
13
-
14
-
15
-
16
-
17
-
18
-
19
-
20
-
21
-
22
-
23
-
24
-
25
-
26
-
27
-
28
-
29
-
30
-
31
-
32
-
33
-
34
-
35
-
36
-
37
-
38
-
39
-
40
-
41
-
42
-
43
-
44
-
45
-
46
-
47
-
48
-
49
-
50
-
51
-
52
-
53
-
54
-
55
-
56
-
57
-
 58
58 -
 59
59 -
 60
60 -
 61
61 -
 62
62 -
 63
63 -
 64
64 -
 65
65 -
 66
66 -
 67
67 -
 68
68 -
69
-
70
-
71
-
72
-
73
-
74
-
75
-
76
-
77
-
78
-
79
-
80
-
81
-
82
-
83
-
84
-
85
-
86
-
87
-
88
-
89
-
90
-
91
-
92
-
93
-
94
-
95
-
96
-
97
-
98
-
99
-
100
-
101
-
102
-
103
-
104
-
105
-
106
-
107
-
108
-
109
-
110
-
111
-
112
-
113
-
114
-
115
-
116
-
117
-
118
-
119
-
120
-
121
-
122
-
123
 |
 |
