Samsung MZ-7PC256D User Manual - Page 42
Select Disk, Browse], Make USB Disk Bootable
 |
View all Samsung MZ-7PC256D manuals
Add to My Manuals
Save this manual to your list of manuals |
Page 42 highlights
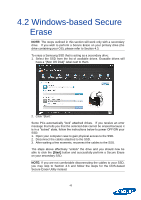
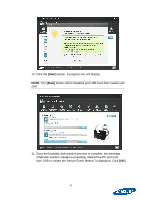
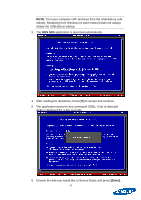
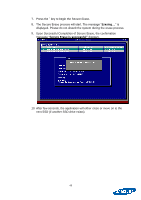
4. A warning message is displayed to backup any important data before proceeding. Press the [Yes] button to continue. 5. Insert a USB flash drive into a USB port on your computer. Please wait a few moments for the computer to recognize the device. 6. From the "Select Disk" dropdown list, Select your SSD 7. Select the [Browse] button next to the "Select USB Bootable Disk" heading and select the USB drive you connected to your computer. 8. Select the checkbox "Make USB Disk Bootable" in order to make the USB disk DOS bootable. 9. A Secure Erase message is displayed. Please read the contents of the message box that appears. If you agree, check the box and Click [Yes] to proceed. 42
-
 1
1 -
2
-
3
-
4
-
5
-
6
-
7
-
8
-
9
-
10
-
11
-
12
-
13
-
14
-
15
-
16
-
17
-
18
-
19
-
20
-
21
-
22
-
23
-
24
-
25
-
26
-
27
-
28
-
29
-
30
-
31
-
32
-
33
-
34
-
35
-
36
-
 37
37 -
 38
38 -
 39
39 -
 40
40 -
 41
41 -
 42
42 -
 43
43 -
 44
44 -
 45
45 -
 46
46 -
 47
47 -
48
-
49
-
50
-
51
-
52
-
53
-
54
-
55
-
56
-
57
-
58
-
59
 |
 |

42
4.
A warning message is displayed to backup any important data before
proceeding. Press the
[Yes]
button to continue.
5.
Insert a USB flash drive into a USB port on your computer.
Please
wait a few moments for the computer to recognize the device.
6.
From the “
Select Disk
” dropdown list, Select your SSD
7. Select the
[Browse]
button next to the “Select USB Bootable Disk”
heading and select the USB drive you connected to your computer.
8.
Select the checkbox “
Make USB Disk Bootable
” in order to make the
USB disk DOS bootable.
9.
A Secure Erase message is displayed. Please read the contents of
the message box that appears.
If you agree, check the box and
Click
[Yes]
to proceed.