Samsung SC-MX10A User Manual (ENGLISH) - Page 37
Setting Date and Time, Réglage de la date et de l'heure
 |
View all Samsung SC-MX10A manuals
Add to My Manuals
Save this manual to your list of manuals |
Page 37 highlights
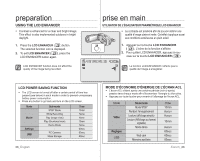
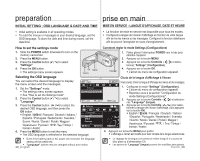
Setting Date and Time Réglage de la date et de l'heure Set the current date and time so that the date and time at which you make a recording can be recorded correctly. The following procedure can also be used to correct the date and time you have already set. Réglez la date et l'heure afin qu'elles soient correctement enregistrées lors de vos sessions d'enregistrement. Vous pouvez aussi utiliser la procédure suivante pour corriger la date et l'heure déjà programmées. 1. Set the "Settings" mode. • The settings menu screen appears. • See "How to set the Settings mode" ➥page 30. 2. Press the Control button ( ) to select "Date/Time Set" and then press the OK button. 3. Set the desired value by moving the Control button ( ). Video Settings OK Move OK Select 1. Configurez le mode "Settings" (Configuration). 120 MIN • L'écran du menu de configuration apparaît. • Reportez-vous à la section "Configuration du mode Settings (Configurations)".➥page 30. 2. Appuyez sur la touche Contrôle ( / ) et sélec- tionnez "Date/Time Set"(Date/Hr), puis appuyez MENU Exit ensuite sur la touche OK . 4. Move to the next item by moving the Control button ( ) , and then set values by moving Settings 3. Définissez la valeur souhaitez en déplaçant la 120 MIN touche Contrôlel ( / ). the Control button ( ). • Items are displayed in the order of the date format. • By default, it appears in the order of year, Date/Time Set 2007 01 01 4. Déplacez-vous sur l'élément suivant en déplaçant la touche Contrôle ( / ), puis définissez ensuite les valeurs en déplaçant la touche month, date, hour, minute and AM/PM. 5. After setting the last item, press the OK button to finish the setting. 12 : 00 AM Move OK Set MENU Exit Contrôle ( / ). • Les éléments s'affichent dans l'ordre chronologique. • Ils s'affichent par défaut dans l'ordre suivant : • Press the MENU button to exit the menu. année, mois, jour , heure, minute et AM/PM. 5. Une fois le dernier élément configuré, appuyez sur la touche OK pour terminer la configuration. • You can set the year up to 2037. • After setting, the date and time are automatically recorded on a special data area of the storage media. • The button type battery maintains the clock function and preset contents of the memory : even if the battery pack or AC power adapter is removed. The button type battery for the memory camcorder lasts about 6 months under normal operation from the time of installation. • When the button type battery becomes weak or dead, the date/time indicator will display "2007/01/01 12:00AM " when you turn the date and time display on. ➥page 20. Turning the date and time display on/off • To switch the date and time display on or off, access the menu and change the date/time mode. ➥page 64 • Appuyez sur la touche MENU pour quitter le menu. • Vous pouvez régler l'horloge jusqu'à l'an 2037. • La date et l'heure sont enregistrées automatiquement dans une zone réservée à ce type de données du support de stockage. • Cette pile de type bouton maintient le fonctionnement de l'horloge et conserve les données programmées de la mémoire : même si le bloc-piles et l'adaptateur CA sont retirés. La durée de la pile de type bouton du caméscope numérique est d'environ six mois à partir de son installation et dans des conditions d'utilisation normales. • Lorsque la pile de type bouton devient faible ou épuisée, le témoin d' horodatage affiche "2007/01/01 12:00AM" à chaque fois que vous allumez l'affichage date/heure. ➥page 20. Activation/désactivation de l'affichage date/heure • Pour allumer ou éteindre l'écran date/heure, accédez au menu et modifiez le mode date/heure. ➥page 64 31_English French_31
-
 1
1 -
2
-
3
-
4
-
5
-
6
-
7
-
8
-
9
-
10
-
11
-
12
-
13
-
14
-
15
-
16
-
17
-
18
-
19
-
20
-
21
-
22
-
23
-
24
-
25
-
26
-
27
-
28
-
29
-
30
-
31
-
 32
32 -
 33
33 -
 34
34 -
 35
35 -
 36
36 -
 37
37 -
 38
38 -
 39
39 -
 40
40 -
 41
41 -
 42
42 -
43
-
44
-
45
-
46
-
47
-
48
-
49
-
50
-
51
-
52
-
53
-
54
-
55
-
56
-
57
-
58
-
59
-
60
-
61
-
62
-
63
-
64
-
65
-
66
-
67
-
68
-
69
-
70
-
71
-
72
-
73
-
74
-
75
-
76
-
77
-
78
-
79
-
80
-
81
-
82
-
83
-
84
-
85
-
86
-
87
-
88
-
89
-
90
-
91
-
92
-
93
-
94
-
95
-
96
-
97
-
98
-
99
-
100
-
101
-
102
 |
 |
