Samsung SCC-B5399H User Manual - Page 17
Virtual Progressive Scan function, the CCD
 |
UPC - 836164370099
View all Samsung SCC-B5399H manuals
Add to My Manuals
Save this manual to your list of manuals |
Page 17 highlights
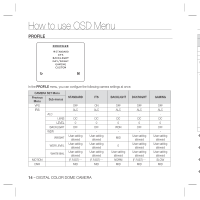
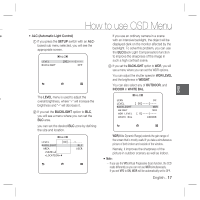
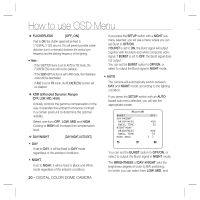
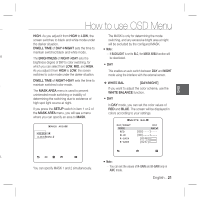
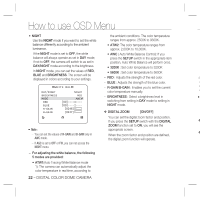
How to use OSD Menu ENG e. • ALC (Automatic Light Control) If you use an ordinary camera in a scene ① If you press the SETUP switch with an ALCbased sub menu selected, you will see the appropriate screen. with an intensive backlight, the object will be displayed dark on the monitor affected by the backlight. To solve this problem, you can use the BLC(Back Light Compensation) function ALC to improve the sharpness of the image in LEVEL [00]----I---- such a high contrast scene. BACKLIGHT OFF ③ If you set the BACKLIGHT option to WDR, you will see a menu where you can set the WDR options. You can adjust the shutter speed in WDR LEVEL and the brightness in WEIGHT. You can also select any of OUTDOOR, and INDOOR in WHITE BAL. n The LEVEL menu is used to adjust the overall brightness, where "+" will increase the ALC LENS DC brightness and "-" will decrease it. LEVEL [ 00]----I---- BACKLIGHT WDR ② If you set the BACKLIGHT option to BLC, you will see a menu where you can set the BLC area. WEIGHT WDR LEVEL WHITE BAL MID [ 0]----I---- INDOOR you can set the desired BLC zone by defining the size and location. ALC LEVEL [00]----I---- BACKLIGHT BLC AREA USER WDR(Wide Dynamic Range) extends the gain range of the screen that is mostly useful if you take a simultaneous picture of both indoor and outside of the window. Namely, it improves the sharpness of the picture in outdoor scenery as well as indoor. Note : - If you use the VPS (Virtual Progressive Scan) function, the CCD reads differently so you can not use WDR simultaneously. If you set VPS to ON, WDR will be automatically set to OFF. English - 17
-
 1
1 -
2
-
3
-
4
-
5
-
6
-
7
-
8
-
9
-
10
-
11
-
 12
12 -
 13
13 -
 14
14 -
 15
15 -
 16
16 -
 17
17 -
 18
18 -
 19
19 -
 20
20 -
 21
21 -
 22
22 -
23
-
24
-
25
-
26
-
27
-
28
-
29
-
30
-
31
-
32
-
33
-
34
 |
 |
