Samsung SCC-B5399H User Manual - Page 27
Other Set
 |
UPC - 836164370099
View all Samsung SCC-B5399H manuals
Add to My Manuals
Save this manual to your list of manuals |
Page 27 highlights
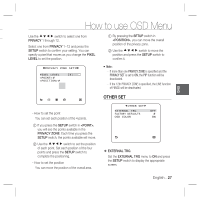
ENG How to use OSD Menu Use the cdef switch to select one from PRIVACY 1 through 12. Select one from PRIVACY 1~12 and press the SETUP switch to confirm your setting. You can specify a pixel that moves as you change the PIXEL LEVEL to set the position. ① By pressing the SETUP switch in , you can move the overall position of the privacy zone. ② Use the cdef switch to move the position and press the SETUP switch to confirm it. PRIVACY ZONE SET1 PIXEL LEVEL [4] Note : - If more than one PRIVACY ZONE is specified and the PRIVACY SET is set to ON, the PIP function will be deactivated. - If the 12th PRIVACY ZONE is specified, the LINE function of FENCE will be deactivated. OTHER SET - How to set the point You can set each position of the 4 points. ① If you press the SETUP switch in , you will see the points available in the PRIVACY ZONE. Each time you press the SETUP switch, the points available will move. ② Use the cdef switch to set the position of each point. Set each position of the four points and press the SETUP switch to complete the positioning. - How to set the position You can move the position of the overall area. eOTHER SETf EXTERNAL TRG FACTORY DEFAULTS OSD COLOR OFF BW ❖ EXTERNAL TRG Set the EXTERNAL TRG menu to ON and press the SETUP switch to display the appropriate screen. English - 27
-
 1
1 -
2
-
3
-
4
-
5
-
6
-
7
-
8
-
9
-
10
-
11
-
12
-
13
-
14
-
15
-
16
-
17
-
18
-
19
-
20
-
21
-
 22
22 -
 23
23 -
 24
24 -
 25
25 -
 26
26 -
 27
27 -
 28
28 -
 29
29 -
 30
30 -
 31
31 -
 32
32 -
33
-
34
 |
 |
